Community Sampler Week #14

Community Sampler Week #14

Community Sampler borders 1.jpg

It's bitter-sweet that we're at the border assembly part of our sew along. This week we'll put on the optional borders and have a finished top! Looking ahead, next week Maureen and I will post about how to sandwich your top, batting, and back and I'll have some suggestions for quilting. The final week #16 is the full reveals and grand finale prize giveaway so stick with us just a few more weeks. 

If you've just found out about this sew along, don't worry, you can still join in on the fun but you may want to start from the very first post and work up to the present. There are eleven blocks in our quilt, block setting, and optional borders. Each Wednesday will be a new PDF block release or finishing step for the quilt. If you are just joining us, pick up the Introduction PDF on the Sew Along page and you'll get a material list along with coloring pages so you can get started planning your quilt. Then, work your way through the first Community Sampler post to the present.

My co-host and sister Art Gallery Fabrics designer Maureen Cracknell and I are so happy to have you sewing with us and can't wait to see your finished quilts.

CS Layered Sharon.jpg

Accurate cutting and use of a true 1/4'' seam allowance is a must for successful patchwork piecing. All your set blocks will measure 17-1/2'' square (unfinished). Review how to cut strips, sew with a true 1/4'' seam allowance, and other helpful piecing tips on my "Are You Ready to Sew" post.

Let's add some borders! Download the free PDF on the Sew Along page.

Community Sampler borders.jpg

If you're using directional prints, you may want to check out my tutorial for controlling directional prints that was posted during the Sewcial Bee Sampler sew along. I know you know how to stitch our No-Waste Flying Geese by now but if you'd like to look back on our past tutorial, revisit week #3 post, here.

Those of you that may have made your quilt bigger by adding more blocks will need to increase the length your borders and more materials will be needed for the added size. 

Adding the Borders

In a perfect world we all could sew perfectly square blocks that are true to size but let's face it, that rarely happens. The cutting and piecing sizes given in our PDF Borders instruction are written for that perfect case senecio which means you're probably going to make a few tweaks to your cutting and piecing to get this baby together.

CS Chain Piecing.jpg

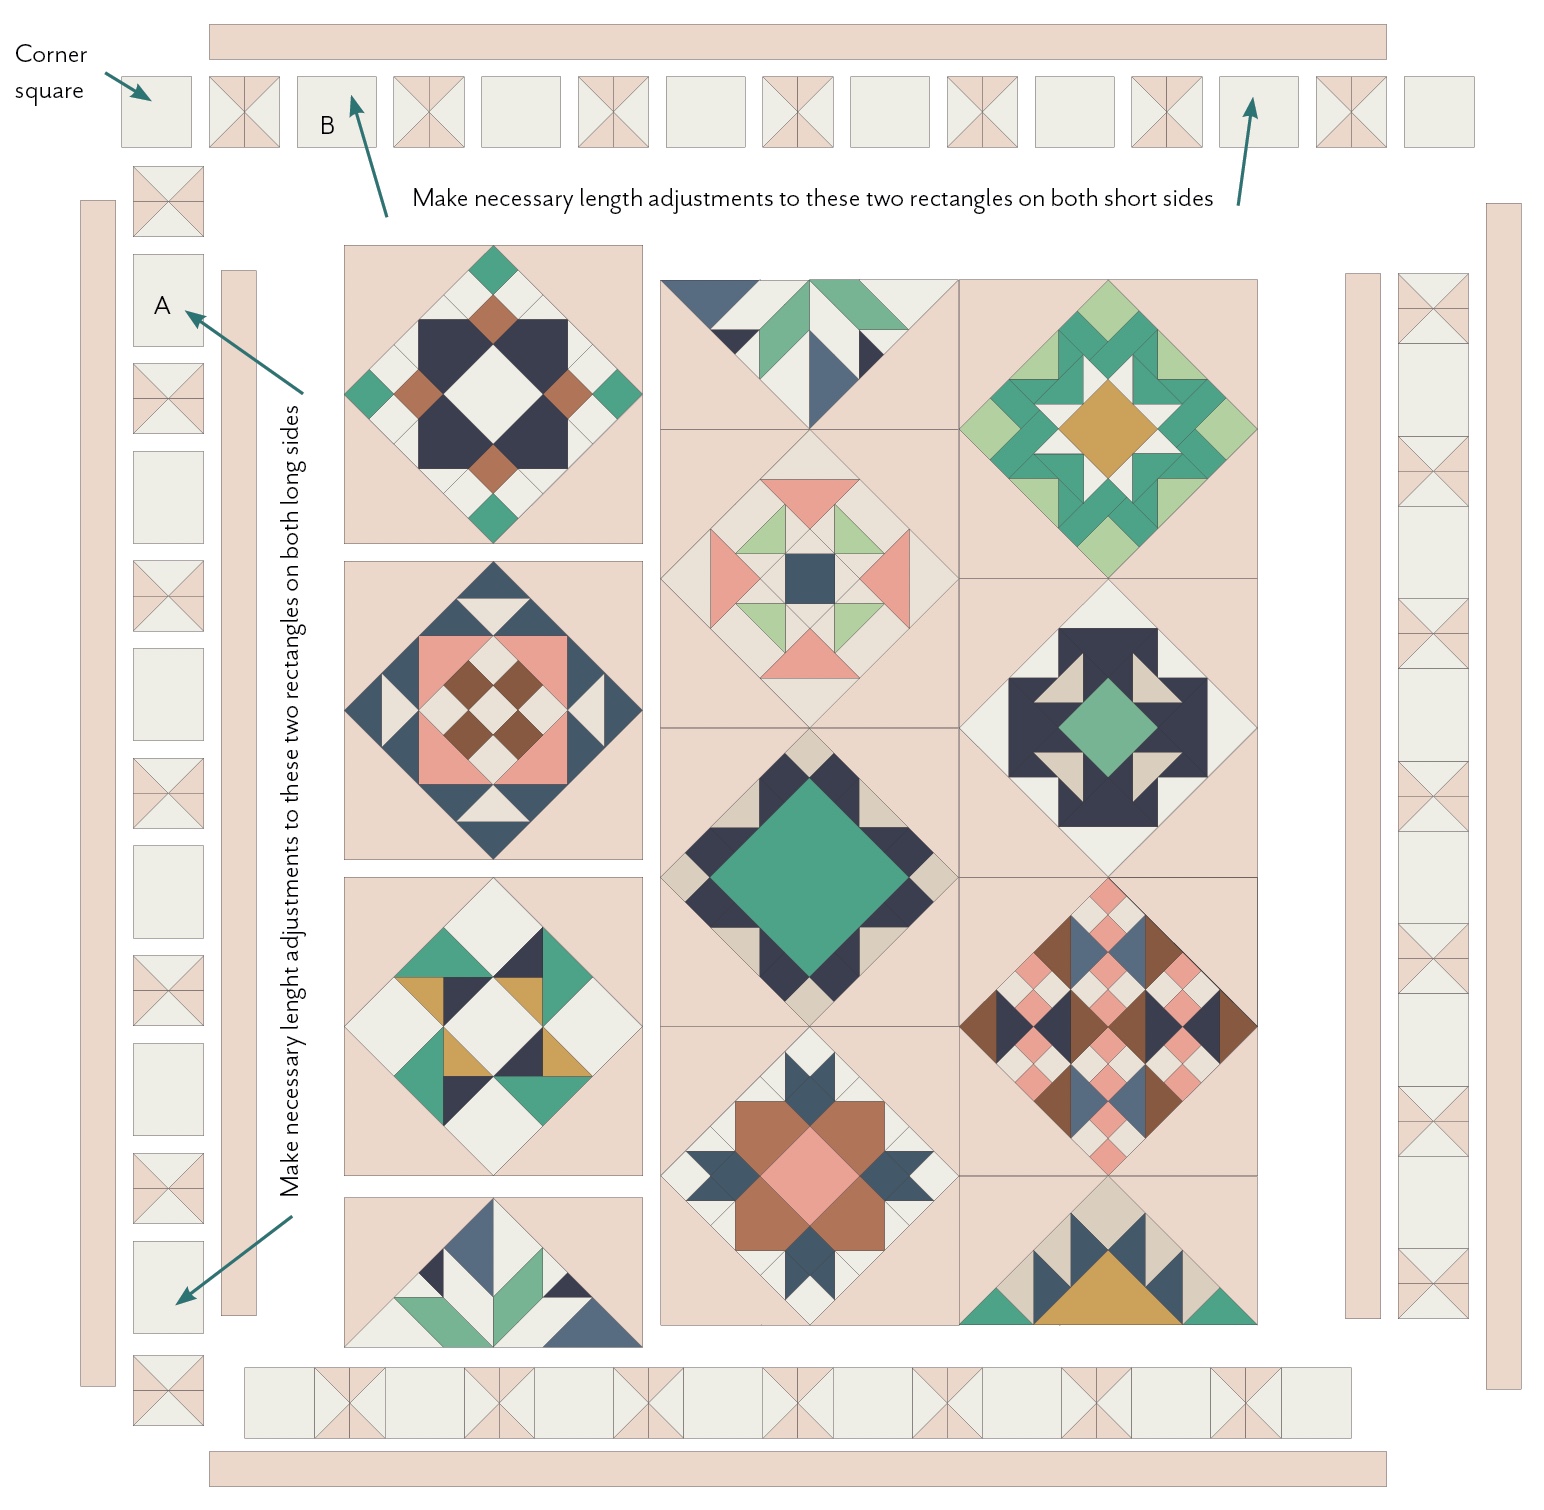
Cut and stitch your Flying Geese (FG) units to the size given in the instructions, making them 2-1/2'' x 4-1/2'' (unfinished). Please read the rest of this blog post and through all the instructions on the PDF before cutting the A and B rectangles for the pieced borders.

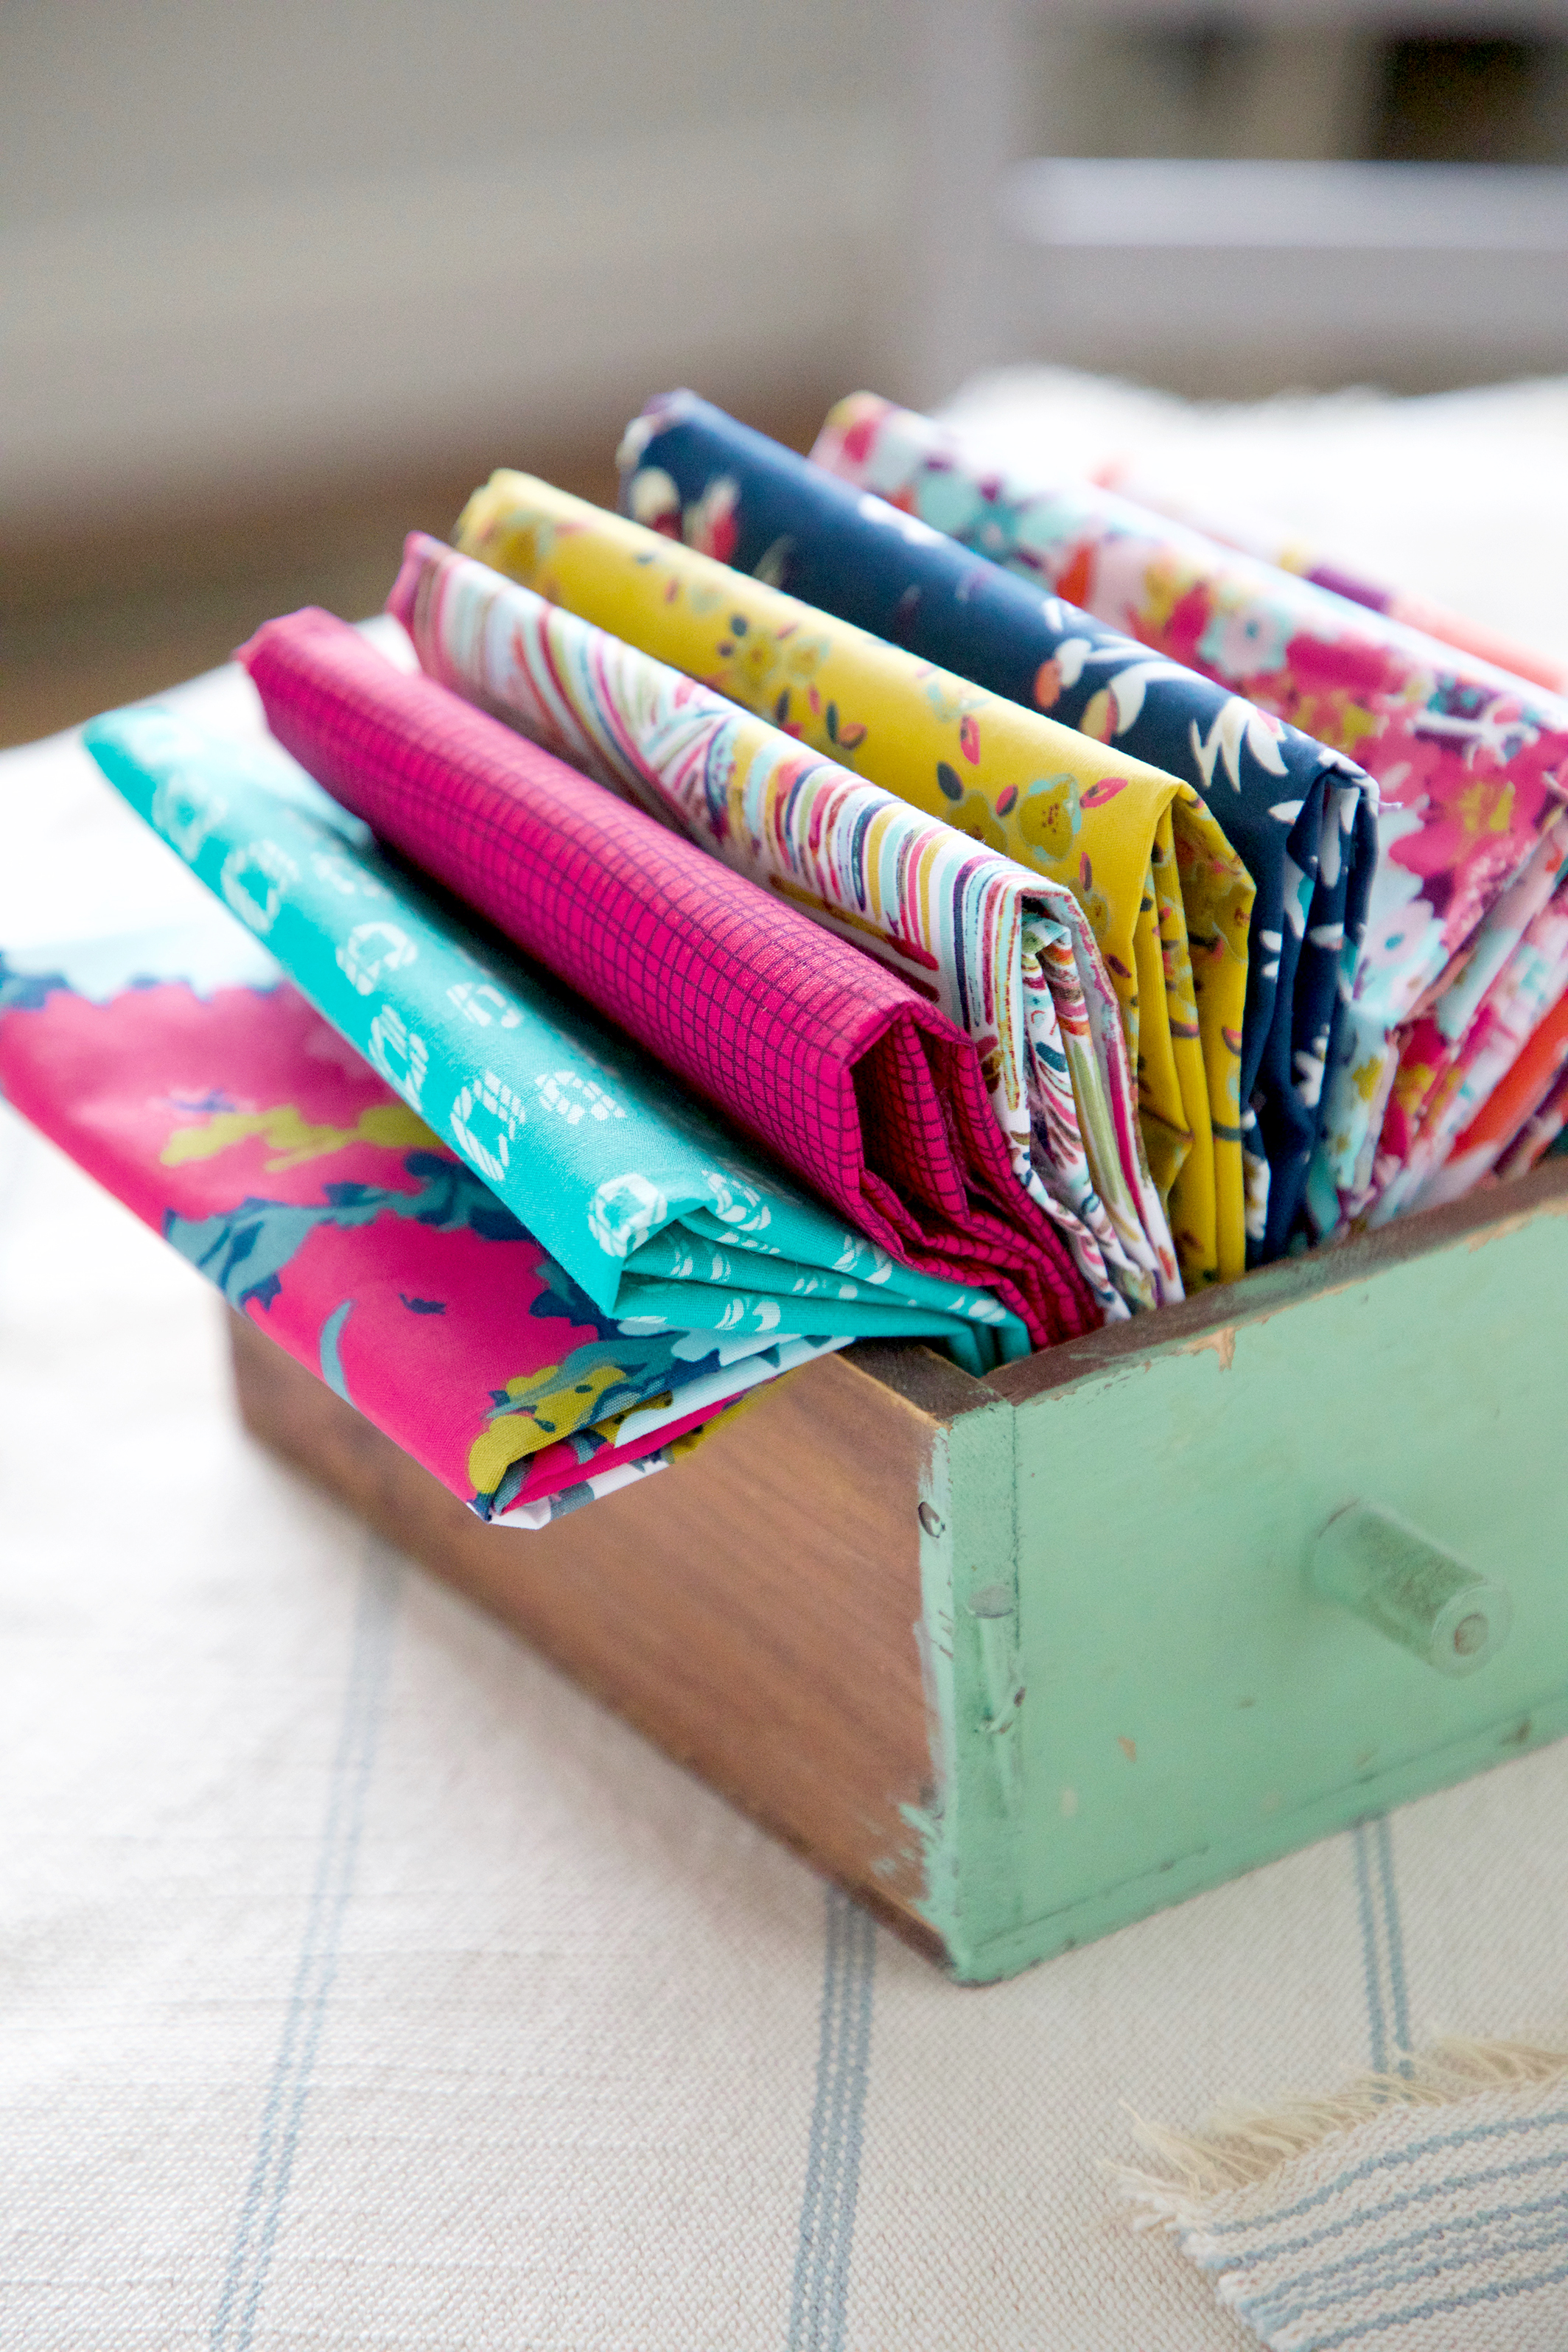
My original plan for my quilt was to make all the Flying Geese units and rectangles white on a peach/pink background to match the block setting background solid. But, the peach/pink is a very light shade and to do all that Flying Geese and rectangle piecing in white against light seemed like a waste of all that piecing! I decided to select a few mid-tone solids that were predominate in the blocks and do a mixed solids border treatment. To do this I needed to divide the number of different fabrics by the number of "pop beads" as I like to call the border shapes. Remember, that with every No-Waste Flying Geese method you'll get four units in the end and will need one 5-1/2" square and four 3-1/8" squares to get four matching FG units. The PDF instructions give the total number needed (if using the size of quilt given) to cut so use those numbers as a guide when dividing in your number of fabrics.

I'd run out of enough fabric to include a terra cotta colored pop bead so I substituted with the more muted PE-472 Cinnamon of Art Gallery Fabrics Pure Elements color seen on the far right of the above photo. 

BG0A6827.jpg

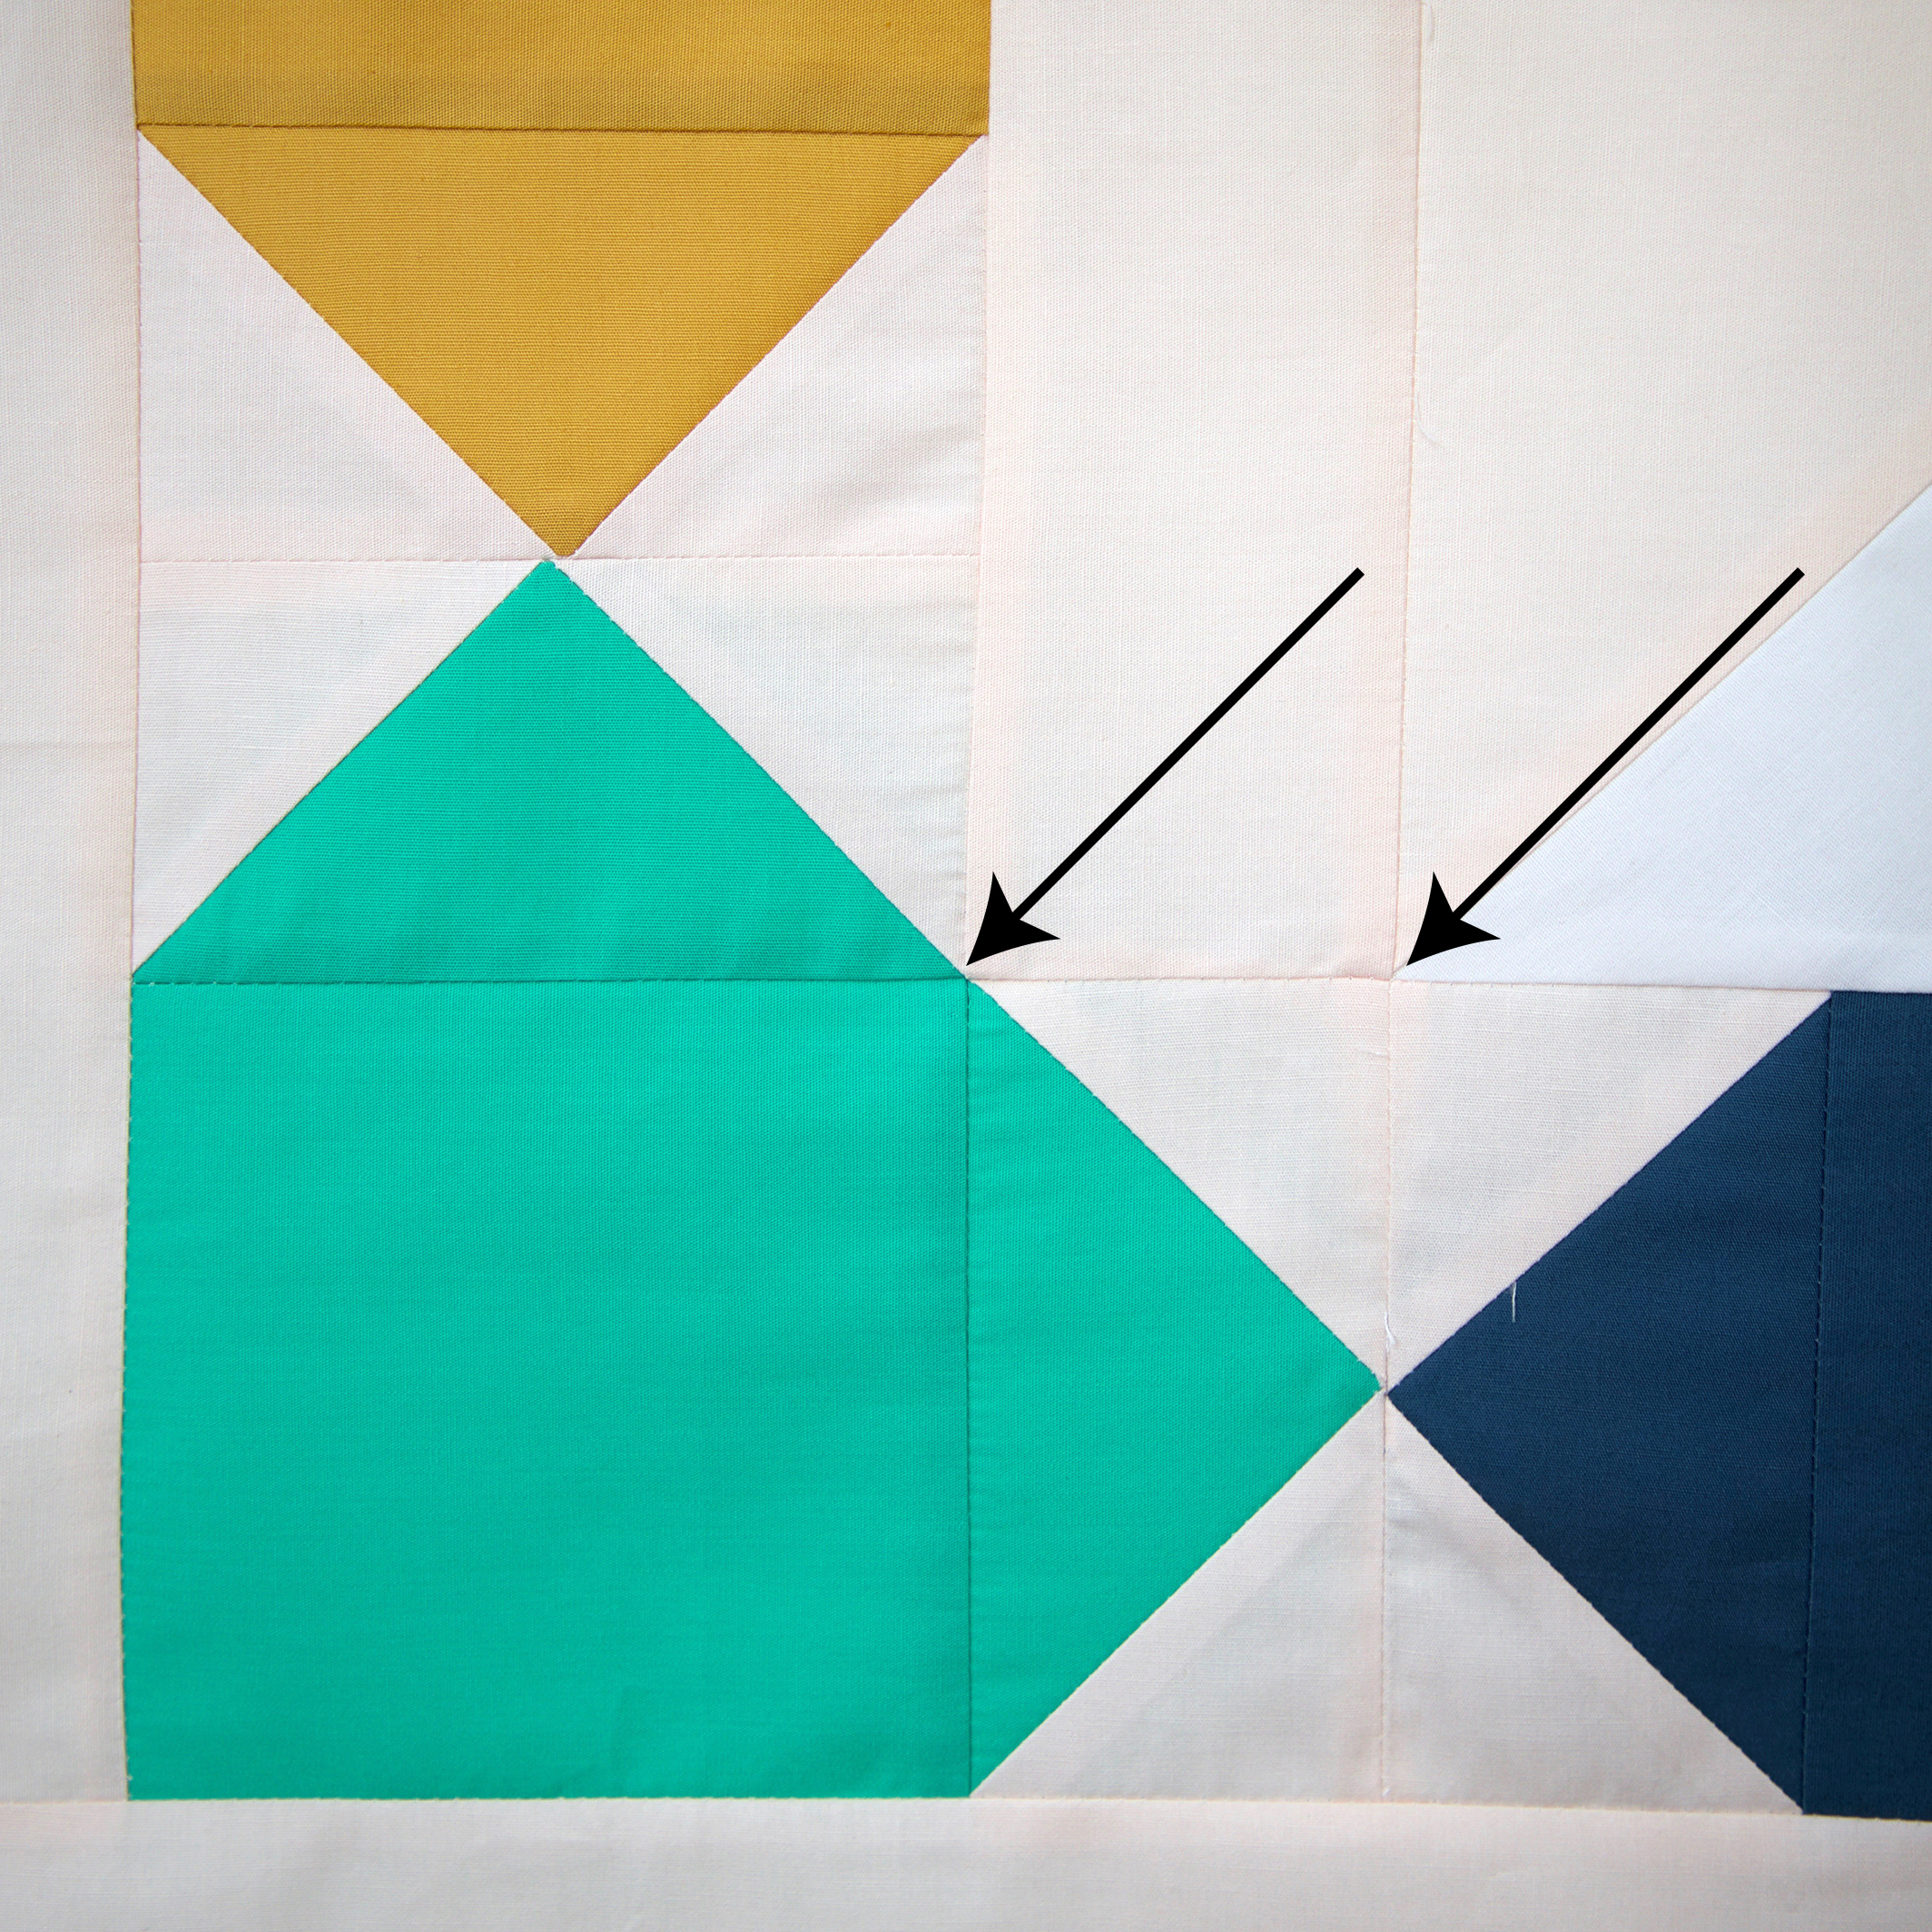
As you can see, the Flying Geese units will measure up nicely to the 4-1/2" square corner squares in the pieced border and the 2-1/2"-wide inner border (even though my points are less than perfect, you get the idea here :).

BG0A6626.jpg

You're quilt center (before adding any of the borders) should be measuring somewhere in the neighborhood of 51-1/1" x 60". If you're way off that mark or increased the size of your quilt by adding more blocks you'll need to make some adjustments... 

Obviously, if you've made a larger quilt than our sampler you will need to get out the calculator and cut more strips for those inner and outer boarders and make additional Pop Beads in the middle borders. Note that the rectangles in the Pop Beads are two different sizes and are labeled A and B on the PDF instructions. 

Community Sampler Quilt Top.jpg

Before you really get crazy and cut all the A and B rectangles, cut just a couple (and label) then sew some of the Flying Geese units to rectangles and check your sizing. 

BG0A6824.jpg

Since the B rectangle/Flying Geese units are stitched directly against the top and bottom of the quilt (no inner border between) that's a good place to start for checking sizes. If your seams match up on major points and seams of the quilt top center then you're in that perfect world senecio and are in good shape to proceed with piecing the borders as given in the instructions. 

If you're considerable off you have two options. 

One, do the math to figure what sort of adjustment is needed to the A and B rectangles to hit on those major seams in the quilt top center. Start by measuring the opposite sides of the top and average those number (subtract 1/2" for total seam allowances and work in finished sizes for now). Each FG pair will measure 4'' finished so add up the number of 4'' units needed. From the remaining amount, figure how many rectangles are needed. Divide that amount by the number of rectangles needed to get the total length per rectangle. Remember to add in the seam allowances after figuring the finished length needed for an A or B rectangles. Yeah, I know, no fun at all.

Okay, option two. Cut and piece as stated in the instructions (unless of course you need to cut more because you made a bigger quilt). After piecing each border section as directed, the adjustments will be made to the end rectangles only. You're border may not hit on the major seams and points of the quilt top but will be easier to figure up and still look balanced in the end.

Remember, don't change the 4-1/2" measurement on any of the rectangles as this side will match the length of the Flying Geese units and corner squares.  

border adjustment Community Sampler.jpeg

I truly hope these pieced borders don't cause heartache and frustration but I do want to cover any possible problems that could occur do to the variables of sewing. Do a few samples like stated above and test the waters before jumping in.

If you're not up to this challenge then maybe consider a simple 4" -wide finished solid middle border (4-1/2" x length needed cut size) and follow the same steps as for making the inner and outer border. 

Remember to use your sew along community on Instagram (#CommunitySampler) if you have questions or need some moral support!

COMMUNITY SAMPLER SPONSORS

My co-host Maureen Cracknell and I are continually amazed by the joy and excitement each of you bring to our virtual community. Thank you for making this sew along so special. Please visit Maureen's blog and see the progress she's making on her sampler quilt, using her beautiful AGF fabrics Love Story collection. Be sure to use the #CommunitySampler hashtag when posting your blocks to Instagram and tag both my @sharonhollanddesigns and @maureencracknell so we don't miss any of your beautiful work! But, please be patient with both Maureen and I over the next few weeks if we don't comment back. Both Maureen and I are preparing sewing samples for our new spring collections and there's just not enough hours in the day (or energy) to get it all done!

Don't forget that this Friday's a Giveaway Friday on the Community Sampler sew along. Maureen and I will take turns hosting a giveaway each week where one of our generous sponsors will be featured and offering amazing prizes both here on our blogs and also on Instagram. I'll be hosting the giveaway this Friday and you'll be instructed how to enter at that time.

Happy sewing!


Community Sampler Week #10

Community Sampler Week #10

BG0A5337.jpg

Welcome to week #10 of the Community Sampler sew along where we not only work on our patchwork piecing techniques but also share our makes on Instagram and have fun with a like-minded community of quilters. My co-host and sister Art Gallery Fabrics designer Maureen Cracknell and I are so happy to have you sewing with us and look forward to seeing your sampler quilt come together.

CS Promo banner 2.jpg

We're coming down the home stretch with making our blocks and this is number nine out of eleven. 

Each Wednesday will be a new PDF block release or finishing step for the quilt. If you are just joining us, pick up the Introduction PDF on the Sew Along page and you'll get a material list along with coloring pages so you can get started planning your quilt. Then, work your way through the first Community Sampler post to the present.

Many of the patchwork units (like Quick-Corner, Flying Geese, Half-Square Triangle, and Square-in-Square units) used in this year's sampler have already been oversized to allow for trimming and squaring of units before assembling your block. Please cut your pieces EXACTLY as given in each of the PDF instructions because bumping up the size of the pieces from the measurements give will not bring great results in some cases. Take advantage of my in-blog tutorials for each of the different quilting techniques used in our sampler.

Accurate cutting and use of a true 1/4'' seam allowance is a must for successful patchwork piecing. All your blocks will measure 12-1/2'' square (unfinished). Review how to cut strips, sew with a true 1/4'' seam allowance, and other helpful piecing tips on my "Are You Ready to Sew" post.

Download the free PDF on the free Double-T block from my Sew Along page and let's get sewing!

BG0A5674.jpg

Our block this week is all review as far as piecing techniques. I'm sure you can do this in your sleep by now but if you need a refresher, use the following link for review how to make Half-Square Triangle (HST) units and No-Waste Flying Geese units that we've already used in earlier Community Sampler blocks. Accuracy is always our goal so make sure all cut pieces are true to size as you work and maintain an accurate 1/4" seam allowance when sewing and the pieces will go together beautifully.

If you're wanting to use directional prints for either the HST units or the Flying Geese units you may want to check out my tutorial for controlling directional prints that was posted during the Sewcial Bee Sampler sew along. 

BG0A5477.jpg

I kept my block real simple this week and love how these Art Gallery Fabrics Pure Element solids look together. If you're curious as to the exact colors I've used I'm including the fabrics name and sku number so you can easily get the same look.

BG0A5382.jpg
 
BG0A5529.jpg

Other fabrics of interest included in my photos this week are the Splendid Fusions prints from Art Gallery Fabrics (now is shops) that include reprints of my Petally and Woodblock prints (first two from right to left on the above photo). Also, under my Double-T block I used my Mudcloth Blue print from Tapestry as a backdrop. It's hard not to include some pattern in my posts! :)

Be sure to stop over at Maureen's blog to see her lovely blocks being made from her Art Gallery Fabrics Love Story collection. 

COMMUNITY SAMPLER SPONSORS

My co-host Maureen Cracknell and I are continually amazed by the joy and excitement each of you bring to our virtual community. Thank you for making this sew along so special. Please visit Maureen's blog and see the progress she's making on her sampler quilt, using her beautiful AGF fabrics Love Story collection. Be sure to use the #CommunitySampler hashtag when posting your blocks to Instagram and tag both my @sharonhollanddesigns and @maureencracknell so we don't miss any of your beautiful work!

Don't forget that this Friday's a Giveaway Friday on the Community Sampler sew along. Maureen and I will take turns hosting a giveaway each week where one of our generous sponsors will be featured and offering amazing prizes both here on our blogs and also on Instagram. I will be hosting the giveaway this Friday and you'll be instructed how to enter at that time.

Happy sewing!

Community Sampler Week #9

Community Sampler Week #9

BG0A5093.jpg

Can you believe it, we're on week #9 of our Community Sampler sew along. My co-host and sister Art Gallery Fabrics designer Maureen Cracknell and I are so happy to have you sewing with us and can't wait to see your block.

CS Promo banner 2.jpg

There are eleven blocks in our quilt and each Wednesday will be a new PDF block release or finishing step for the quilt. Today we start our third and final column of blocks. If you are just joining us, pick up the Introduction PDF on the Sew Along page and you'll get a material list along with coloring pages so you can get started planning your quilt. Then, work your way through the first Community Sampler post to the present.

Many of the patchwork units (like Quick-Corner, Flying Geese, Half-Square Triangle, and Square-in-Square units) used in this year's sampler have already been oversized to allow for trimming and squaring of units before assembling your block. Please cut your pieces EXACTLY as given in each of the PDF instructions because bumping up the size of the pieces from the measurements give will not bring great results in some cases. Take advantage of my in-blog tutorials for each of the different quilting techniques used in our sampler.

Accurate cutting and use of a true 1/4'' seam allowance is a must for successful patchwork piecing. All your blocks will measure 12-1/2'' square (unfinished). Review how to cut strips, sew with a true 1/4'' seam allowance, and other helpful piecing tips on my "Are You Ready to Sew" post.

Let's start sewing the Morning Star block. Download the free PDF on the Sew Along page.

BG0A5060.jpg

Although this week's block is all review for patchwork techniques there's a lot of moving parts to the Morning Star block and accurate cutting, seam allowance sewing, and trimming will be the key to keeping all those points crisp and everything going together nicely. 

We need to make eight Flying Geese units for this block so if you need a refresher on how to piece the No-Waste Flying Geese method, read an earlier tutorial on this technique. 

Also, if you're concerned about keeping directional prints in line, here's a tutorial for controlling those bossy prints. don't forget to cut that center square on-point if you're concerned about the print's direction.

BG0A5480.jpg

For my sampler I'm sewing with Art Gallery Fabrics Pure Element solids. I've been getting a lot of questions as to the exact colors I'm sewing with so I will start including a swatch image each week showing the sku number of each solid. 

BG0A5147.jpg

I thought these spring greens and golden honey solids helped this block live up to it's name and I love how it turned out. 

My co-host Maureen Cracknell and I are continually amazed by the joy and excitement each of you bring to our virtual community. Thank you for making this sew along so special. Please visit Maureen's blog and see the progress she's making on her sampler quilt, using her beautiful AGF fabrics Love Story collection. Be sure to use the #CommunitySampler hashtag when posting your blocks to Instagram and tag both my @sharonhollanddesigns and @maureencracknell so we don't miss any of your beautiful work!

COMMUNITY SAMPLER SPONSORS

Don't forget that this Friday's a Giveaway Friday on the Community Sampler sew along. Maureen and I will take turns hosting a giveaway each week where one of our generous sponsors will be featured and offering amazing prizes both here on our blogs and also on Instagram. Maureen will be hosting the giveaway this Friday and you'll be instructed how to enter at that time.

Community Sampler Week #8

Community Sampler Week #8

Weathervane Mood Board 2.jpg

Welcome to week #8 of the Community Sampler sew along and the last block in our second column. My co-host and sister Art Gallery Fabrics designer Maureen Cracknell and I are so happy to have you sewing with us!

CS Promo banner 2.jpg

There are eleven blocks in our quilt and each Wednesday will be a new PDF block release or finishing step for the quilt. If you are just joining us, pick up the Introduction PDF on the Sew Along page and you'll get a material list along with coloring pages so you can get started planning your quilt. Then, work your way through the first Community Sampler post to the present.

Many of the patchwork units (like Quick-Corner, Flying Geese, Half-Square Triangle, and Square-in-Square units) used in this year's sampler have already been oversized to allow for trimming and squaring of units before assembling your block. Please cut your pieces EXACTLY as given in each of the PDF instructions because bumping up the size of the pieces from the measurements give will not bring great results in some cases. Take advantage of my in-blog tutorials for each of the different quilting techniques used in our sampler.

Accurate cutting and use of a true 1/4'' seam allowance is a must for successful patchwork piecing. All your blocks will measure 12-1/2'' square (unfinished). Review how to cut strips, sew with a true 1/4'' seam allowance, and other helpful piecing tips on my "Are You Ready to Sew" post.

Let's start sewing the Weathervane block. Download the free PDF on the Sew Along page.

BG0A5561.jpg

To make this week's block we will be using techniques we've already played with in earlier Community Sampler blocks. If you'd like to review how to make the Quick-Corner units see the tutorial from Week #2.

If you need a refresher on how to make Half-Square Triangle (HST) units see my in-blog tutorial from Week #3.

For help on controlling those obvious directional prints, read my tutorial from the Sewcial Bee Sampler posts. Remember, these blocks will be set on-point so you may want to fussy cut that center square on-point.

BG0A5483.jpg

For my sampler quilt I'm using Art Gallery Fabrics Pure Elements solids. Using all solids is a personal challenge for this pattern designer and is not without it's own set of additional challenges because solids are very unforgiving and show every little missed point. Again, this is a good challenge even for a quilter that's been doing this awhile and I will need to take extra care in my stitching!

Art Gallery Fabrics has the most beautiful colors for their solids and of course the quality of the material in un-matched! Above are the color name and sku number information for the fabrics I used in my block. 

BG0A5184.jpg

Maureen and I both love seeing your blocks you post to Instagram and of course the community of support you give to your fellow CS makers. Be sure to use the #CommunitySampler hashtag when you post to Instagram and tag @maureencracknell and myself @sharonhollanddesigns so we don't miss any of your beautiful blocks.

Don't forget to visit Maureen's blog to see her Weathervane block!

COMMUNITY SAMPLER SPONSORS

Sponsors Graphic Use-01.jpg

Lady Belle Fabric  Omnigrid   Aurifil Thread  Art Gallery Fabrics 

Hobbs Batting  Dritz  Fat Quarter Shop  Bloc-Loc

Don't forget that this Friday's a Giveaway Friday on the Community Sampler sew along. Maureen and I will take turns hosting a giveaway each week where one of our generous sponsors will be featured and offering amazing prizes both here on our blogs and a second chance on Instagram. I will be hosting the giveaway this Friday and you'll be instructed how to enter at that time.

Happy sewing!