Improv Boho Pillow

Improv Boho Pillow

Signature Boho Pillow 3.jpg

To continuing my marathon series of home decor pillows sewn with my Signature fabrics for Art Gallery Fabrics, today I'm posting about an improv patchwork pillow.

I wanted a long, bolster-type pillow for my Soho-style bedroom photo shoot and had a 14'' x 28'' pillow form that would be just perfect. 

IMG_6096.jpg

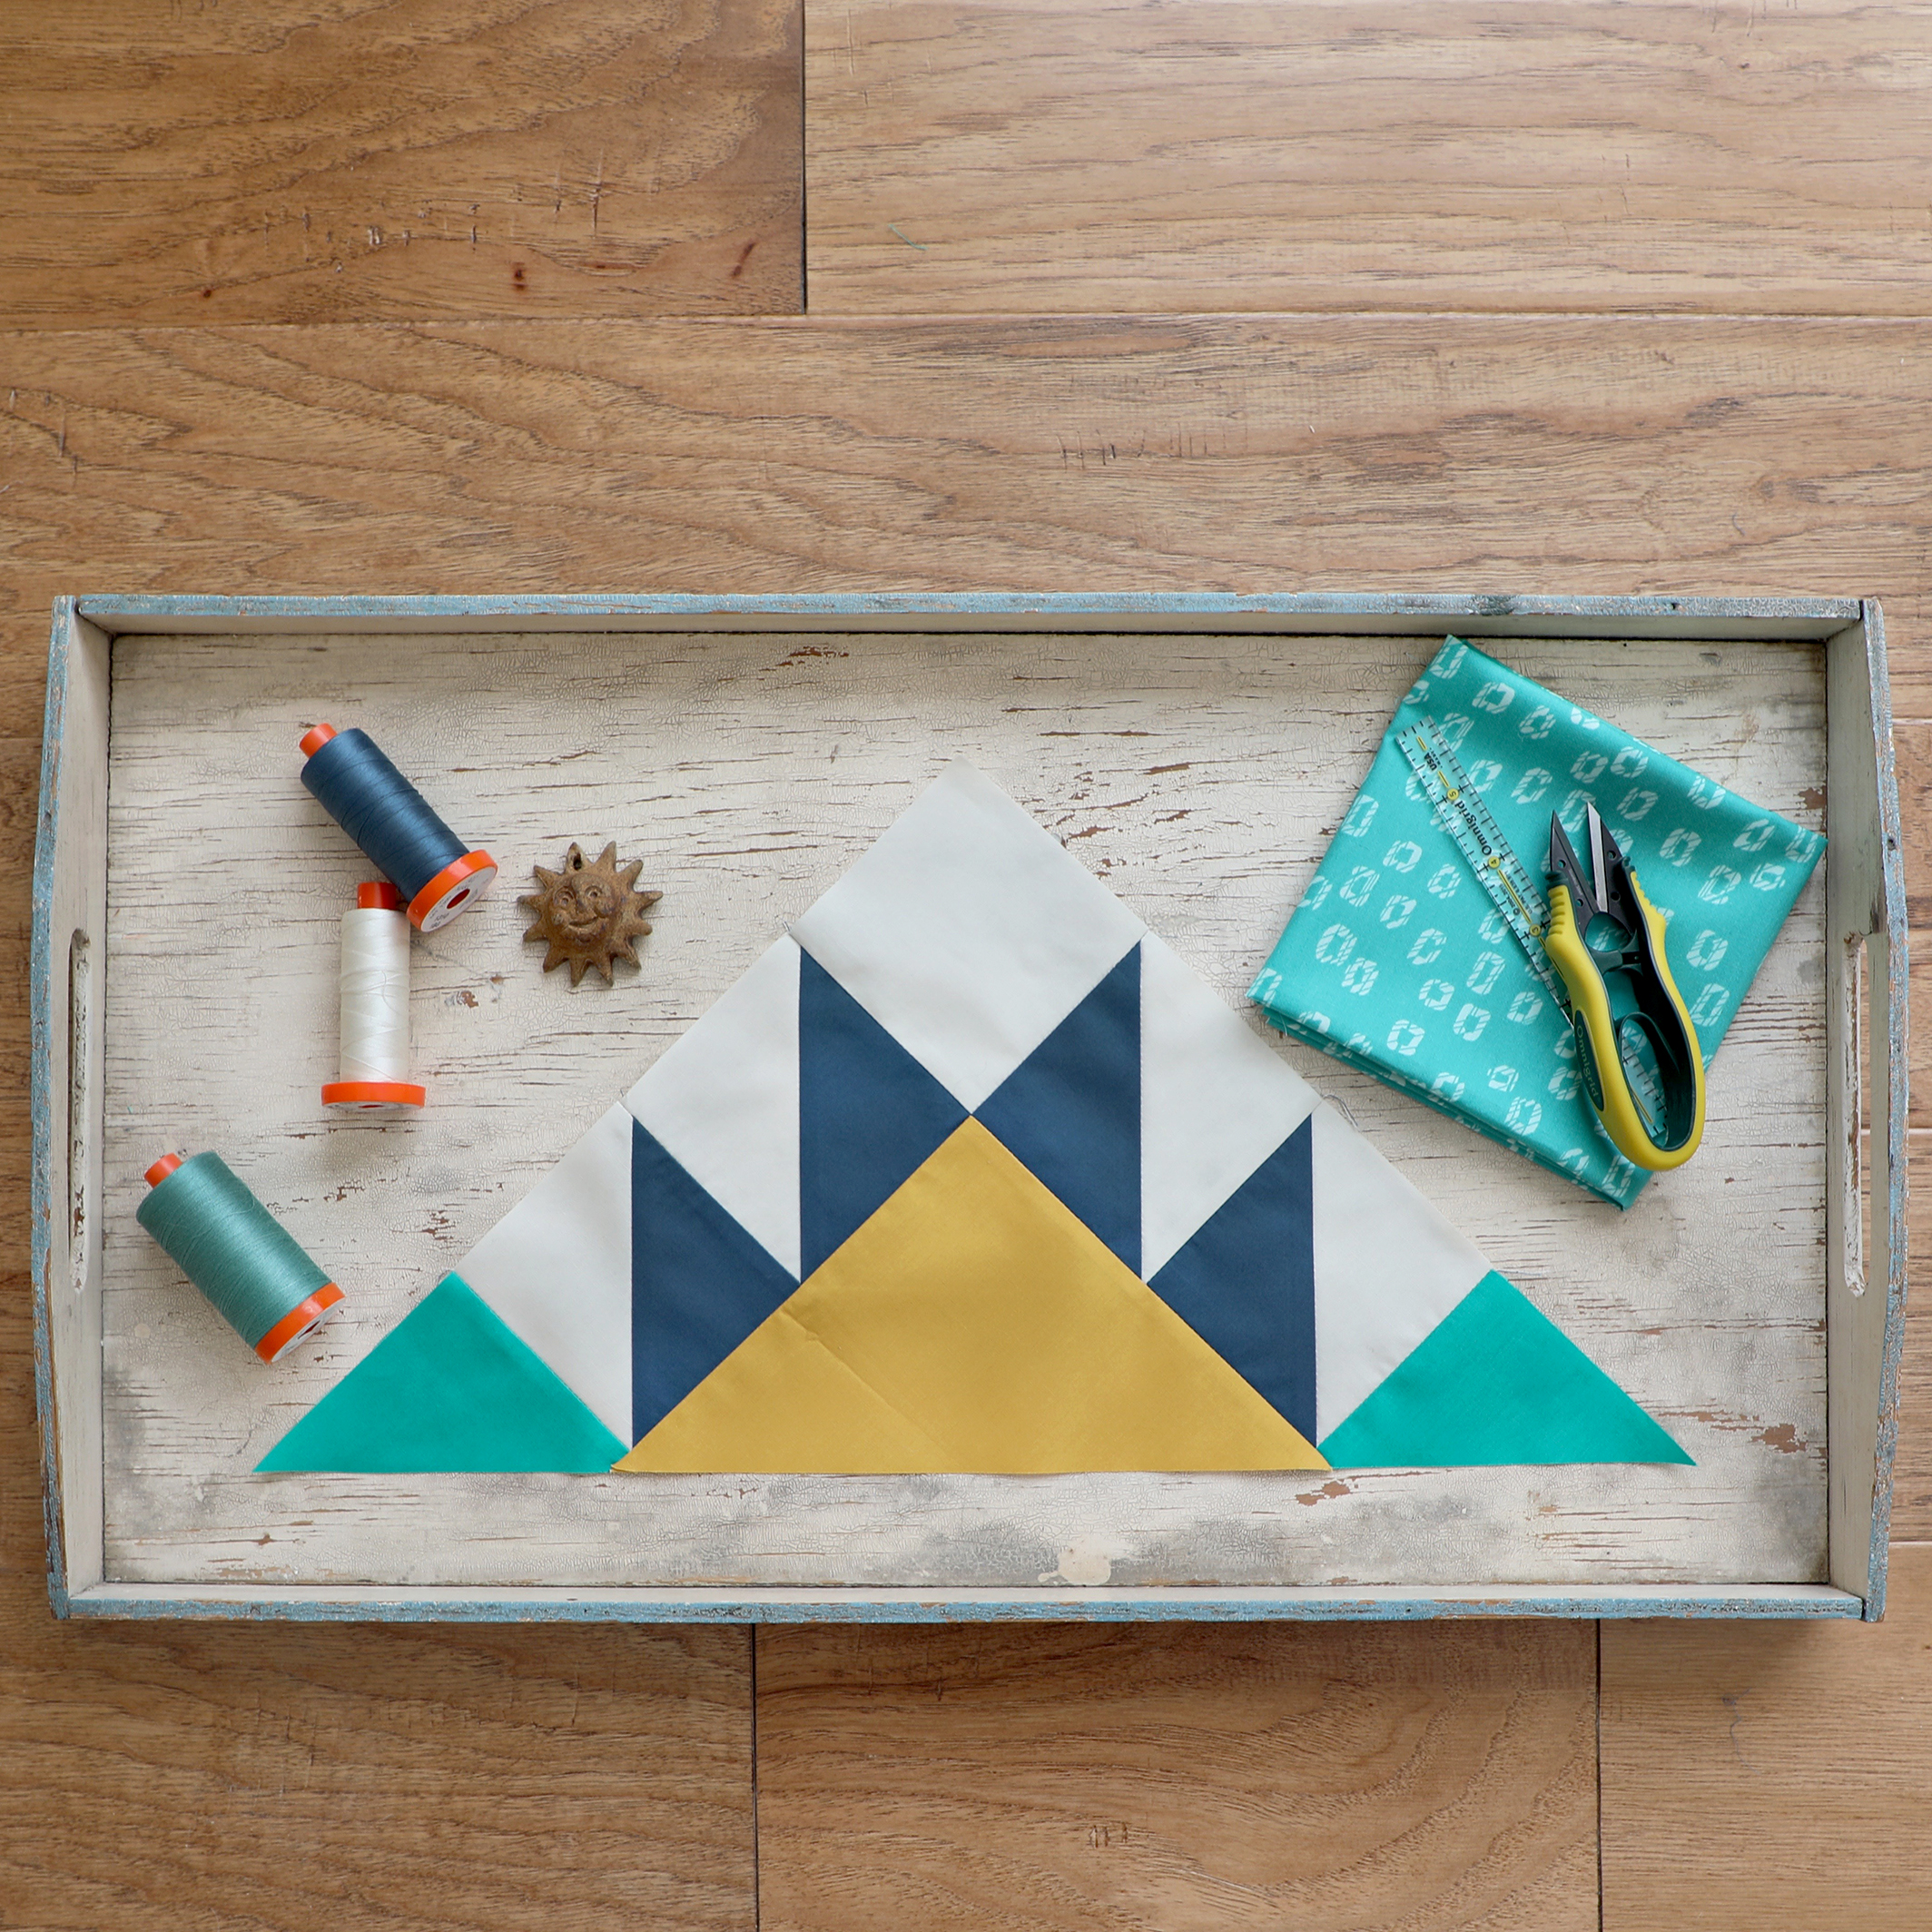
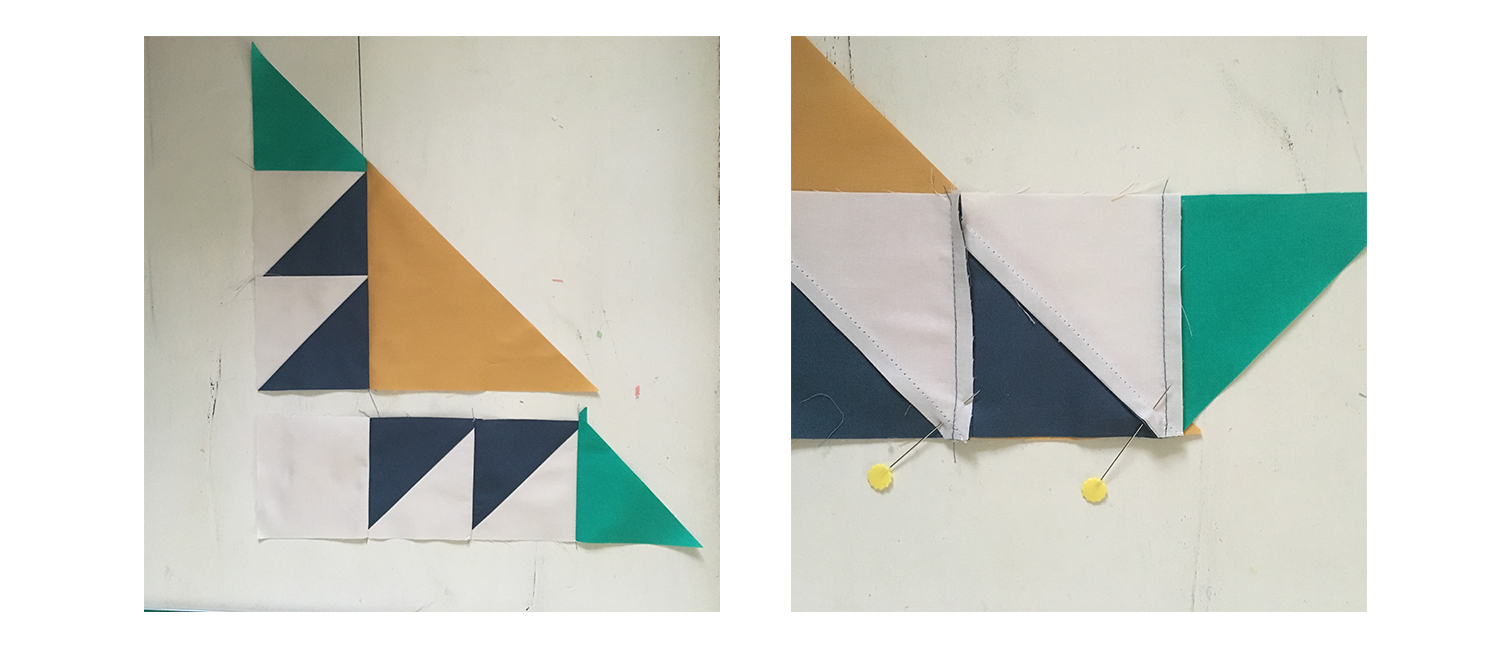
I used prints from my Signature Foliar color way and first made the four 3-1/2'' x 6-1/2'' Flying Geese units from:

  • One 7-1/2" square Venture Forward
  • Four 4-1/8" squares Tender Arrangement

See my No-Waste Flying Geese tutorial here.

The Flying Geese units didn't quite make the 14-1/2'' width I was needing for my pillow so I added two 1-1/2'' x 6-1/2'' strips of Art Gallery Fabrics PE-411 Pink Quartz Pure Elements solids to get it up to size. 

Signature Boho pillow 2.jpg

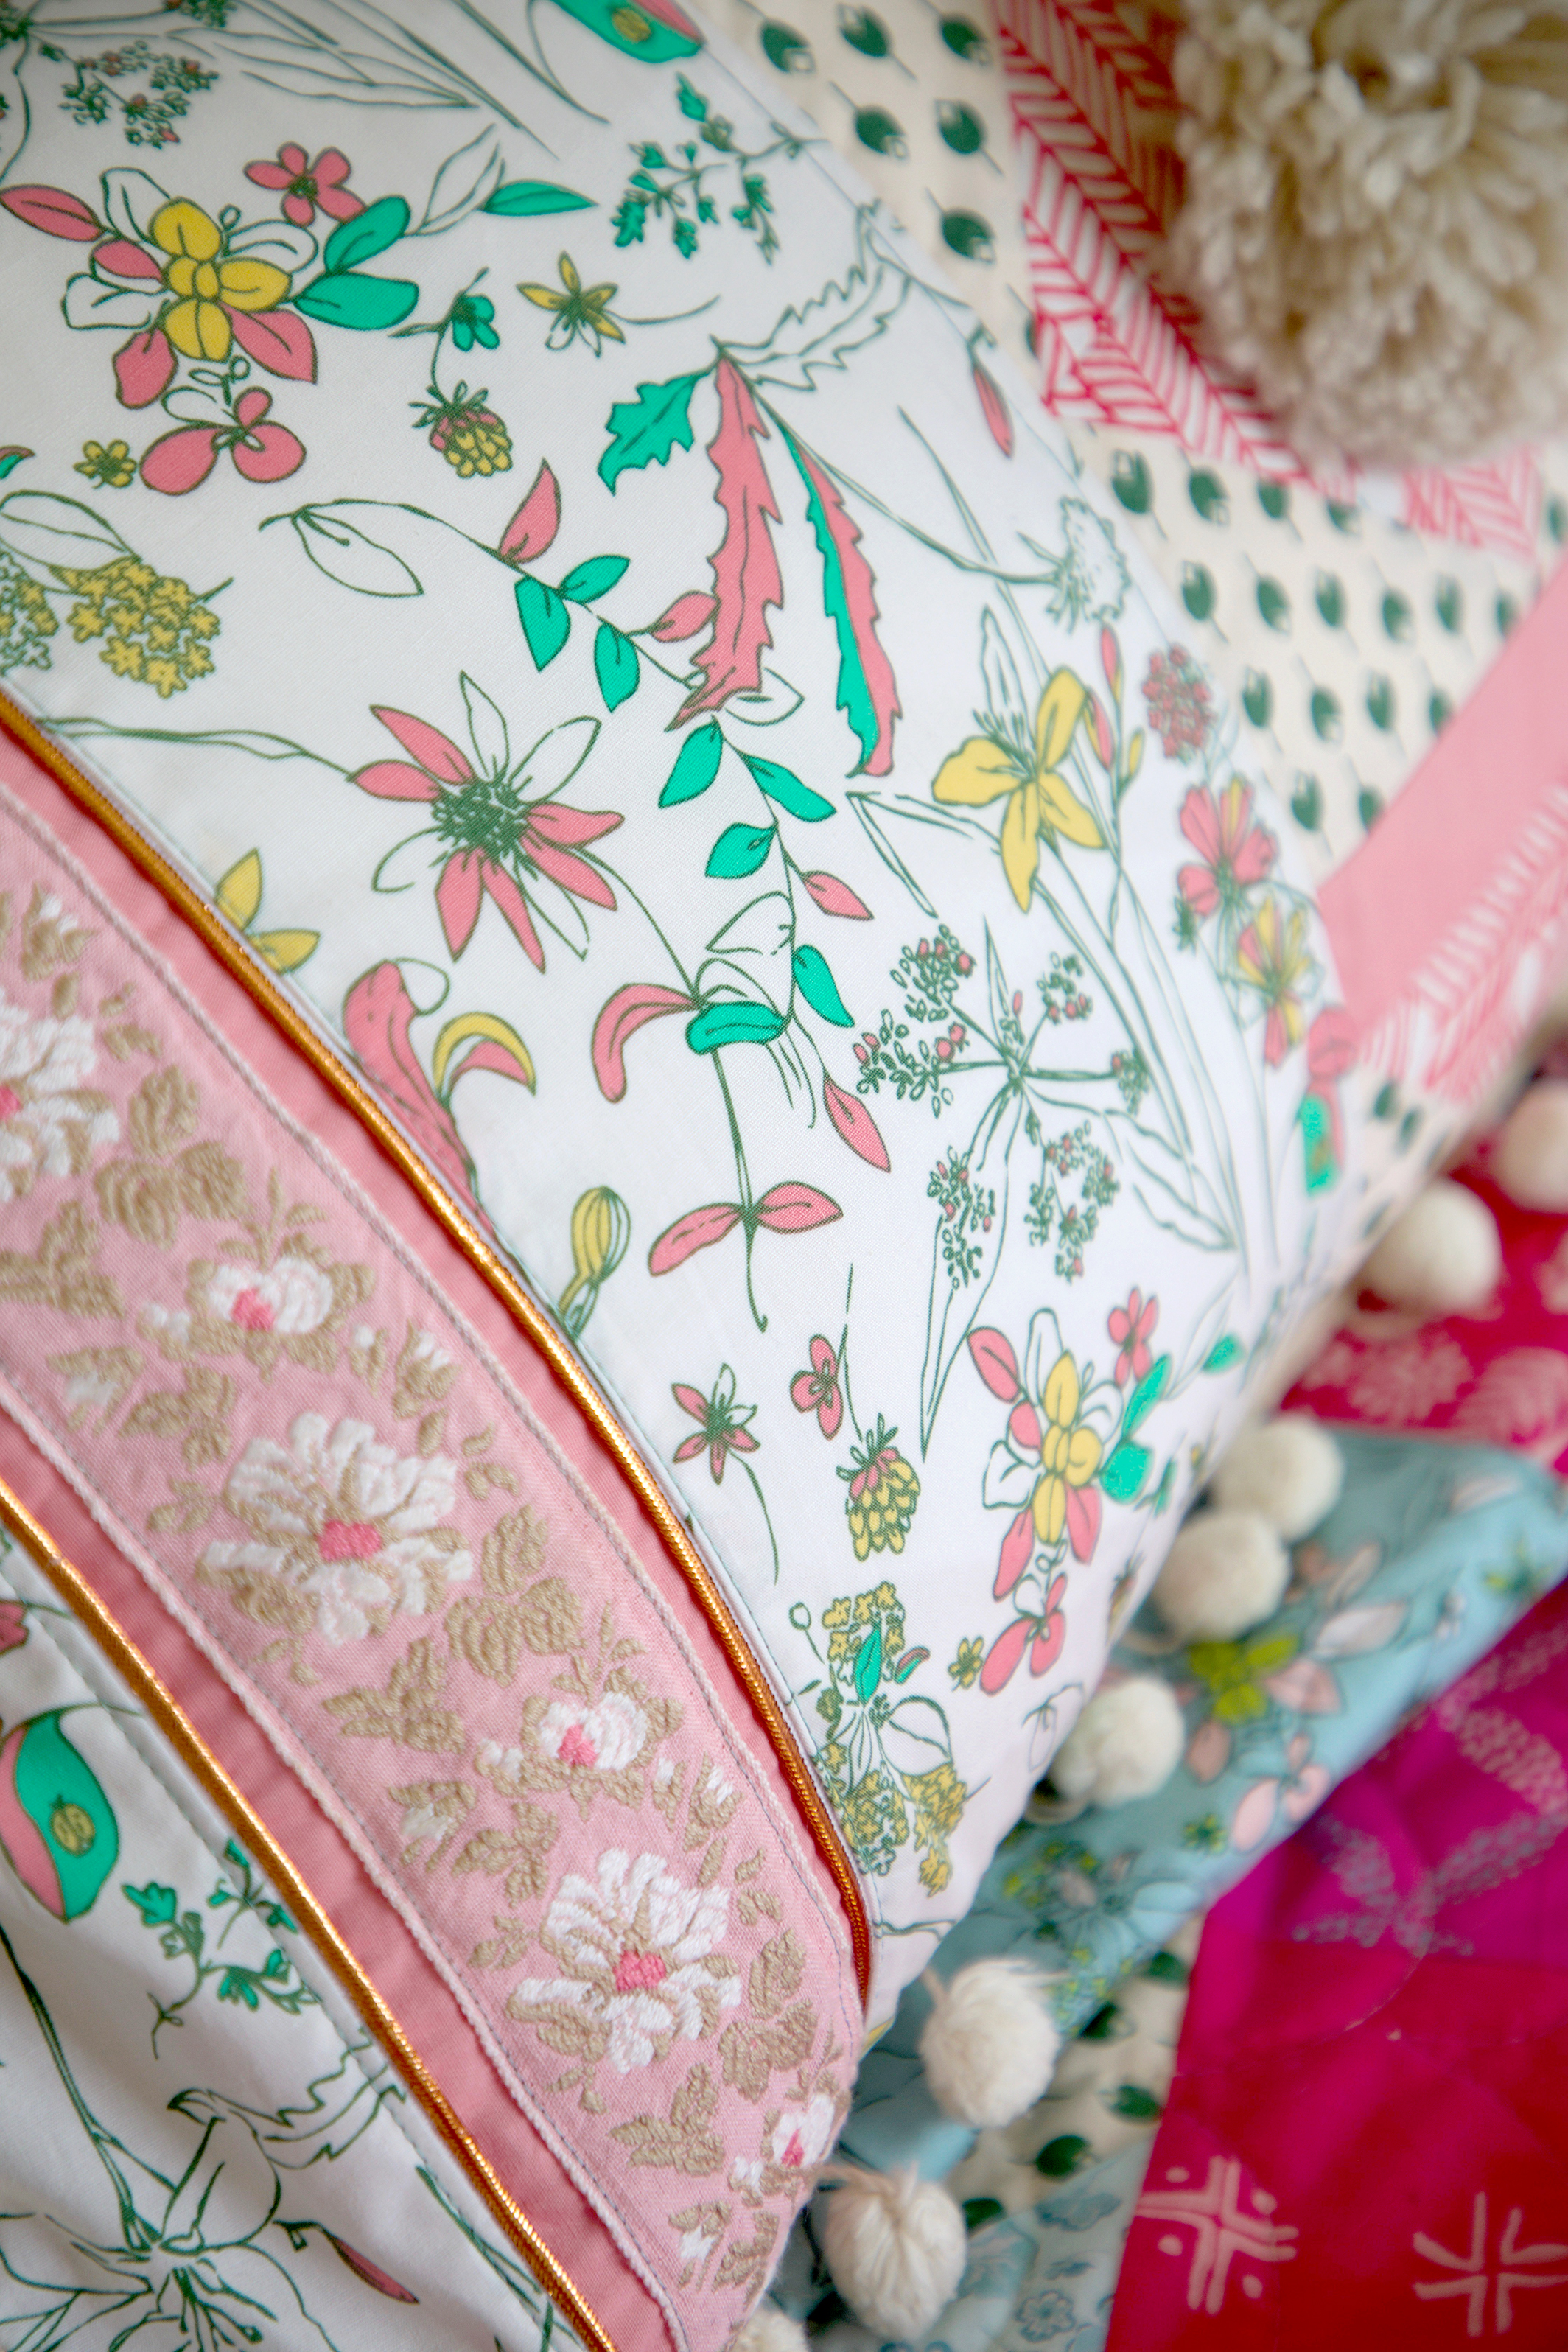
Improvising as I went, I made two 3'' x 14-1/2'' strips of vintage trim embellished Pink Quartz and cut the following of Untamed Beauty Daybreak: two 6-1/2'' x 14-1/2'' strips and two 3'' x 14-1/2'' strips. When assembling the sections I added in the vintage copper colored piping for a little bling. 

Once the pillow front was pieced I basted reclaimed vintage pompoms to the raw edge before assembling the pillow. 

Signature Boho Pillow 1.jpg

Since this pillow front only had enough seam allowance for a 1/4'' seam allowance I decided to finish the back with an envelope pillow backing. There's a terrific tutorial over at the Sew Mama Sew blog and she even has the cut sizes for the different sizes of pillows in a handy-dandy chart!

Signature Pillow 1.jpg

After my pillow was all sewn I thought it needed just one more fun element and hand sewed a giant pompom to the center of the pillow (before inserting the pillow form). 

Four Signature Pillows.jpg

Next, and final installment in this pillow series I'll be sharing how to make a Yo-yo pillow. If you've missed the first two pillow tutorials, take a look at my Chenille Pillow with Hidden Zipper and the Ruching Rose posts.


Ruching Rose Pillow

Ruching Rose Pillow

Ruching Rose Pillow 4.jpg

It seems that texture is the latest thing in home decor. If you step into any home department in your favorite store there's beautiful pillows with loads of character. I know I want to buy them all but after awhile that gets pretty pricey. Why not make your own decorator pillows at a fraction of the cost!

Ruching Rose Pillow 1.jpg

As I was coming up with project ideas to show off my new Art Gallery Fabrics Signature fabrics collection I wanted to off course show off the prints but also show you new ways to use fabric. 

Art Gallery Fabrics produces some of the finest quality quilting cotton and garment fabrics on the market. Their knit material is buttery soft and of thick weight that it can be used in more than just garment sewing. 

My Signature collection has three knit prints and for the Ruching Rose pillow I used two of them. Extempore Fest is the large floral background and Lacey Cosmos is used for the ruched flower. 

Ruching Rose Pillow 3.jpg

Make a Ruching Rose Pillow

You can customize the size of your pillow by adding 1" to the finished dimensions of your pillow form. Example: If you want a 20" square finished pillow, cut two 21" squares for front foundation and backing.

Note: The material list is based on a 16'' finished pillow.

Materials

  • 16" pillow form
  • 1/2 yard knit for background
  • 1/4 yard knit for rose cut into (4) 2'' x Width of Fabric strips for rose
  • Needle and matching thread
  • One package 1/4'' -wide Dritz Wash Away Wonder Tape
  • (1) 12'' - 14'' invisible zipper
  • Zigzag and zipper foot attachments
Ruching Rose-03.jpg

Join the (4) 2'' -wide strips into one long strip. Pace ends right sides together at right angles and stitch on the diagonal as shown. Trim seam allowance to 1/4''. Trim dog ears. Press seams open to reduce bulk.

Ruching Rose-01.jpg

Fold the long strip in half lengthwise with wrong sides together and press to crease. Unfold and then refold the raw edges wrong sides together toward the center. Press. 

Knot the end of a long length of matching thread. Hand sew a basting stitch in a zigzag design down the length of the long strip, loosely gathering the strip as you sew for ruching. 

Tip: Use binding clips to hold the folded fabric while you stitch. If you reach the end of the thread but need to continue ruching, gather the strip as desired before knotting off the thread on the raw edge side of the strip. Continue with a new length of thread in the same manner. 

Note: For my pillow I only used about 3-1/2 strips out of the 4 strips. If you're making a larger pillow the 4 strips will make a larger rose.

Ruching Rose-02.jpg

Fold a 17'' square of fabric into quarters to find the center of the square. Press to crease. Cut a 12'' length of Dritz Wonder Tape. Turn one short end of the ruching strip under 1/4''.

Adhere the tape to the raw edge seam side of the ruching strip, holding the turned end in place under the tape. Remove paper backing.

Starting at the creased intersection, adhere the ruching strip to the pillow front, spiraling it around the center to form a rose. Tip: I let the previous row of petals slightly overlap the subsequent rows to give more of a 3-D effect to the flower. 

Note: Working on a flat surface, rotate the strip around the center while keeping the raw edge seam side down and the ruching flat and evenly spaced. Add more 12'' lengths of tape as needed to continue making the rose. 

Turn the end of the ruching under, tapering the end under the proceeding spiral to finish the rose. 

Starting on the outside ending point, sew down the rose with a zigzag stitch on your sewing machine to secure it to the pillow front. Spiral around as you sew, ending in the center of the rose.

See my Hidden Zipper tutorial for finishing your pillow with an invisible zipper. 

Ruching Rose Pillow 2.jpg

Chenille Pillow with Hidden Zipper

Chenille Pillow with Hidden Zipper

Chenille Pillow.jpg

Making your own decorator pillows has never been this easy! 

Here's what you'll need:

  • Pillow form of choice
  • Two pieces of fabric cut 1'' larger than pillow form. Example: If using a 14" square pillow form then cut (2) 15" squares.
  • One Invisible Zipper approximately 4" shorter than side of pillow zipper will be placed on. Example: If making a 14" square finished pillow, select a 9''-10'' -length zipper.
  • Chenille-It Blooming Bias or similar chenille bias product and matching thread
  • One package 1/4'' -wide Dritz Wash Away Wonder Tape
  • Zipper foot attachment
  • Seam ripper
  • Marking tool
Signature Chenille Pillow.jpg

My Chenille pillow was made using the Traveler Raindrops print from my new Signature fabrics for Art Gallery Fabrics. This print was perfect for this decorative finish because of the lines of the print could be used as a guide for chenille placement. 

Chenille-It Blooming Bias tm.jpg

Chenille bias tape comes in rolls and is a loosely woven cotton cut on the bias. 

IMG_6338.JPG

Mark your fabric, if necessary to give yourself sewing guides. In my case, I could use the lines of my Traveler print and get right to sewing. 

Following the manufacturer's instructions, stitch the chenille bias tape to the fabric foundation using a short stitch length. Sew down the center of the strip with a straight stitch. 

Add as many rows as desired.

Assemble the pillow before blooming the chenille with water.

Hidden Zipper

zipper pillow-01.jpg

On a flat surface, place the pillow front and back right sides together with edges matched. If there's a definite top and bottom to your pillow place the bottom of the pillow closest to you, as shown in illustration. 

Center the zipper on the edge that will be the bottom of the pillow. Mark the fabric at the points where the zipper begins and end.

zipper pillow-04.jpg

Remove zipper and stitch bottom edge using a 1/2" seam allowance from the outside edge to the marked line on each end. Backstitch to reinforce.

Using a basting stitch length, sew the space between the marks with a 1/2'' seam allowance. Do not backstitch. Press seam open. 

zipper pillow-02.jpg

On the wrong side, place the zipper wrong side up centered directly over the seam and between the marks. Pin in place or I like to use Dritz Wash Away Wonder Tape to hold the zipper in place without the need for pins. 

If using Dritz Wash Away Wonder Tape, cut two lengths of tape as long as the zipper. Stick a length of tape to the right side of the zipper on each side, keeping the tape away from the zipper teeth. Peel off backing tape and stick the right side of the zipper to the fabric as shown above.

Reset stitch length to regular length. Switch to the zipper foot attachment for your machine and stitch zipper in place around all sides. Note: Stitch with needle in the down position and pivot around corners, sewing just past the metal ends of the zipper. 

zipper pillow-03.jpg

Turn to right side of the pillow and remove the basting stitches using a seam ripper. Open zipper. 

Fold front and backing on the zipper seam with right sides together and edges matching. Pin. Change presser foot to regular foot. Using a 1/2'' seam allowance, stitch three sides together. 

Turn right side out through zipper opening. Tip: Do not clip the corners. By leaving the corners unclipped the bulk helps to fill out the corners of the pillow. Carefully poke out corners.

Chenille Pillow with Hidden Zipper.jpg

Following the chenille manufacturer's instructions, wash or wet bias to bloom. Dry completely before inserting pillow form. Tip: If washing creates gaps in the chenille, simply cut a slightly longer piece of chenille bias tape longer than the gap and stitch in place using the pillow opening. Wet and fluff to blend into original chenille. 

Signature Look Baby Room pillow 2.jpg

This pillow was so much fun to make and looks comfy cozy in my Signature baby room setting. Be watching for more looks from this baby room in the upcoming Signature Look Book next week. 

Signature Look Baby Room Pillow.jpg

Community Sampler Week #12

Community Sampler Week #12

BG0A5247.jpg

I can hardly believe we're at our last block already! But don't worry, that doesn't mean the Community Sampler is over yet, we still have block setting and the optional borders to attach. My co-host and sister Art Gallery Fabrics designer Maureen Cracknell and I are so happy to have you sewing with us and can't wait to see your block.

CS Layered Sharon.jpg

There are eleven blocks in our quilt, block setting, and optional borders. Each Wednesday will be a new PDF block release or finishing step for the quilt. If you are just joining us, pick up the Introduction PDF on the Sew Along page and you'll get a material list along with coloring pages so you can get started planning your quilt. Then, work your way through the first Community Sampler post to the present.

Many of the patchwork units (like Quick-Corner, Flying Geese, Half-Square Triangle, and Square-in-Square units) used in this year's sampler have already been oversized to allow for trimming and squaring of units before assembling your block. Please cut your pieces EXACTLY as given in each of the PDF instructions because bumping up the size of the pieces from the measurements give will not bring great results in some cases. Take advantage of my in-blog tutorials for each of the different quilting techniques used in our sampler.

Accurate cutting and use of a true 1/4'' seam allowance is a must for successful patchwork piecing. All your blocks will measure 12-1/2'' square (unfinished). Review how to cut strips, sew with a true 1/4'' seam allowance, and other helpful piecing tips on my "Are You Ready to Sew" post.

Let's start sewing the final block in our sampler--Sawtooth. Download the free PDF on the Sew Along page.

BG0A5377.jpg

TUTORIAL FOR PIECING THE Sawtooth BLOCK

The success of this block rest solely in your ability to cut and sew accurately. You'll be put to the test here and hopefully rewarded for your efforts.

If you're wanting to use directional prints for the HST units you may want to check out my tutorial for controlling directional prints that was posted during the Sewcial Bee Sampler sew along. 

Sawtooth 1.jpg

In the CUT section of the instructions you're told to cut fabric C and D in half diagonally, as show above. Handle these pieces with care so as not to stretch the bias edge. You'll only be using one of the large triangles.

Make the required Half-Square Triangle (HST) units as explained in the PDF download. For a tutorial on making HSTs visit my earlier tutorial HERE from week #3.

Sawtooth 2.jpg

Referring to the block assembly diagram on the PDF, sew two HST units together and one fabric C triangle. Notice how the edges of the fabric C triangle match the edges of the HST section at a right angle. The tip of the fabric C triangle extends past the upper edge of the HST section. The 1/4'' seam will enter where the fabrics form a "V". Press open.

Sawtooth 3.jpg

In the same manner and noting orientation, sew a fabric D triangle to the section. Notice how the extended tips form a "V" and the 1/4" seam allowance enters at that point. Press open. Trim dog ears to reduce bulk. 

Sawtooth 4.jpg

Sew the 3-1/2'' fabric A square, two HST units, and the remaining fabric C triangle together as shown. Sew to the remains side of the fabric D triangle to make the half block. 

Handle this block carefully to keep from stretching the long bias edge.

Also, this is a good time to remind everyone that our Cactus block should also be half blocks for the construction of the quilt top. If you've sewn that block together is will need to be separated into two diagonal halves like our Sawtooth block. 

BG0A5495.jpg

The fabrics I'm using for my sampler quilt are Art Gallery Fabrics Pure Elements solids. This block made me think of a hill with pine trees so I kept my palette simple and harmonious, like in nature.

The print shown in my photos is a re-coloring of my Woodblock print and this lovely turquoise coloring is found in the new Splendid Fusions from Art Gallery Fabrics.

BG0A5247.jpg

Community Sampler Sponsors

My co-host Maureen Cracknell and I are continually amazed by the joy and excitement each of you bring to our virtual community. Thank you for making this sew along so special. Please visit Maureen's blog and see the progress she's making on her sampler quilt, using her beautiful AGF fabrics Love Story collection. Be sure to use the #CommunitySampler hashtag when posting your blocks to Instagram and tag both my @sharonhollanddesigns and @maureencracknell so we don't miss any of your beautiful work! But, please be patient with both Maureen and I over the next few weeks if we don't comment back. Both Maureen and I are preparing sewing samples for our new spring collections and there's just not enough hours in the day (or energy) to get it all done!

Don't forget that this Friday's a Giveaway Friday on the Community Sampler sew along. Maureen and I will take turns hosting a giveaway each week where one of our generous sponsors will be featured and offering amazing prizes both here on our blogs and also on Instagram. I will be hosting the giveaway this Friday and you'll be instructed how to enter at that time.

Happy sewing!