My Signature Sampler Week #17

My Signature Sampler Week #17

My Signature Sampler Quilt 3.jpg

Here we are, week #17 and reveal finale of the My Signature Sampler sew along! I feel like I have a documentation of this years spring and summer flowers all stitched into a beautiful sampler quilt.

It’s been a joy sewing with my Signature fabrics for Art Gallery Fabrics (AGF) and a treat for me to see so many of you also sewing with my Signature collection or with other fabric collections I’ve designed for AGF. I’ve seen so many amazing new fabric pairings that I’m seriously thinking the next sampler sew along I host will be to make a quilt in prints from across my collections. But, that wouldn’t be until early next year—which will be here before we know it.

My Signature Sampler Banner copy.jpg

Assembly

For this week’s blog post it’s all about assembling the blocks and finishing your quilt. Luckily for me in writing this post, I’ve already covered the tips and tricks for quilt finishing in other sew along post so, if you need extra help with assembling your top, be watching for links to previous tutorials throughout the text in this post.

My Signature Sampler Quilt 2.jpg

I've been adding the setting triangles to my finished blocks as I constructed them but many of you may have been waiting to finish all your blocks before deciding on fabric choices and block arrangements, which I completely understand so this post is dedicated to assembly and finishing.

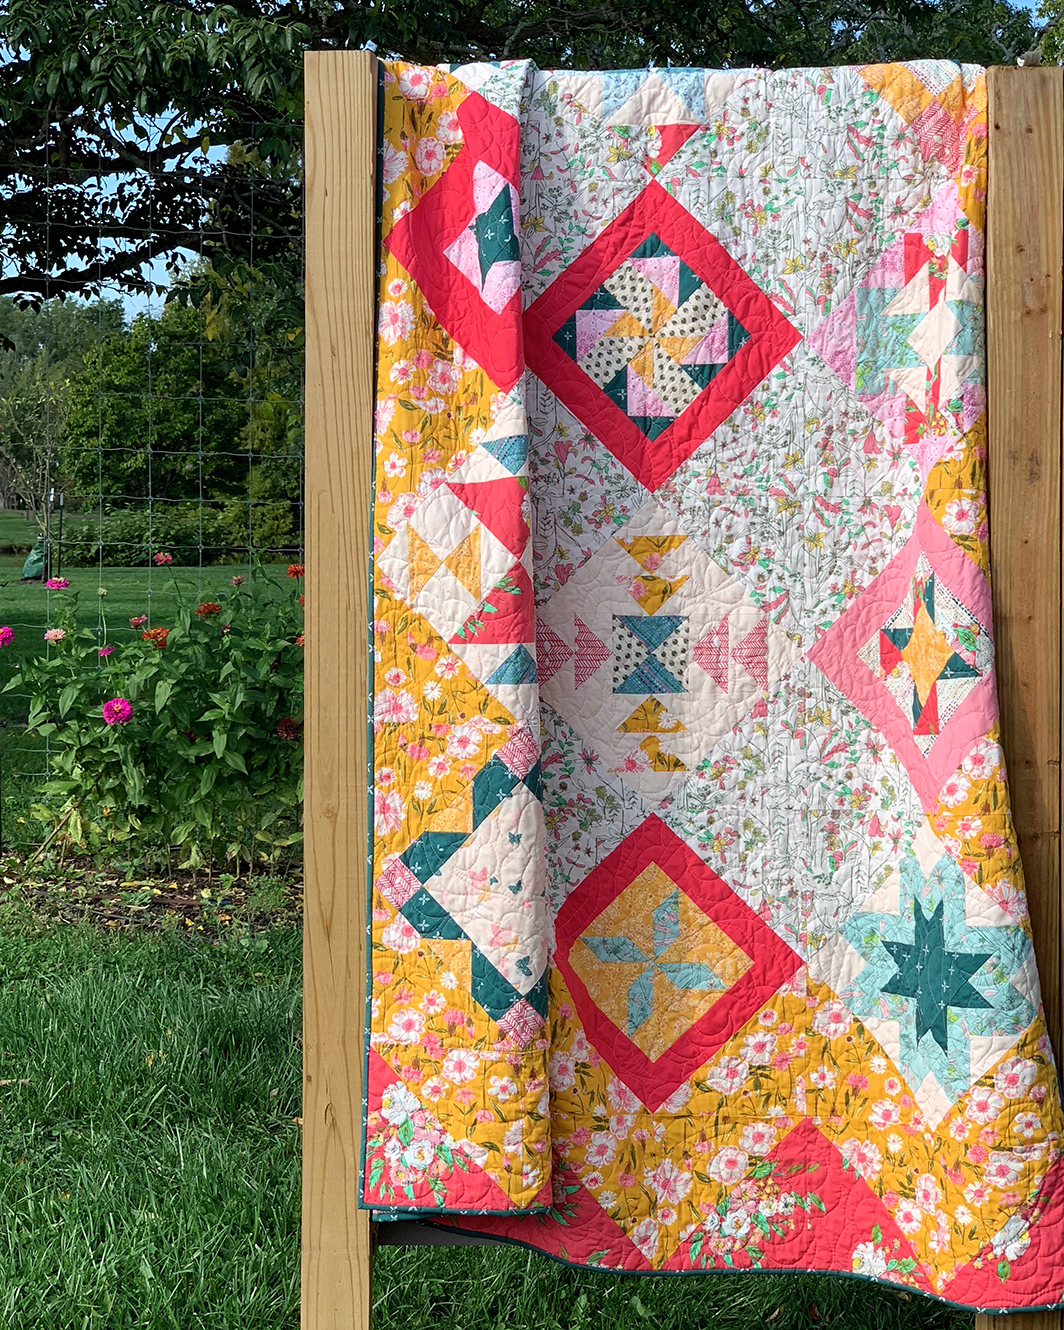
I used a combination of my Perennial print from Printemps Fusions and Untamed Beauty Daybreak from Signature as the background setting of my quilt and stuck to original layout found in the first week handouts.

Working with directional prints in half-square triangle units

Working with directional prints in half-square triangle units

The setting triangles are made by cutting a 9-1/2'' square on the diagonal to make two setting triangles. Be mindful of print direction, if applicable. See Community Sampler Week #13 for block setting instructions. 

My Signature Sampler Quilt Top Center.jpg

Here’s a look at my sampler top after stitching all the setting triangles and blocks together. This is the original option without the added Chevron borders added.

If you're interested in adding a Chevron border to your sampler quilt, take a look at the My Signature Sampler week #6 blog post and pick up the border supplement PDF. In the suppliment PDF I also talk about working with directional prints in the borders so please read instructions through thoroughly before beginning.

My Signature Sampler Quilt 5.jpg

For my finished sampler I decided to use the top and bottom Chevron border option. This make the quilt a rectangle rather than a square and gives the effect of fringe on the two short ends of the quilt. I love the coral Extempore Celebration floral print addition on the Chevron borders and it plays beautifully to pop the Flamingo Pure Elements solid used in the frames of some of the blocks.

I was height-challenged when clipping my quilt to this fence at the local arboretum but I got the job done and this quilt just begged to be photographed outdoors. I only wish there were more flowers in bloom this time of year in Ohio. Oh well, the quilt makes up for what nature could not provide!

My Signature Sampler Quilt 7.jpg

Rather than reinvent the wheel, I'm directing you to the blog post for Finishing that was originally posted during the Sewcial Bee Sampler sew along. You'll find all the tutorial information for spray basting, quilting, and binding your quilt. The sizes have changed but the concept for basting, quilting, and binding your quilt are the same. As stated in that post, there are many ways to finish a quilt and I am blogging about how I finish my quilts. If you have a preferred method, please do it the way you're comfortable with. If you intend to send your top off to be professionally quilted, discuss with your long-arm quilter how they'd like you to prepare your quilt top and backing for being quilted. 

QUILTING

I'm not a professional quilter by any means. I get by and call my quilting style "organic" because it's not perfect and lines are not straight. I love the human touch that non-perfect quilting adds to my quilts.

I used my favorite Hobb’s Tuscany Silk batting inside my quilt and love how light and drapey a quilt this size can be with silk batting inside. Especially for handling and maneuvering a large quilt when quilting on a mid-arm machine.

My Signature Sampler Quilt 6.jpg

For a floral quilt like this, I wanted to go floral all the way and chose to do an all-over, organic stylized flower motif. This gives a dense quilting effect of timeless look and feel. I’ve not washed my quilt yet so it’s not even gotten any of that crinkly goodness laundering would add.

My Signature Sampler Quilt 10.jpg

The backing on my quilt is from my Signature fabric collection for Art Gallery Fabrics and is called Venture Forward seen here with the last few blooms of summer. I like the addition of this geometric print amongst all the florals and it reminds me of a trellis. For the binding I went with the Lateral Bud Profusion print from this same collection and it frames up the quilt nicely with that incredible teal color.
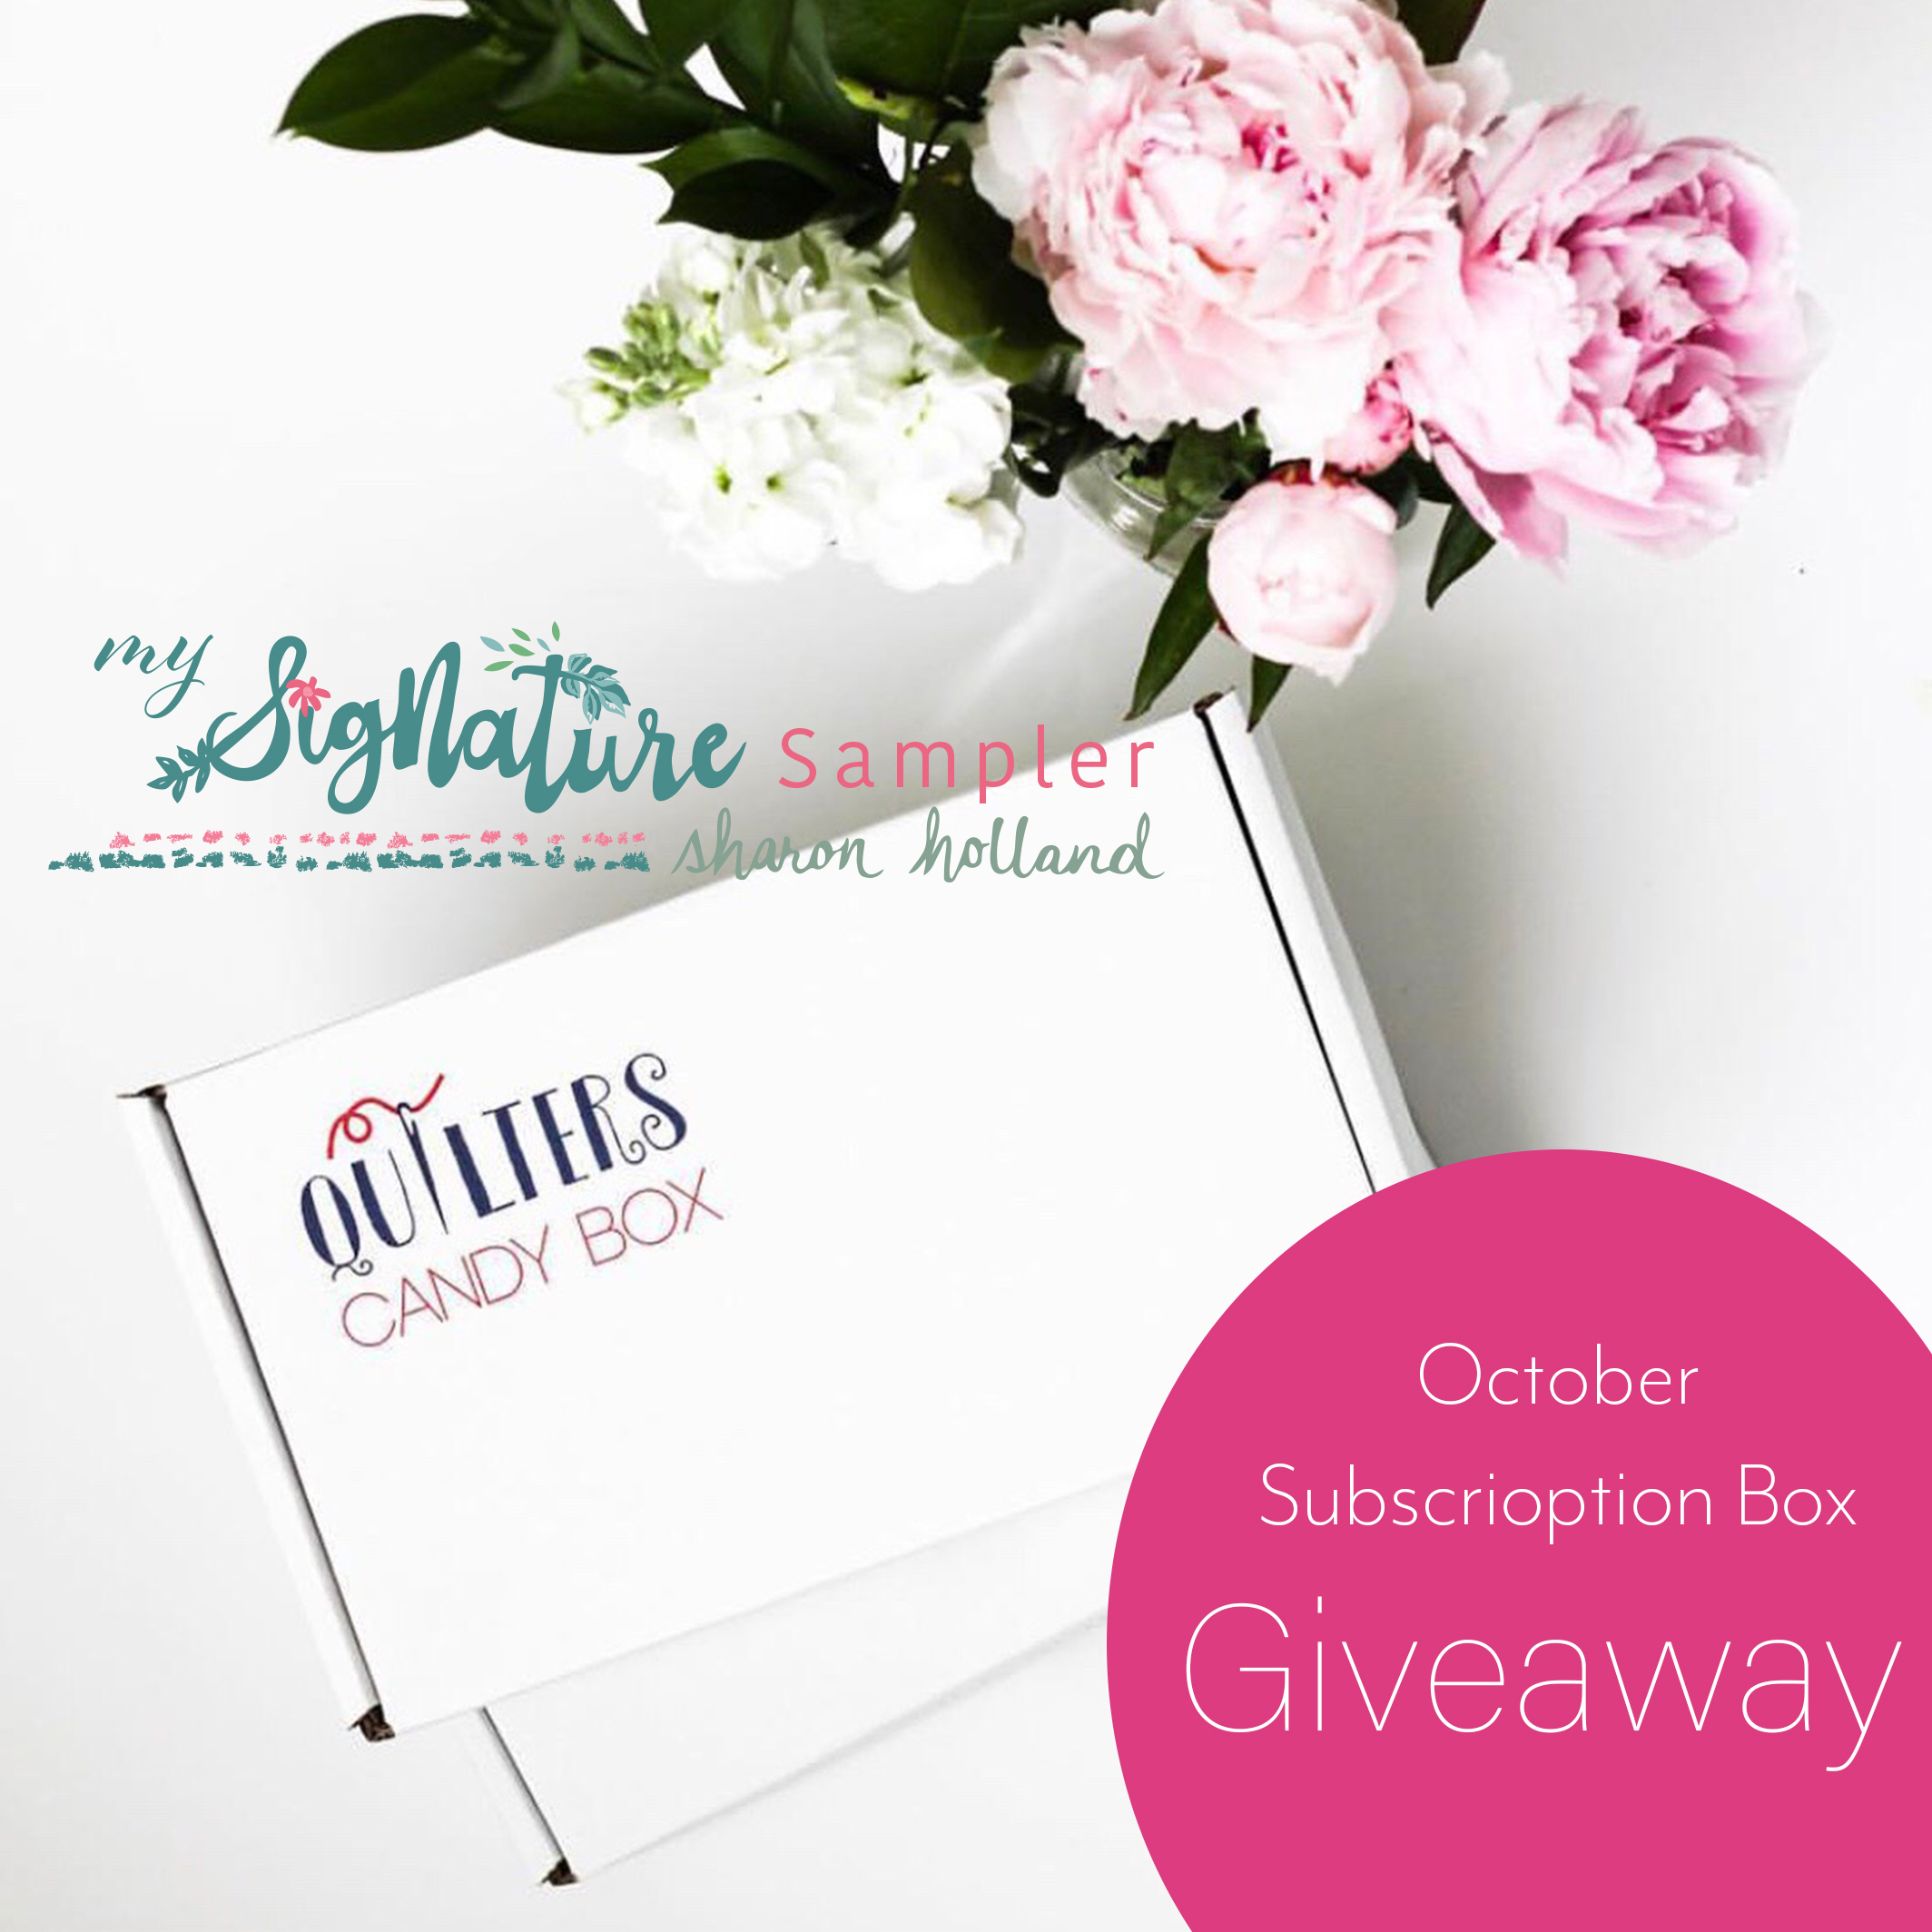
GIVEAWAY

This week’s our final Friday Giveaway for the My Signature Sampler sew along. This sew along was sponsored by the most amazing companies that generously donated incredible prizes to share with you. I want to give a big thank you to all my sponsors for their part in making this sew along so much fun!

OUR SPONSORS

THIS WEEK'S GIVEAWAY SPONSOR IS: Quilter’s Candy Box

QCB-Logo(2).jpg

The Quilter’s Candy Box began in 2016 by Elizabeth Chappell with a wish to surprise and delight quilters with an exciting quilting experience of novelty and boutique notions, patterns, the latest fabrics, and of course, yummy treats all contained in a monthly subscription box. With a motto of, “Satisfy your quilters craving” Quilter’s Candy Box was born.

Quilter’s Candy Box is a curated monthly subscription of quilting treats and a dessert, delivered right to your door. Every box has 5 to 8 items. In each box you’ll be surprised with beautiful fabric, an exciting pattern, and a delicious treat plus quality and unique quilting notions you’re sure to love!

Blog  *  Facebook *  Instagram  * Pinterest

Elizabeth Chappell of Quilter’s Candy Box

Elizabeth Chappell of Quilter’s Candy Box

When one project ends another one begins! So, for the My Signature Sampler finale giveaway prize, one lucky winner here on the blog will receive the October Quilter’s Candy Box.

Note: This giveaway is only open to U.S. residents, sorry international friends. See giveaway rules for details.

Quilter's Candy Box Giveaway.jpg

Who doesn’t love a surprise?

The Quilter’s Candy Box contents are kept a secret until subscription boxes land in hundreds of waiting mail boxes (around the middle of each month). Even now I cannot show you what the October box will contain but I can give you a little hint! The October box will include fabrics from Amy Sinibaldi’s beautiful new Sonata collection for Art Gallery Fabrics and sure to be amazing!

Giveaway now closed. Congratulations to Barbara Matzat!

Note: This giveaway is open to US address only for this prize. If you're a "no reply" or anonymous commenter, please remember to include your email address in your comment--you can't win if I can't get a hold of you!

1. Simply leave a comment here under this post! (First comment entry).

2. Follow Quilter’s Candy Box on any of their social media platforms (see links above). Just let me know that you did by making a separate comment here to record that entry. (Separate comment-second entry). 

3. My followers get a third entry! If you follow me via subscribing to my posts, on Pinterest, and/or Instagram, just let me know by making a separate comment here to record that entry. (Separate comment-third entry).

4. Help spread the word!! I know that many of you already do, so I thought it would be nice to add that as another way to enter! Spread the word about the My Signature Sampler sew along on YOUR instagram, Facebook, Twitter, Pinterest by pinning any of my pretty images in this post, etc... (separate comment-fourth entry). 

That’s FOUR possible entries—maximum! Enter now through Monday, October 15th! The winner will be picked at random around 4pm Eastern. I will post the name of the winner on this post once they've been notified and responded to my email.

Don't forget to enter into this same giveaway on Instagram by posting images of your sampler inspiration, sampler fabric pull, or blocks. Use the official #mysignaturesampler hashtag every time you post your My Signature Sampler makes (to a public account) and you're automatically entered into the weekly IG drawings as well! See my Instagram giveaway posts @sharonhollanddesigns for full details. 

Happy sewing!

Sharon

Community Sampler Week #14

Community Sampler Week #14

Community Sampler borders 1.jpg

It's bitter-sweet that we're at the border assembly part of our sew along. This week we'll put on the optional borders and have a finished top! Looking ahead, next week Maureen and I will post about how to sandwich your top, batting, and back and I'll have some suggestions for quilting. The final week #16 is the full reveals and grand finale prize giveaway so stick with us just a few more weeks. 

If you've just found out about this sew along, don't worry, you can still join in on the fun but you may want to start from the very first post and work up to the present. There are eleven blocks in our quilt, block setting, and optional borders. Each Wednesday will be a new PDF block release or finishing step for the quilt. If you are just joining us, pick up the Introduction PDF on the Sew Along page and you'll get a material list along with coloring pages so you can get started planning your quilt. Then, work your way through the first Community Sampler post to the present.

My co-host and sister Art Gallery Fabrics designer Maureen Cracknell and I are so happy to have you sewing with us and can't wait to see your finished quilts.

CS Layered Sharon.jpg

Accurate cutting and use of a true 1/4'' seam allowance is a must for successful patchwork piecing. All your set blocks will measure 17-1/2'' square (unfinished). Review how to cut strips, sew with a true 1/4'' seam allowance, and other helpful piecing tips on my "Are You Ready to Sew" post.

Let's add some borders! Download the free PDF on the Sew Along page.

Community Sampler borders.jpg

If you're using directional prints, you may want to check out my tutorial for controlling directional prints that was posted during the Sewcial Bee Sampler sew along. I know you know how to stitch our No-Waste Flying Geese by now but if you'd like to look back on our past tutorial, revisit week #3 post, here.

Those of you that may have made your quilt bigger by adding more blocks will need to increase the length your borders and more materials will be needed for the added size. 

Adding the Borders

In a perfect world we all could sew perfectly square blocks that are true to size but let's face it, that rarely happens. The cutting and piecing sizes given in our PDF Borders instruction are written for that perfect case senecio which means you're probably going to make a few tweaks to your cutting and piecing to get this baby together.

CS Chain Piecing.jpg

Cut and stitch your Flying Geese (FG) units to the size given in the instructions, making them 2-1/2'' x 4-1/2'' (unfinished). Please read the rest of this blog post and through all the instructions on the PDF before cutting the A and B rectangles for the pieced borders.

My original plan for my quilt was to make all the Flying Geese units and rectangles white on a peach/pink background to match the block setting background solid. But, the peach/pink is a very light shade and to do all that Flying Geese and rectangle piecing in white against light seemed like a waste of all that piecing! I decided to select a few mid-tone solids that were predominate in the blocks and do a mixed solids border treatment. To do this I needed to divide the number of different fabrics by the number of "pop beads" as I like to call the border shapes. Remember, that with every No-Waste Flying Geese method you'll get four units in the end and will need one 5-1/2" square and four 3-1/8" squares to get four matching FG units. The PDF instructions give the total number needed (if using the size of quilt given) to cut so use those numbers as a guide when dividing in your number of fabrics.

I'd run out of enough fabric to include a terra cotta colored pop bead so I substituted with the more muted PE-472 Cinnamon of Art Gallery Fabrics Pure Elements color seen on the far right of the above photo. 

BG0A6827.jpg

As you can see, the Flying Geese units will measure up nicely to the 4-1/2" square corner squares in the pieced border and the 2-1/2"-wide inner border (even though my points are less than perfect, you get the idea here :).

BG0A6626.jpg

You're quilt center (before adding any of the borders) should be measuring somewhere in the neighborhood of 51-1/1" x 60". If you're way off that mark or increased the size of your quilt by adding more blocks you'll need to make some adjustments... 

Obviously, if you've made a larger quilt than our sampler you will need to get out the calculator and cut more strips for those inner and outer boarders and make additional Pop Beads in the middle borders. Note that the rectangles in the Pop Beads are two different sizes and are labeled A and B on the PDF instructions. 

Community Sampler Quilt Top.jpg

Before you really get crazy and cut all the A and B rectangles, cut just a couple (and label) then sew some of the Flying Geese units to rectangles and check your sizing. 

BG0A6824.jpg

Since the B rectangle/Flying Geese units are stitched directly against the top and bottom of the quilt (no inner border between) that's a good place to start for checking sizes. If your seams match up on major points and seams of the quilt top center then you're in that perfect world senecio and are in good shape to proceed with piecing the borders as given in the instructions. 

If you're considerable off you have two options. 

One, do the math to figure what sort of adjustment is needed to the A and B rectangles to hit on those major seams in the quilt top center. Start by measuring the opposite sides of the top and average those number (subtract 1/2" for total seam allowances and work in finished sizes for now). Each FG pair will measure 4'' finished so add up the number of 4'' units needed. From the remaining amount, figure how many rectangles are needed. Divide that amount by the number of rectangles needed to get the total length per rectangle. Remember to add in the seam allowances after figuring the finished length needed for an A or B rectangles. Yeah, I know, no fun at all.

Okay, option two. Cut and piece as stated in the instructions (unless of course you need to cut more because you made a bigger quilt). After piecing each border section as directed, the adjustments will be made to the end rectangles only. You're border may not hit on the major seams and points of the quilt top but will be easier to figure up and still look balanced in the end.

Remember, don't change the 4-1/2" measurement on any of the rectangles as this side will match the length of the Flying Geese units and corner squares.  

border adjustment Community Sampler.jpeg

I truly hope these pieced borders don't cause heartache and frustration but I do want to cover any possible problems that could occur do to the variables of sewing. Do a few samples like stated above and test the waters before jumping in.

If you're not up to this challenge then maybe consider a simple 4" -wide finished solid middle border (4-1/2" x length needed cut size) and follow the same steps as for making the inner and outer border. 

Remember to use your sew along community on Instagram (#CommunitySampler) if you have questions or need some moral support!

COMMUNITY SAMPLER SPONSORS

My co-host Maureen Cracknell and I are continually amazed by the joy and excitement each of you bring to our virtual community. Thank you for making this sew along so special. Please visit Maureen's blog and see the progress she's making on her sampler quilt, using her beautiful AGF fabrics Love Story collection. Be sure to use the #CommunitySampler hashtag when posting your blocks to Instagram and tag both my @sharonhollanddesigns and @maureencracknell so we don't miss any of your beautiful work! But, please be patient with both Maureen and I over the next few weeks if we don't comment back. Both Maureen and I are preparing sewing samples for our new spring collections and there's just not enough hours in the day (or energy) to get it all done!

Don't forget that this Friday's a Giveaway Friday on the Community Sampler sew along. Maureen and I will take turns hosting a giveaway each week where one of our generous sponsors will be featured and offering amazing prizes both here on our blogs and also on Instagram. I'll be hosting the giveaway this Friday and you'll be instructed how to enter at that time.

Happy sewing!


Sneak Peek at the 2018 Sew Along

Sneak Peek at the 2018 Sew Along

Designer Collage.jpg

It's been so difficult keeping secrets but the news is finally out that Maureen Cracknell and I will be co-hosting another virtual sewing bee! The 2018 sew along is called Community Sampler. We gave it that name because of the amazing community that grew out of last year's Sewcial Bee Sampler event. The response was incredible and so were the many friendships formed over a common love of quilting. So, to everyone that joined us last year and made the sew along such a success and to all the new friends that will be made with our new sampler--this one's for you!

Next week on Wednesday, February 21st around 9 am Eastern. Maureen and I will be posting to our blogs and release your first PDF download. This sew along is a free event and all you need to do is follow along on this blog and Maureen's blog to find the new PDF release each week, enjoy tips and tutorials, block inspiration, and weekly giveaways. 

With our new name (and new look!) starts a new hashtag pool in Instagram. Grab either or both of the buttons above for sharing on your blog or social media platforms to show your support for the Community Sampler block-of-the-week sew along. When posting your makes to your Instagram account, use the hashtag #CommunitySampler and then you can connect with all your fellow CS Makers by following the hashtag--it's that easy!

Public Instagram accounts will enjoy the added bonus of automatically being entered into the weekly giveaway drawings each and every time you post and use the official #CommunitySampler hashtag. We'll give more details on that as we get underway next week. Remember, this is just a sneak peek and the full reveal will be next week, starting with the Introduction PDF download. 

Sponsors Graphic Use-01.jpg

The Community Sampler is proud to announce these generous sponsors:

Lady Belle Fabric

Omnigrid

Aurifil Thread

Art Gallery Fabrics

Hobbs Batting

Dritz

Fat Quarter Shop

Bloc-Loc

We look forward to you sewing along with us. Next week cannot come soon enough so to keep yourself busy, finish up all those UFO projects!  

Sewcial Bee Sampler Finale

Sewcial Bee Sampler Finale

This is it, the finale week of the Sewcial Bee Sampler (SBS) and time for Maureen and I to reveal our finished sampler quilts! The last 27 weeks have been incredible. The response and participation to the Sewcial Bee Sampler sew along has been more than my co-host Maureen Cracknell and I could ever imagine. So many new friendships have been formed through the SBS Instagram community and I love hearing how your patchwork sewing skills have been improving through our sewing techniques and tutorials. Thank you for making this so successful.

Surprisingly we still have a few new Makers joining our sew along at this late point and will continue to as they see your beautiful finished quilts being posted. If you're just finding out about us, be sure to take advantage of the in-blog tutorials for the different patchwork techniques used throughout the Sewcial Bee Sampler. Pick up tips and block variations beginning with the first blog post The Start of Something Sewcial. Both Maureen and I will leave all the SBS downloads up on our blogs for you to download long after this event is done. Also, check out the #SewcialBeeSampler hashtag on Instagram, you'll see an amazing array of beautiful blocks and quilts as inspiration overload! 

Before I get to showing you my finished quilts I want to remind you one last time about our Sewcial Bee Sampler Survey. The survey will only remain open one more week, until August 9th, 2017. To help us better understand what you're looking for in a future sew along, Maureen and I have prepared an 8 question survey. This quick questionnaire is completely anonymous and your answers will give us better insight into serving your needs as a quilter. To ensure the most accurate results, please only take the survey once. Many thanks to the 472 SBS Makers who've already participated in the SBS questionnaire! If you've not yet had a chance to take the survey, please do using this link provided. The link is the same on both Maureen's and my blog and goes to the same survey. So, if you access the questionnaire from either Maureen's site or mine, your answers are compiled to the same place.  

Quilt 1: Bountiful 

Originally I only planned to make one sampler quilt but very early into the sew along I could see I wanted to play with more fabric and color options and decided to make two to better show the variety that can be achieved in a project like this. I think each of my quilts has it's own personality as each and everyone of the SBS samplers have a unique point of view from the makers fabric choice, block assembly, and final layout arrangement. That's what makes a project like this so much fun.

My original quilt is made with fabrics from my newest Art Gallery Fabrics (AGF) collection called Bountiful. I also added in some coordinating AGF Pure Element solids.

I decided to keep the sashing fabric the same as the block frames to make the blocks float on the white background. 


The batting for my Bountiful SBS sampler is Hobbs Tuscany Wool. This is an exceptionally fine product and makes for a lightweight quilt with extra loft than a cotton type batting. It is a little different machine quilting on wool because of the added loft and takes a little bit of getting used to handling but needle quilts with ease. I chose to do a very simple free motion stitching on this quilt to give it a modern touch. 


Photo courtesy of Alexis Wright

Photo courtesy of Alexis Wright

Visit my Shop Fabrics page to find online quilt shops that carry Bountiful.

Quilt 2: Tiny Dancer

For my second SBS sampler quilt I decided to use fabrics from my first four Art Gallery Fabrics collections with the addition of the new Fusion reprints of my prints. I call my mixed group Tiny Dancer after the Sketchbook fabrics dandelion print by the same name.

On my second quilt I used my Sketchbook fabrics Speckled Lapis print for the block frames and a medium blue Mudcloth Blue print from Tapestry for the sashing. 

Since this quilt had a decidedly feminine quality to it with the colors and floral prints, I chose to stitch a dense, meandering floral machine quilting on it. The batting is the exquisite Hobbs Tuscany Silk batting. Truly the best batting I've ever had the pleasure to work with and works and handles much like a cotton batting.


To find shops that carry fabrics from my Gossamer, Sketchbook, Coastline, and Tapestry collections, use the links provided on my Shop Fabrics page

It was so much fun finally putting these blocks together and I love how they both turned out! My daughter helped me photography these over the weekend and I believe she has her eyes set on the Bountiful quilt for her guest bed (it's her favorite fabric collection to date). My year and a half year old granddaughter loved the Tiny Dancer mixed prints quilt and would point out the flowers and butterfly prints. I think someday when she's ready for a big girl bed, that will be her quilt. 

This Friday we still have another Giveaway Friday and it's going to be a big one! Maureen will be hosting the giveaway from her blog and I will be hosting the Instagram giveaway. Everything will be run as normal with the exception of the giveaway being slightly different in the two social media platforms. More about that on Friday!