
Sewcial Bee Sampler Block #3
Hello, friends! It's Wednesday and that means a new block is available for the Sewcial Bee Sampler sew along co-hosted by myself and Maureen Cracknell. If you're just now joining us, welcome! Please take a moment to catch up by reviewing all my earlier posts, beginning with the January 30th, 2017 post The Start of Something Sewcial.
The rest of you, let's get sewing! Block #3 is called Flock. You'll enjoy it because we're reviewing the two different half-square triangle (HST) techniques we've learned about in blocks #1 and #2. You've got this, but if you'd like a refresher, follow these links to my tutorials: 8-at-a-time HST units and the traditional HST units (2-at-a-time).


#3 Flock Sewcial Bee Sampler featuring Bountiful fabrics by Sharon Holland for Art Gallery Fabrics
I've started a series of tutorials to accompany this sew along that covers very basic patchwork sewing skills. If you've missed the first installment and want to perfect your strip cutting and seam allowance sewing skills, pop over to my Perfect Patchwork post here.
Just so you know, there's always several ways to accomplish the same end result in patchwork piecing and quilting. The methods I give you are my go-to methods and have served me well over the years. I'm not saying this is the absolute and only way to do things--this is just how I prefer to sew my patchwork quilts.
Perfect Patchwork
Pressing and Pinning
A question I'm asked a lot is do I wash my fabrics before I sew with them? The answer from me is, NO. Again, this is a personal preference. I like to sew with fabric that still has the mill sizing finish on it. I feel the fabric is easier to handle and work with in a crisper state. Yes, I could pre-wash and then starch--but why go through that extra work?
Second big question is about pressing seams to one side or pressing them open. If you'd have asked me this question 6 months ago I would have gasped in horror at the very thought of pressing patchwork seams open. But, this fall as I was sewing a quilt for my Utility Style quilt book, (in print later this year) I had a scrap quilt project that I just HAD TO press the seams open for it to work. This was the first quilt I ever, ever had done that way and was pleasantly surprised how it really helped make this particular quilt go together so nicely.
I've since been using a hybrid of pressing seams to one side and pressing seams open. If you put a little thought into the construction of each section of your block and how they fit together like a puzzle, you can get into a bit of a rhythm when piecing and start to instinctively know when to fold them (press to one side) and when to hold them (press open).
Let's Practice on the #3 Block
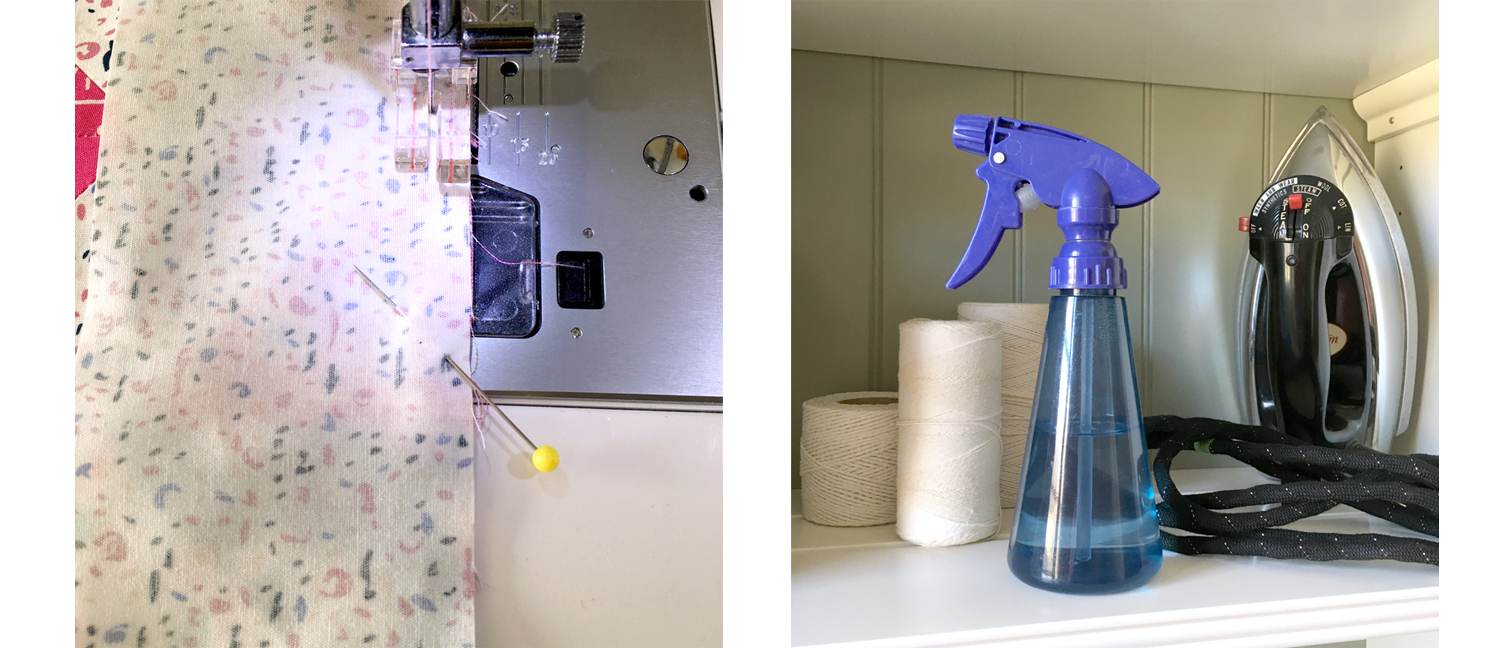
1. Always start cutting and sewing with wrinkle-free fabric. When piecing you'll want to press not iron. Pressing is the motion of picking the iron up and putting it down rather than sliding it across the surface. Use the correct setting for the type of material and keep the iron clean. When pressing a unit or block press the seam from the back first to set the seam then open the unit or block and press the piece open. Press as you piece so the block stays true to size. I do not recommend using a steam iron. Steam could distort the shape of pieces by loosing the weave. I inevitably burn my fingers from the steam and it just messes up my iron no matter what, it's not been my friend.
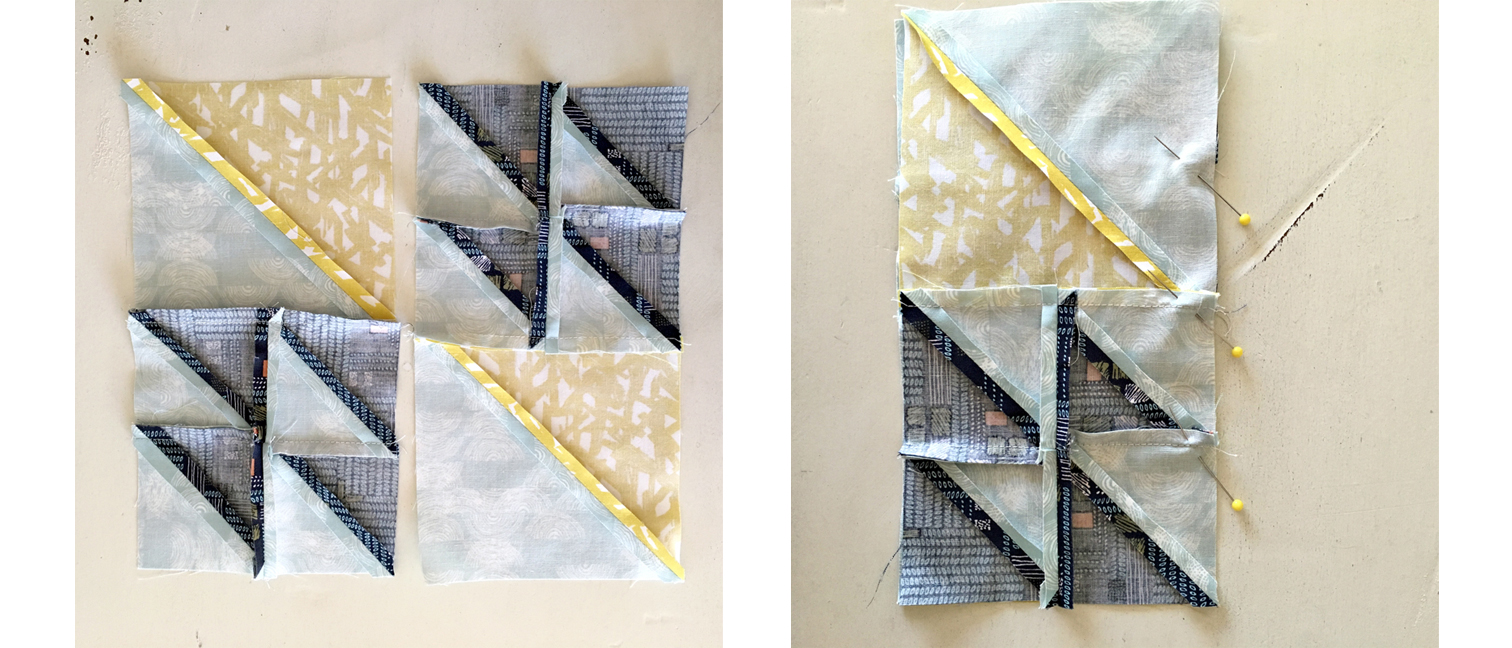
2. To press the seams for the #3 Flock block like I've done, press the seams on all the HST units open. Trim the dog ear corners to reduce bulk.

3. After sewing the 2 small HST units together, press the seams to one side so they can be nested when joining the two rows of two small HST units. I find when joining sections like this the nested seams are invaluable for locking the seams in place. Nesting seams before sewing means the seam allowances of each unit are going in the opposite direction. After joining the small HST units, this now becomes a section of the block; press the seams open on all sections.
Pressing tip: When the pressing direction is important, place the fabric to be pressed toward face up when pressing and opening. This trick will save time and result in the seams being pressed in the direction of the face-up fabric.
Pinning tip: I always pin when nesting seams and joining sections. Pinning helps to keep pieces and units from shifting when sewing. Pin seam allowances on a diagonal from right to left as shown, locking the seams in place. Do not sew over pins. Instead, stitch up to the diagonally placed pin, catching the leading seam allowance. With the needle in the down position, stop and remove the pin before proceeding.

4. Join the 2 large HST units and 2 HST sections into 2 rows of 2 units/sections each. Press seams to one side for nesting. Pin, stitch, and press the seams open.
5. When adding the frames, I press after each frame is added toward the frame strip because it will have the least amount of bulk in that direction.
Once my entire block is pieced and if I feel it needs to be flatter, I have a spritz bottle of regular tap water. The water, reactivates the mill sizing that will now act like starch (without the mess to your ironing board and iron). Your block is now (hopefully, a square) and if the pieces have been cut on the straight-of-grain, the straight-of-grain outside edges of the block will help to keep the shape of the square. I lightly mist my block and give it a good pressing with a hot iron (be sure to use the appropriate setting for your fabric). Remember, do not iron, this will distort and pull the block out of shape. Instead, press with an up and down motion and the block will remain true to size. If you'd prefer to use a steam iron, this would be the time to use it to make your block nice and flat instead of the spray bottle technique.
I've enjoyed watching your blocks as you post them to Instagram. Be sure to use the hashtag #SewcialBeeSampler when you post and tag @maureencracknell and myself @sharonhollanddesigns so we can see all your hard work. Any public IG account posting that uses the official hashtag will automatically be entered into the hashtag pool for our weekly giveaway drawings.
This Friday, February 17th, 2017 is my turn to host the weekly giveaway. I'll have a new post introducing you to this week's sponsor Sharon McConnell of Color Girl Quilts and all the details on how to enter on Friday.
P.S. I love you sew! Photo by Sharon Holland