Trimming HST and Flying Geese Units

Trimming HST and Flying Geese Units

IMG_0173 copy.jpg

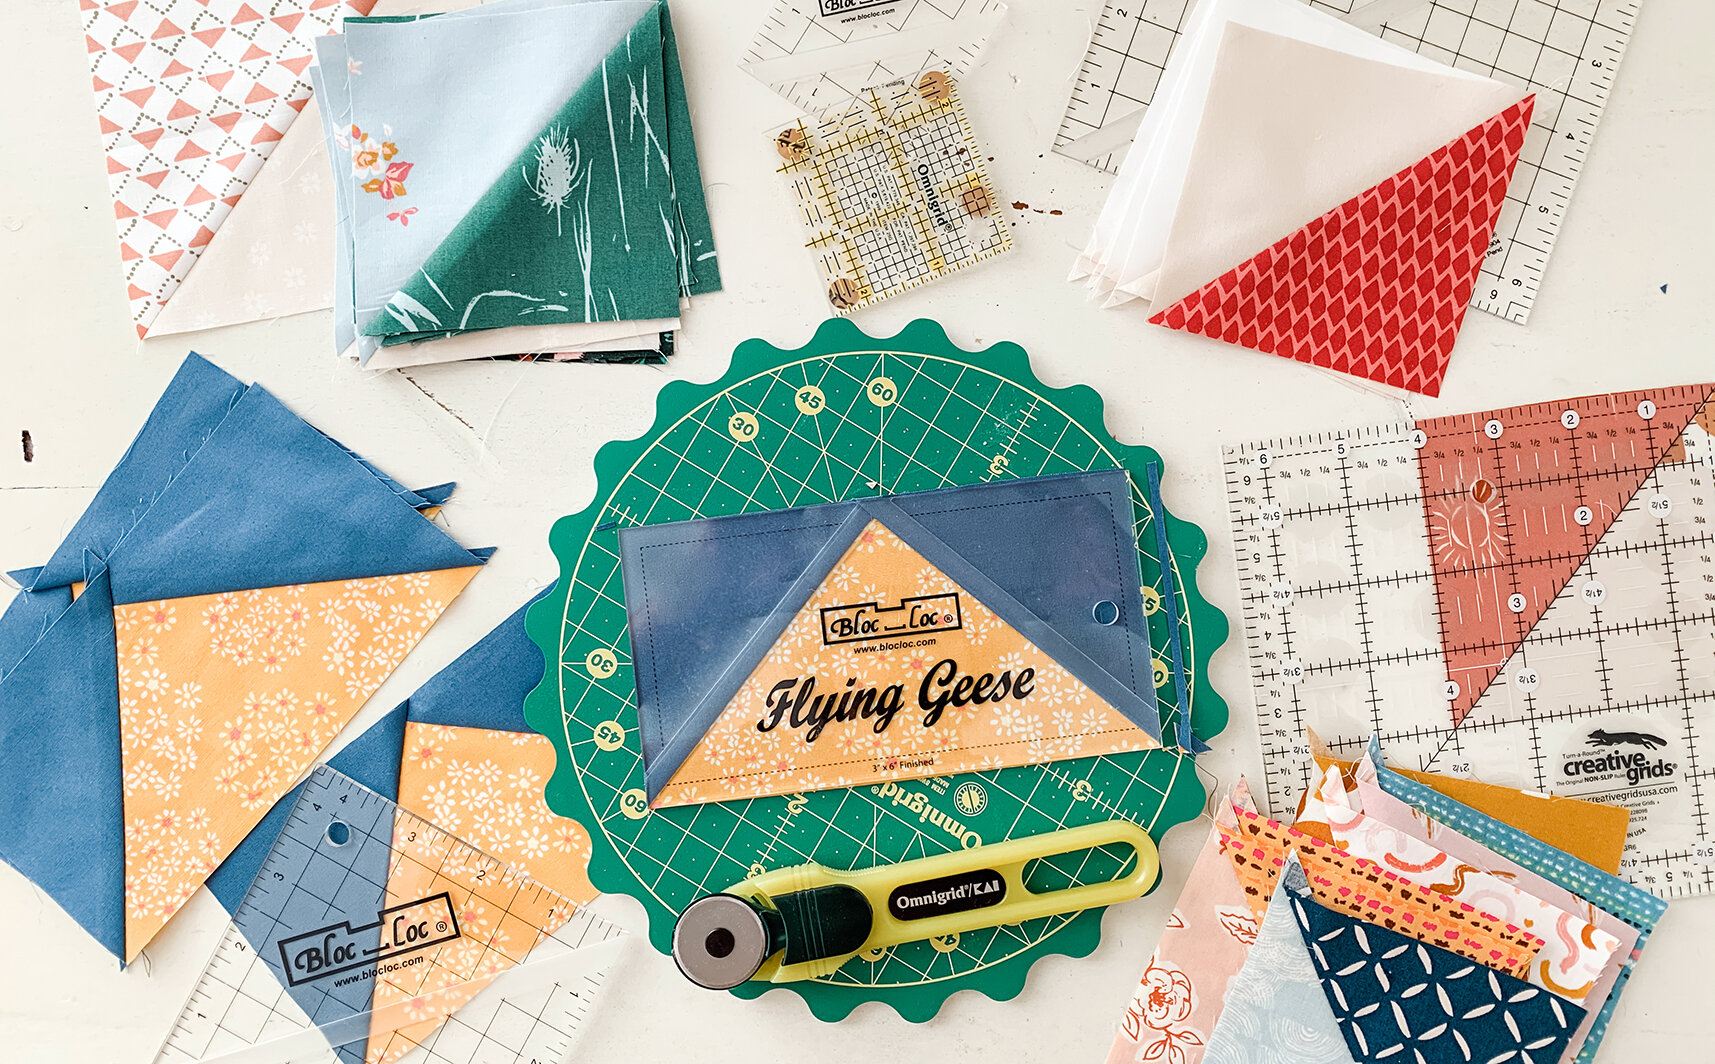
As a pattern designer I strive to make my patterns as easy as possible for all level of quilters to follow and for each maker to finish their quilt with true to size blocks and sharp points on units like Half-Square Triangle units (HST) and Flying Geese Units. Tips and tutorials make for better patchwork and in a recent discussion with my quilt testers group I realized many newer quilters are unsure of how to trim up units like Half-Square Trangkes and Flying Geese.

You’ll find many tutorials on this blog about how to make these different sort of units but I’ve not addresses directly on how to trim these units down to size if you don’t have specialty rulers like my favored Bloc_Loc Rulers. This seemed the perfect time to add this lesson as I’ve a new quilt pattern coming out in October that utilizes several different types of units.

IMG_0157.jpg
Template 4.jpg

Half-Square Triangles are the easiest units to trim to size and can be done without any specialty rulers. I’m using a left over HST unit from making Sweet Home roofs as an example in this tutorial.

Stitch two triangles together using a 1/4” seam allowance or make HST units according to a pattern instructions. Press unit open.

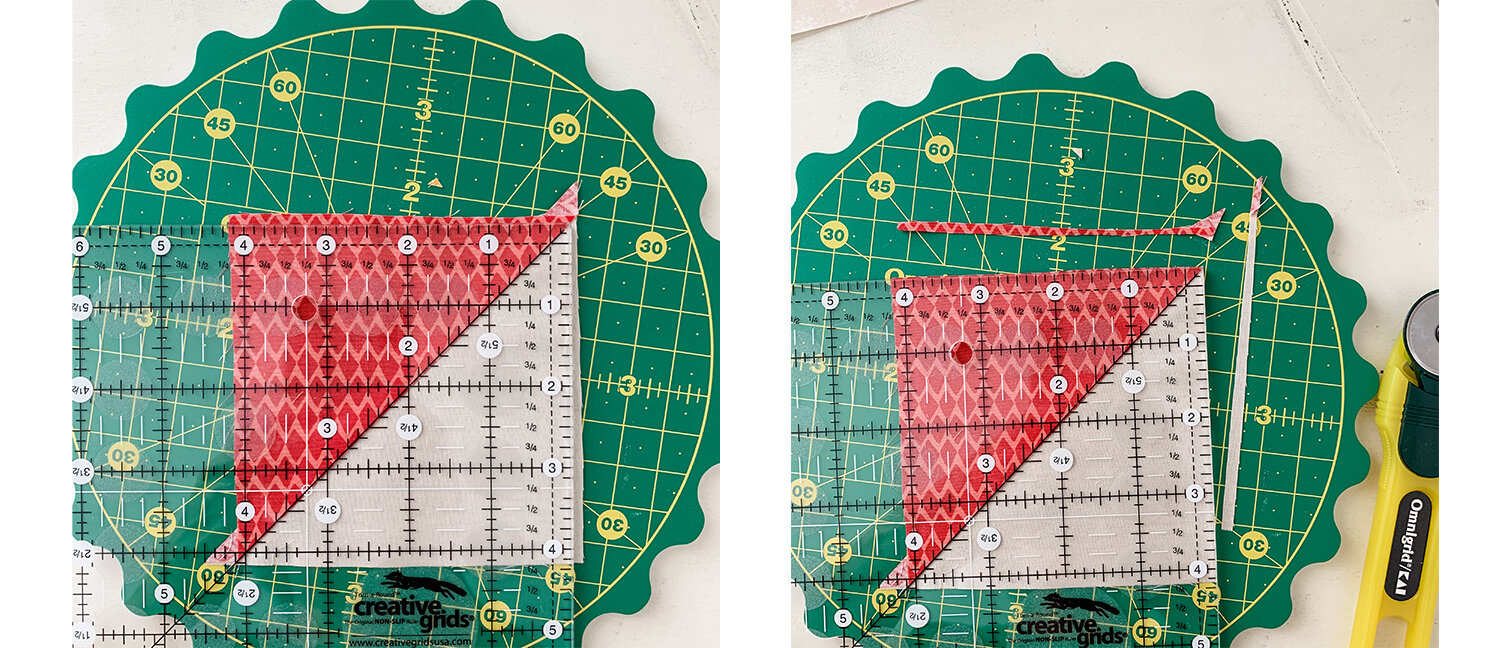
For this example I’m using a 6-1/2” square Creative Grids ruler that has a 45° diagonal line marking as well as the normal grid line markings. A square ruler works best for HST units.

In the above left image, use the ruler to size up the HST to see what usable size can be made by lining up the 45° marking with the seam line and making sure there’s at least a 1/4” seam allowance on all side. As you see, a 4’’ square or smaller can be made from this HST unit.

With the ruler in position, trim the top and right sides of the HST with a rotary cutter as seen in the above right image. Reverse these instructions if you’re left handed.

Template 5.jpg

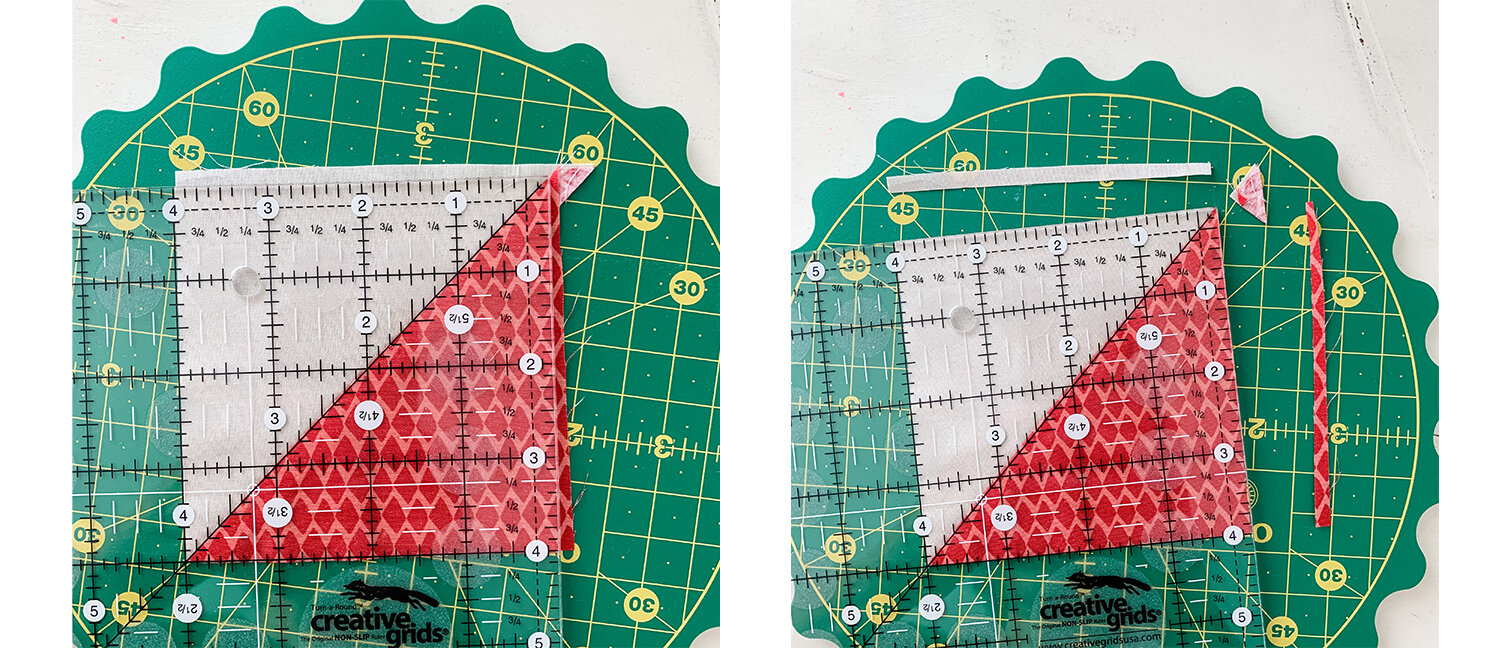
If working on a rotating mat, rotate everything 180° without disturbing the HST. If on a stationary mat, turn the HST so the trimmed sides are opposite of their starting point.

Slide the ruler down so the diagonal marking still aligns to the seam line and the 4” markings line up with the newly trimmed edges. Trim the two remaining sides to square the HST.

Template 6.jpg


The image above uses the same method to trim a HST unit to 5” square using a regular 6-1/2” square ruler and a 6-1/2” square Bloc_Loc ruler.

Trimming Flying Geese Units

Template 1.jpg

Flying Geese units take just a little more care when trimming and squaring to size. A regular square ruler is still the best tool for this job if you don’t have a specialty Flying Geese ruler for trimming.

I happen to have a square ruler the same width as what’s needed for my Flying Geese unit but a larger ruler would be just as useful but require a few more passes to cut since you could only cut up to two sides at once with a larger ruler.

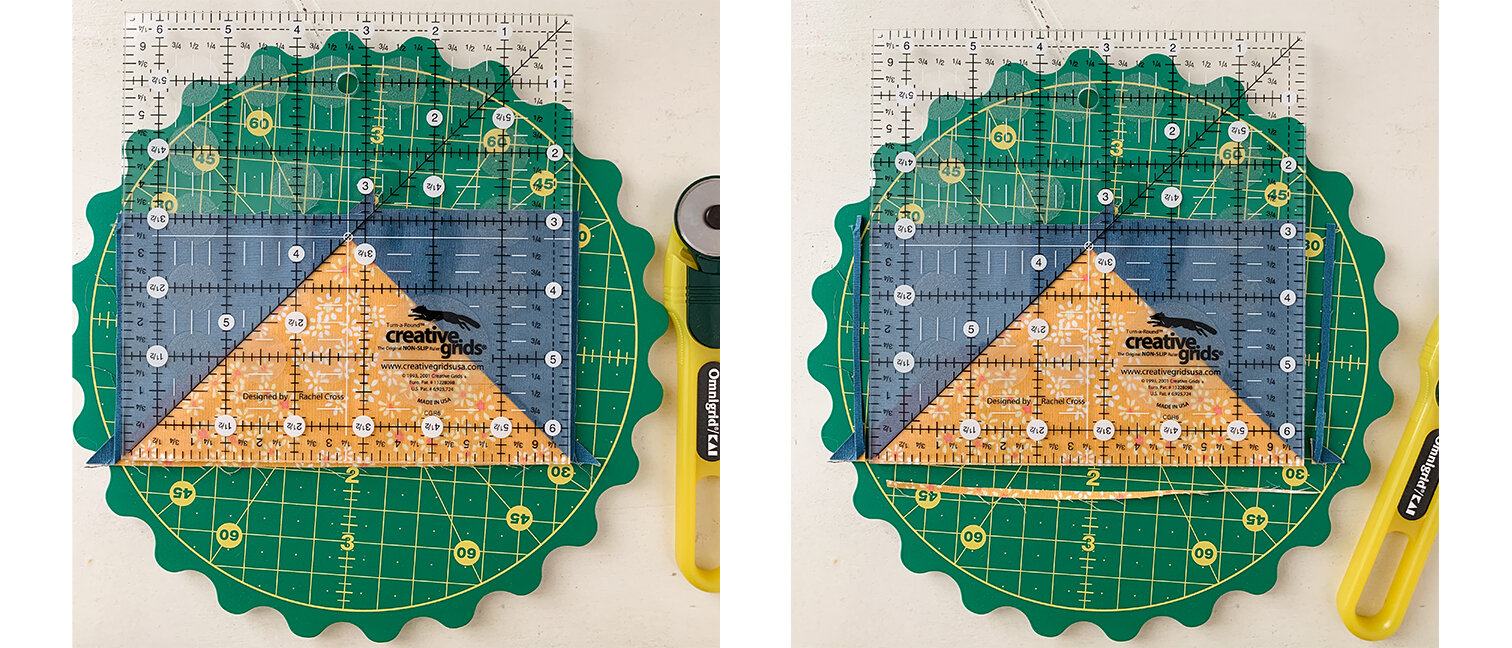
Determine the cut size of your Flying Geese unit. In this case I need to trim my unit to 3-1/2” x 6-1/2”. Subtract 1/4” from the height of the unit. Example: 3-1/2” minus 1/4” is 3-1/4”. This is well marked on my ruler as it’s the center of this 6-1/2” ruler. Place the measurement mark (in this case 3-1/4”) on the point of the Goose. The point of the Goose is used as the reference point and will help establish the 1/4” seam allowance. Note how the 45° marking on the ruler lines up with one seam line on the unit and there’s enough fabric on all sides of the Flying Geese unit for trimming.

Template 2.jpg

Trim both the sides and bottom edge of the unit as shown. If your ruler is larger, trim bottom and one side of unit.

Template 3.jpg

Rotate the unit or mat so the Goose now points down. Align the 3-1/2” mark (or the cut size needed) with the trimmed bottom edge of the unit (now located at the top).

Trim the Goose point edge and remaining side, if necessary so all outside edges have been trimmed as needed to size which includes the 1/4’’ seam allowance.

Template 8.jpg

Above shows the no-measure needed trimming of a Flying Geese unit using a Bloc-Loc Ruler.

There are other rulers on the market that are considered specialty rulers and cover more than one size of unit. I’ve only used the Bloc_Loc rulers but have heard good things about the Wing Clipper ruler from other quilters. Here are some examples available on Amazon using affiliate links:


HST Pile.jpg

Having all your units true to size will make patchwork assembly a breeze and no more fudging or wrestling your pieces into place. There’ll be no more clipped points, or wonky blocks. Taking time to trim and square up units is all part of the patchwork process and since you’ve already put in so much time and money into your beautiful quilt It’s well worth the extra effort to assure it’s made as well and as near perfect as it can be!

Happy trimmings!

Hold Tight Sew Along Week #3

Hold Tight Sew Along Week #3

Hold Tight Sew Along 3A Sq cover.jpg

Welcome to Week #3 of the Hold Tight Sew Along where I'll be sharing tips and tutorials to bring your quilting skills to a new level. No longer will curved piecing hold you back from stitching a quilt with curves! 

If you don't have the pattern already, you'll want to purchase the Hold Tight PDF pattern from my Shop page or from our friends at Fat Quarter Shop who now carries this pattern along with the Hold Tight quilt kit. If you’ve just discovered this blog or only just heard about this sew along, there’s still plenty of time to join in on the fun and take part in the sponsored giveaway prizes for each week of the event. To get up to speed, take a look at the Week #1 posting dedicated to color selection and working with colors like a designer.

Hold Tight Sew Along Banner web.jpg

The Hold Tight Sew Along tutorials are useful to anyone working with fabric and patchwork regardless what quilt is being made. In addition to my written posts, I’ve adding skill-building demonstration videos to further your learning experience. The videos support Weeks #1 through #3 and you’ll find these helpful videos on my Sew Along page. All the videos will be available on Week #1 of the sew along for those wanting to work ahead and will stay a permanent feature to resource in the future.

These blog posts serve to supplement the instructions but don't provide the detailed pattern information that you'll find in the PDF available for purchase. The Hold Tight pattern will have your material list, cutting requirements, full-size templates, and be fully illustrated. My supplementary blog posts are just that, supplementary and meant to guide you along as you sew and give general patchwork sewing information for anyone sewing curves.

Hold Tight Piecing.jpg

Even though I’ve labeled this pattern an intermediate skill level quilt pattern, I firmly believe that even a confident beginner can tackle curved patchwork with ease because you’ve completed the following:

  1. You’ve printed out the PDF instructions and templates to 100% scale (not borderless) onto US letter size paper and because you’ve cut your fabrics true to size (see Hold Tight Sew Along Week #2 post).

  2. You’re sewing with an accurate seam allowance. As with any patchwork sewing its imperative to stitch with an accurate 1/4” seam allowance. Take a moment to read the Seam Allowance section on my Perfect Patchwork tutorial.

I’ve prepared bonus videos for this week’s tutorial and you’ll find the Hold Tight Sew Along Week #3 parts 1 and 2 are extremely helpful for pinning, sewing, press, and squaring up your blocks. Find all the Hold Tight Sew Along videos on my Sew Along page.

Sewing Curves

Sewing Curves 1.jpg

First image: To begin, find the center of an A and B shape and finger press a crease. With the largest A shape on the bottom (right side up), pin midpoints with the smaller B shape, right side down, on top.

Second image: Align a short, squared end of the B shape to the corner (straight) edge of the A shape and pin. Repeat on the other side.

Sewing Curves 2.jpg

Place the pinned pieces over your knee or a pressing form to help the curved pieces align. Place additional pins at equal distances so the curved edges match.

Sewing Curves 3.jpg

Using an accurate 1/4” seam allowance, stitch with a short (2.4-2.6) stitch length. Slowly sew the seam along the curve with the sewing machine needle in the down position. By having the needle lowered into the fabric when the machine is stopped this allows the presser foot to be raised and holds the fabric in place without loosing the needle position.

Remove pins as you sew. Avoid pulling or pushing the pieces to be sewn so as not to stretch the bias curved edges. Continue to check that the raw edges are matched and lift presser foot to reduce any bulk in fabric before lowering and continuing to stitch.

Sewing Curves 4.jpg

Once two pieces have been sewn together, finger press the seam open. Press block in an up and down motion (not side to side) to avoid distorting the block.

Note: For this quilt I recommend pressing the seams open because it will be easier to assemble the quilt top and avoid bulky seams.

If you’re piecing a B/B/C block where three shapes are sewn to make a block, press the first seam open before proceeding to stitching the second seam. Once a block(s) are pieced, proceed to Squaring the Blocks.

Squaring the Blocks

Hold Tight Template Cutting 2.jpg

Use the Block Trimming Template found in the PDF and make a plastic template. Transfer all markings onto the plastic. See Week #2 blog post. I’ve added in some extra wiggle room into the Hold Tight blocks and they’ll need to be trimmed exactly to size for quilt assembly. Tip: Use rolled Washi tape to hold the plastic template in place while cutting. This also allows the template to easily be rotated when trimming a different side.

First image: For an A/B, align the square edge of the Block Trimming Template to the right angles of the A shape (lower left) as this piece will have the least amount of distortion from sewing.

Use the curve marking of the Block Trimming Template to match template with the curved seam on the block.

Second image: Before trimming the block to size, take a moment and make sure the seam allowance area of the Block Trimming Template is covering fabric on all sides and that the curve(s) of the template and block match and seam allowances are true. Trim sides as necessary to square the block.

Hold Tight Template Trimming 3.jpg

When trimming a B/B/C block, use both curve markings on the Block Trimming Template (see second image where the curved markings have been highlighted in black). Align template to block curves and double check that seam allowance is correct on all sides before trimming.

HoldTightSewAlong Sponsor.jpg

A sew along’s a lot more fun with sponsors and giveaways, right!? Our friends at Dritz Sewing, the Fat Quarter Shop, Hobbs Batting, and Omnigrid have generously provided the Hold Tight Sew Along with products I know you’ll love! 

Every Friday I’ll be posting weekly a giveaway on Instagram. By using the hashtag #HoldTightSewAlong on Instagram every time you post sew along photos to a public account (private account posts don’t show up in hashtag pools) your IG account is automatically entered into the weekly sew along drawings! Ideas for what to share include your sew along progress, the “I’m a maker” sew along badge found HERE, your fabric pull, blocks, and finished quilt. Be sure to follow me on Instagram @sharonhollanddesigns so you never miss a thing!

THIS WEEK'S GIVEAWAY SPONSOR IS FROM Hobbs Batting

Hobbs Giveaway.jpg


I’m so excited for this week’s giveaway. Our friends at Hobbs Batting are offering batting prizes for two winners. We’re holding a giveaway here on the blog (see entry details below) and another winner drawn from the #holdtightsewalong Instagram hashtag pool.

logo-tuscany.jpg

The lucky winners will be able to select three, throw-size batts of their choice from the following fine quality Hobb’s Tuscany brand battings. I personally love the Hobb’s Tuscany batting collection and found it to be the best batting for handling, drape, stitch definition, and quality.

Tuscany Poly

Tuscany Unbleached Cotton

Tuscany Bleached Cotton

Tuscany SUPREME Cotton

Tuscany Cotton/Wool

Tuscany Wool

Tuscany Silk


Giveaway now Closed. Congratulations to Margaret Swan!

Note: This giveaway is open to EVERYONE! If you're a "no reply" or anonymous commenter, please remember to include your email address in your comment--you can't win if I can't get a hold of you!

1. Simply leave a comment here under this post! (First comment entry).

2. Follow Hobbs batting on one of their social media platforms *  Blog  *  Instagram  *  Facebook  *  Just let me know that you did by making a separate comment here to record that entry. (Separate comment - second entry). 

3. My followers get a third entry! If you follow via subscribing to my posts, through Bloglovin (or other service), or on Instagram, just let me know by making a separate comment here to record that entry. (Separate comment - third entry). 

4. Help spread the word!! I know that many of you already do, so I thought it would be nice to add that as another way to enter! Spread the word about the Hold Tight Sew Along on YOUR instagram, facebook, tweet, pin, blog post, etc... (separate comment - fourth entry). 

That’s FOUR possible entries! Enter now through Monday, April 8th! The winner will be picked at random around 4 pm Eastern. I will post the name of the winner on this post once they've been notified and responded to my email.

Don't forget the giveaway for this week is also held on Instagram for an additional chance to win and will be randomly drawn on Monday. The winner is randomly drawn from the posts in the hashtag pool. By posting images of your Hold Tight color inspiration, fabric pull, blocks, or quilt. Use the official #holdtightsewalong hashtag every time you post your makes (to a public account) and you're automatically entered into the weekly IG drawings! See my Instagram Friday giveaway posts @sharonhollanddesigns for full details and don’t forget to tag me too! 

Are You Ready to Sew?

Are You Ready to Sew?

Thread Heart photo by Sharon Holland

Thread Heart photo by Sharon Holland

Great news everyone, there's going to be another free sew along this year! May co-host, good friend, and Art Gallery Fabrics sister designer Maureen Cracknell and I will be hosting another block-of-the-week sew along and it's going to start February 21st! Be sure to follow us both on our blogs, Instagram at @sharonhollanddesigns and @maureencracknell for all the upcoming details. Next week we will give you your first peek at the new name, new look, and a Maker button to share on your blog and/or Instagram feed. Everything you loved about the Sewcial Bee Sampler will be there plus we took into account all the wonderful feedback from last year's survey. We're hoping you'll love this new sampler even more. 

2017 block from the Sewcial Bee Sampler with Bountiful and Pure Elements fabrics from Art Gallery Fabrics

2017 block from the Sewcial Bee Sampler with Bountiful and Pure Elements fabrics from Art Gallery Fabrics

In preparation for all that sewing you'll be doing I wanted to give you a little pre-flight checklist so your sewing experience can be a good one. 

Machine Maintenance 

BG0A3948.jpg

Having your sewing machine in tip-top running condition is a must. Not only does it protect your investment but it makes for a hassle-free sewing session. Check out my past tutorial on how to clean your machine and help it perform at it's best. 

Accurate Sewing

IMG_2334.jpg

You heard me say it a million times last sew-along "sew with an accurate 1/4'' seam allowance." I'm going to always stress that point and it's the number one reason beginning and seasoned quilters get wonky blocks and clipped points. Make sure you're starting out on the right foot and review my Perfect Patchwork tutorial

Pressing Questions

Pressing 5.jpg

Pressing is always a question every quilter has. The answer is, "Yes, and often." I press my fabric before I cut it and after every time it's been stitched. I especially think it's important to press before cutting apart units like Half-Square Triangles, Flying Geese, etc. By pressing the fabrics before cutting apart it not only flattens the unit but sets the seams and helps for a sharp edge once the unit is opened. Read more on the Perfect Patchwork tutorial page. You'll also find my favorite sure-fire, easy pinning method. 

Stip Cutting

Strip Cutting 1.jpg

Another must for making your patchwork effortless is starting with accurately cut strips and shapes. Even the small amount off will cumulate once pieces are sewn together and your block again can be wonky or way off the mark. Review how to straighten the edge of your fabric before cutting strips and how to cut the right size strips and shapes for your blocks here

Directional Prints

Print Direction 3.jpg

One of the things I noticed about last years sampler blocks was the desire for quilters to have their chosen prints all running the same direction. In the past I've not been overly concerned about that because I think of a quilt as an object that is seen from all directions and not static. But, it was a good eye-opening for me to realize that others did find this something they wanted to achieve in their work. To help with that problem, especially when making units like Half-Square Triangles and Flying Geese I put together a little tutorial for controlling the direction of prints

Prints designed by Sharon Holland for Art Gallery Fabrics

Prints designed by Sharon Holland for Art Gallery Fabrics

You have a little less than two weeks to dust off your machine, finish up UFOs, and get ready for some sewing fun with Maureen, myself, and the amazing other Makers online that take part in our virtual sew along. I'm looking forward to seeing all your beautiful makes and reconnecting. 

With love,

Sharon