Community Sampler Giveaway Week #6

Community Sampler Giveaway Week #6

Dritz Products.jpg

Each Friday that Maureen Cracknell and myself are co-hosting the Community Sampler will be a Giveaway Friday. We've coordinated special prizes with our amazing participating sponsors for a giveaway each and every week! If you've happened to miss the first Community Sampler posts, take a look back from the first post Community Sampler Week #1 to get caught up to the present. Feel free to start sewing with us at anytime--it's never too late to join in, and it's free! 

CS Promo banner 2.jpg

COMMUNITY SAMPLER SPONSORS

TODAY'S FEATURED COMMUNITY SAMPLER SPONSOR IS Dritz!

The Dritz story spans nearly 100 years, and encompasses tens of thousands of creative products. What began as a family business in 1920s New York City, is today a storied brand that is recognized by DIY enthusiasts around the world. Today, Dritz embodies a heritage of quality, value and innovation. Sewists and quilters alike turn to Dritz for top-notch quilting and sewing supplies. Dritz is conveniently sold via mass merchants, independent shops and online retailers, so it’s readily available where and when you need it. - See more at: Dritz!

Products  *  Projects & Patterns  *  Instagram  *  Blog  *  We hope you enjoy visiting Dritz!

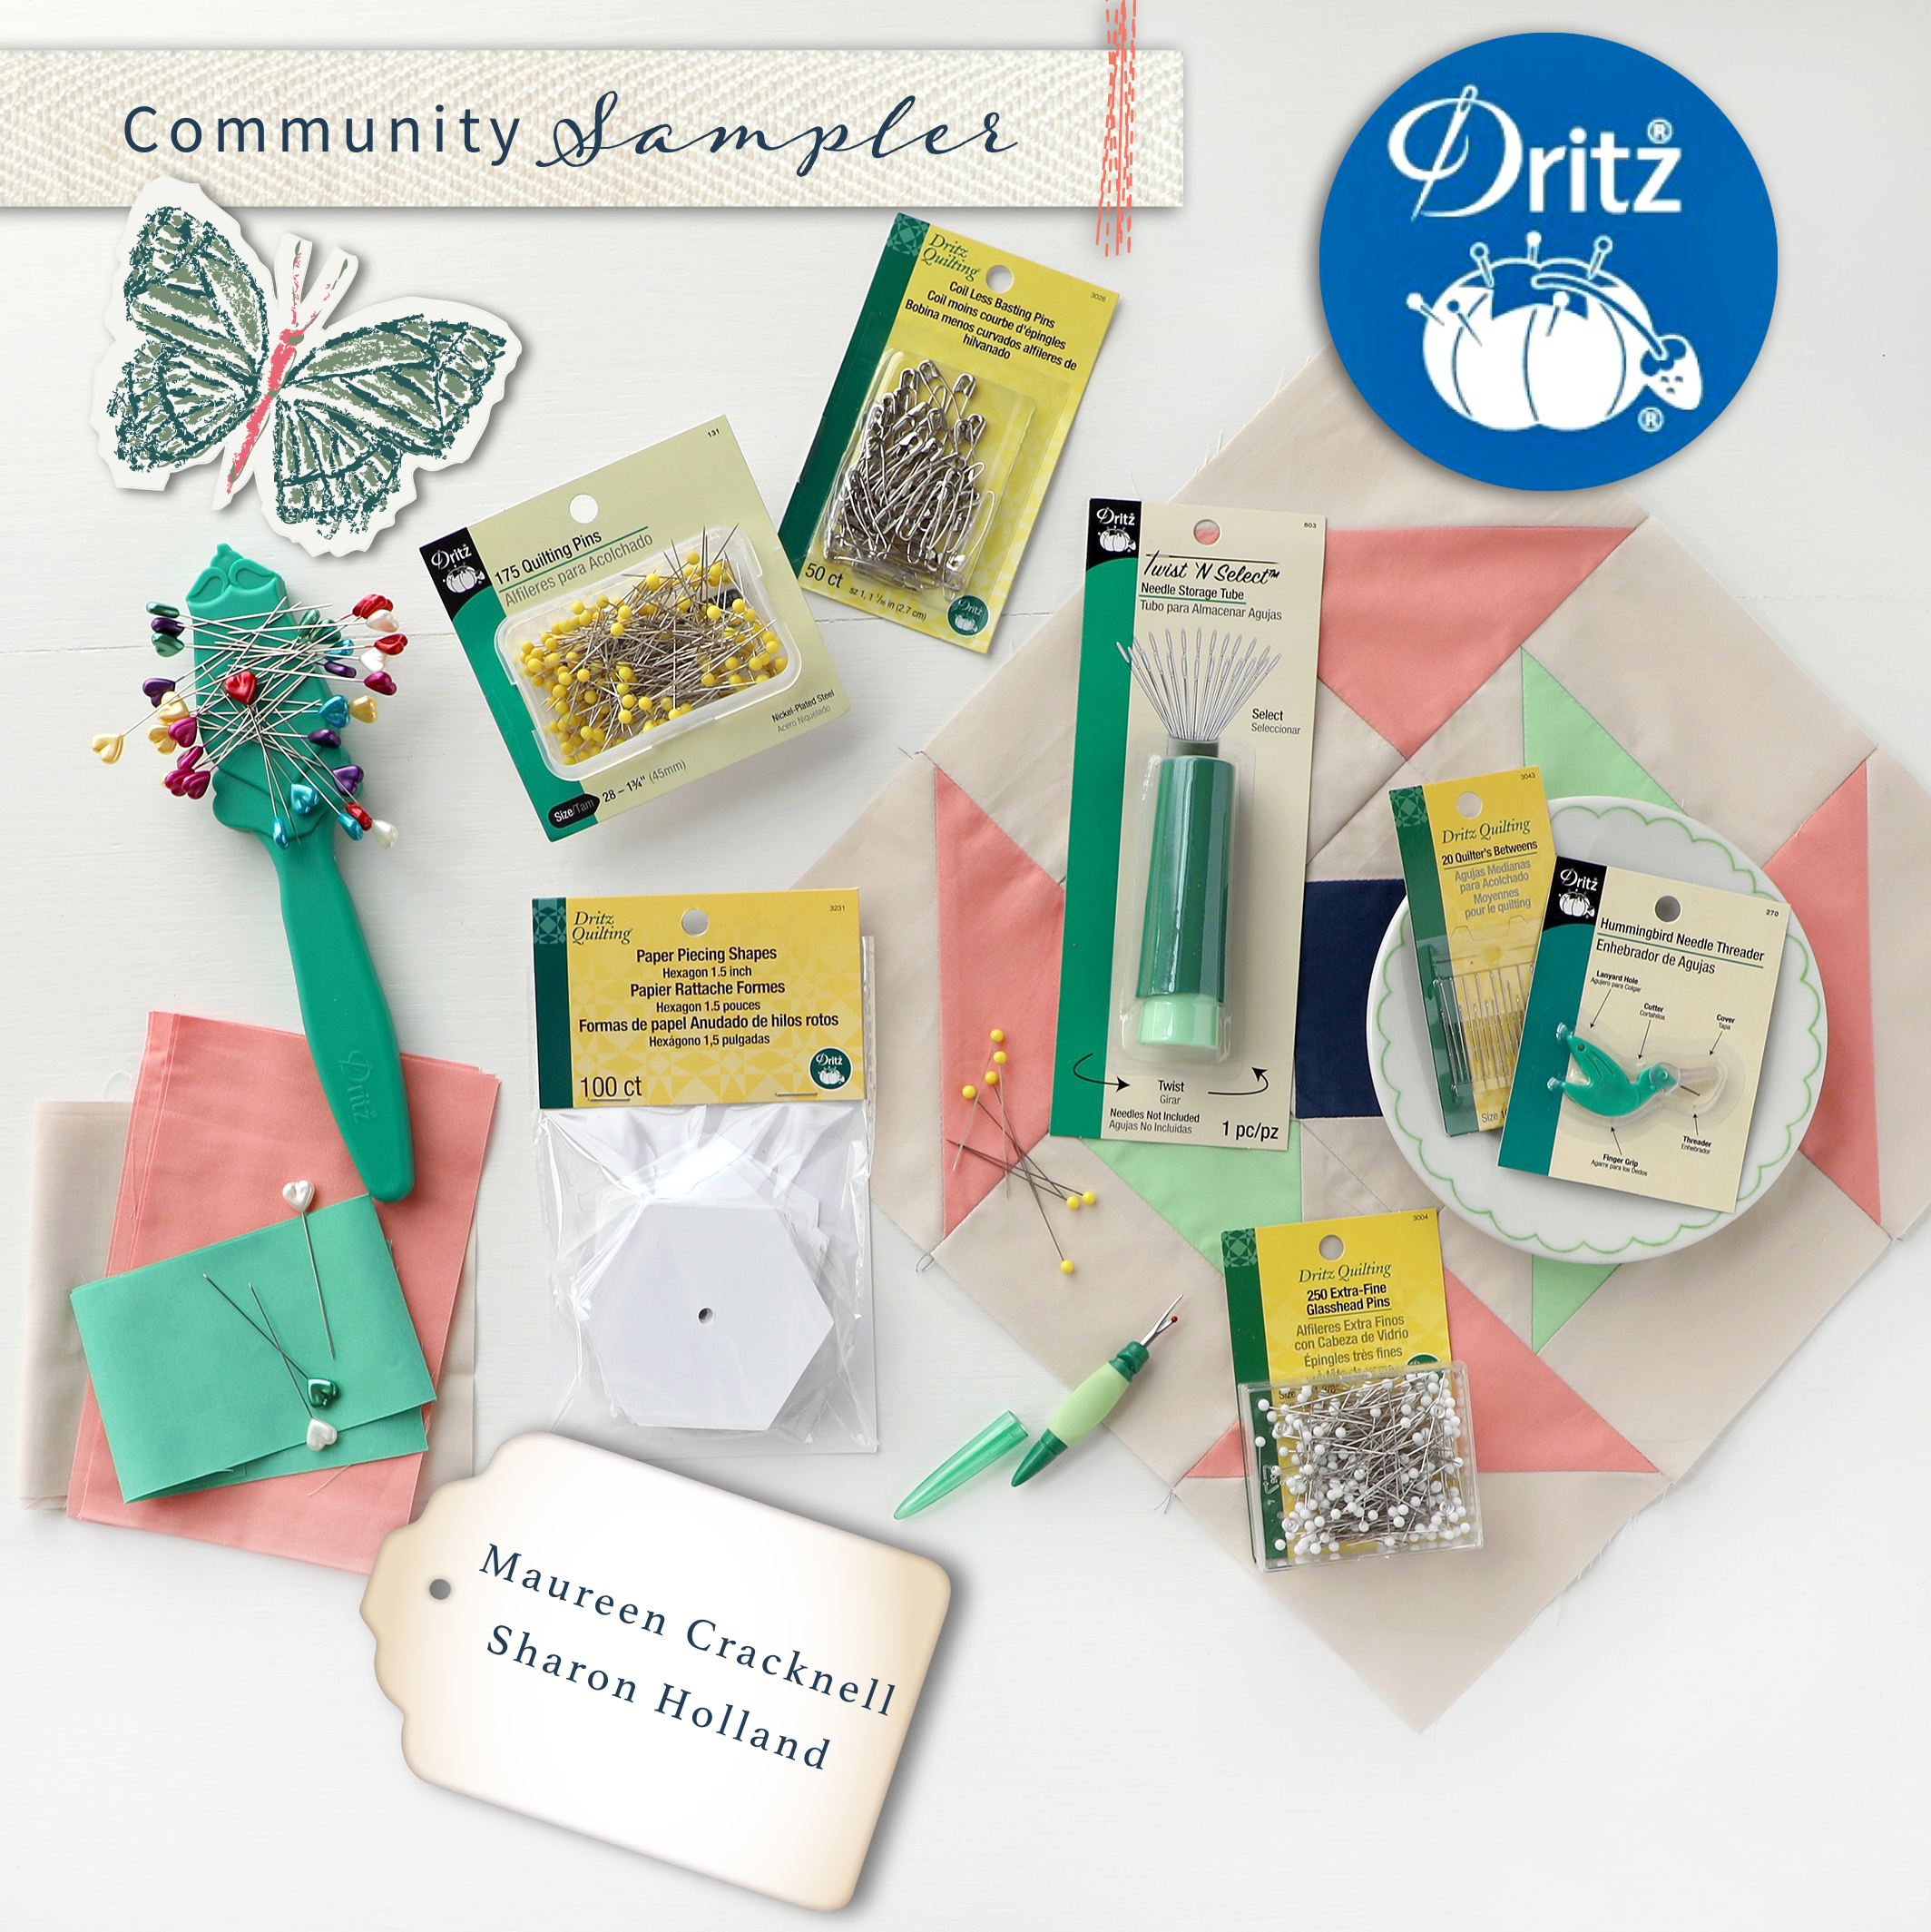
For this week's Community Sampler Giveaway, Dritz is offering an incredible prize! Both the blog and Instagram winner will receive all of the wonderful Dritz sewing/quilting products shown below! 

BG0A4930.jpg

The items included in this fabulous giveaway are the following:

Quilting Pins

Extra-Fine Glasshead Pins

Coil Less Basting Pins

Magic Pin Wand

Hummingbird Needle Threader

Small Seam Ripper

Pearlized Heart Pins

Twist 'N Select® Needle Storage Tube

Hexagon Paper Piecing Shapes

Quilter's Betweens Needles

Thank you Dritz for this generous prize!


This Giveaway is now Closed. Congratulations Delaine for being our Dritz giveaway winner!

* Note * This giveaway is open to EVERYONE! If you're a "no reply" or anonymous commenter, please remember to include your email address in your comment--you can't win if I can't get a hold of you!

1. Simply leave a comment here under this post! (First comment entry).

2. Follow Dritz on their Blog and/or Instagram. Just let me know that you did by making a separate comment here to record that entry. (Separate comment - second entry). 

3. My followers get a third entry! If you follow via subscribing to my posts, through Bloglovin (or other service), or on Instagram, just let me know by making a separate comment here to record that entry. (Separate comment - third entry). Note: I'm no longer on Facebook.

4. Help spread the word!! I know that many of you already do, so I thought it would be nice to add that as another way to enter! Spread the word about the Community Sampler on YOUR instagram, facebook, tweet, pin, blog post, etc... (separate comment - fourth entry). 

That’s FOUR possible entries! Enter now through Monday, April 2nd! The winner will be picked at random around 4pm Eastern. I will post the name of the winner on this post once they've been notified and responded to my email.

Happy Easter,

Sharon

Community Sampler Week #6

Community Sampler Week #6

BG0A5269.jpg

Welcome to week #6 of the Community Sampler sew along where we not only work on our patchwork piecing techniques but also share our makes on Instagram and have fun with a like-minded community of quilters. My co-host and sister Art Gallery Fabrics designer Maureen Cracknell and I are so happy to have you sewing with us and look forward to spending the next few months with you.

CS Promo banner 2.jpg

There are eleven blocks in our quilt and each Wednesday will be a new PDF block release or finishing step for the quilt. If you are just joining us, pick up the Introduction PDF on the Sew Along page and you'll get a material list along with coloring pages so you can get started planning your quilt. Then, work your way through the first Community Sampler post to the present.

Many of the patchwork units (like Quick-Corner, Flying Geese, Half-Square Triangle, and Square-in-Square units) used in this year's sampler have already been oversized to allow for trimming and squaring of units before assembling your block. Please cut your pieces EXACTLY as given in each of the PDF instructions because bumping up the size of the pieces from the measurements give will not bring great results in some cases. Take advantage of my in-blog tutorials for each of the different quilting techniques used in our sampler.

Accurate cutting and use of a true 1/4'' seam allowance is a must for successful patchwork piecing. All your blocks will measure 12-1/2'' square (unfinished). Review how to cut strips, sew with a true 1/4'' seam allowance, and other helpful piecing tips on my "Are You Ready to Sew" post.

Let's start sewing the Fairground block. Download the free PDF on the Sew Along page.

BG0A5144.jpg

Square-in-Square Unit Tutorial

Use the following link for review how to make Half-Square Triangle (HST) units and No-Waste Flying Geese units that we've already used in earlier Community Sampler blocks. There's a lot of moving pieces in the Fairground block and accuracy is always our goal. The more seams in a block the more even minor discrepancies will start to multiply into a big mess. Make sure all pieces are true to size as you work and you maintain an accurate 1/4" seam allowance when sewing and the pieces will go together beautifully.

If you're wanting to use directional prints for either the HST units or the Flying Geese units you may want to check out my tutorial for controlling directional prints that was posted during the Sewcial Bee Sampler sew along. 

To see how this Square-in-Square unit is created in a video, view the Bloc_Loc method for making this units in the Flying Geese rulers tutorial or follow along with my step out tutorial below.

IMG_5318.jpg

Cut the two 3-1/4” in half diagonally to make four HST pieces

Fairground 1.jpg

Fold the 3-3/8” fabric D square in half and press to crease.

Fairground 2.jpg

Stack two fabric A HST pieces with edges matched. Center and align the point of the stacked triangles with the vertical crease line and straight edge matching the edge of the square.

Trim dog ears of stacked triangles with edges of the square.

Fairground 3.jpg

Rotate the square 90° so crease line is now parallel with top edge of square. Place a trimmed triangle right sides together and edges matched to top edge of square. Stitch with a 1/4” seam allowance.

Press corner out. Repeat for the opposite side.

Fairground 4.jpg

Rotate the pieced section 90° and use the vertical crease line to center an untrimmed triangle. Stitch to section, noting how the stitch line enters and exits at the “V” where the two fabrics intersect. Press corner out. Repeat on the remaining side to make a Square-in-Square unit.

Fairground 5.jpg

Trim unit to 4-1/2” square, leaving a 1/4” seam allowance on each side. If using the Bloc_Loc 2” x 4” Flying Geese ruler to trim your Square-in-Square unit, trim one side at a time, rotating your unit 90° between each trim. Watch the Bloc_Loc tutorial for piecing and trimming of a Square-in-Square unit.

IMG_5336.jpg

I pieced my Fairground block with a slight variation from the instructions. Instead of cutting four 2-1/2” x 4-1/2” rectangles from fabric A, I cut those four rectangles from my blue fabric D. This gave the block more visual weight on the edges and created an octagon shape within the block.

BG0A5475.jpg

For my sampler I'm sewing with Art Gallery Fabrics Pure Element solids. I've been getting a lot of questions as to the exact colors I'm sewing with so I will start including a swatch image each week showing the sku number of each solid. Clockwise from the peach is Grapefruit, Creme de la Creme, Night Sea, and Pistachio Creme. 

BG0A5347.jpg

My completed block! I like it's playfulness and all the second and maybe third designs these patchwork shapes make. Have fun with your block and don't be afraid to add more or even less different fabrics into it to make it your own.

If you notice I had to pull out the seam ripper to correct sewing that top row upside down--oops. This stuff happens and I don't care how seasoned a quilter you are--that's why seam rippers were invented!

Community Sampler Sponsors

Sponsors Graphic Use-01.jpg

Lady Belle Fabric  Omnigrid   Aurifil Thread  Art Gallery Fabrics 

Hobbs Batting  Dritz  Fat Quarter Shop  Bloc-Loc

My co-host Maureen Cracknell and I are continually amazed by the joy and excitement each of you bring to our virtual community. Thank you for making this sew along so special. Please visit Maureen's blog and see the progress she's making on her sampler quilt, using her beautiful AGF fabrics Love Story collection. Be sure to use the #CommunitySampler hashtag when posting your blocks to Instagram and tag both my @sharonhollanddesigns and @maureencracknell so we don't miss any of your beautiful work!

Don't forget that this Friday's a Giveaway Friday on the Community Sampler sew along. Maureen and I will take turns hosting a giveaway each week where one of our generous sponsors will be featured and offering amazing prizes both here on our blogs and also on Instagram. I will be hosting the giveaway this Friday and you'll be instructed how to enter at that time.

Happy sewing!


Community Sampler Giveaway Week #5

Community Sampler Giveaway Week #5

Love Story Enchanted CS.jpg

Each Friday that Maureen Cracknell and myself are co-hosting the Community Sampler will be a Giveaway Friday. We've coordinated special prizes with our amazing participating sponsors for a giveaway each and every week! If you've happened to miss the first Community Sampler posts, take a look back from the first post Community Sampler Week #1 to get caught up to the present. Feel free to start sewing with us at anytime--it's never too late to join in, and it's free! 

CS Promo banner 2.jpg

Community Sampler Sponsors

TODAY'S FEATURED COMMUNITY SAMPLER SPONSOR IS the Fat Quarter Shop!

Fat Quarter Shop logo.jpg

The Fat Quarter Shop was founded in 2003 by Kimberly Jolly. An avid quilter, Kimberly began her shop as a side business while still working a corporate position, cutting, packing and shipping right out of her house during evenings and weekends. From the very beginning, she was committed to delivering top-notch service for every single order and customer. As the Fat Quarter Shop's reputation grew, Kimberly decided to make it a full-time operation. Her husband Kevin joined her not long after, and with his help, lots of hard work, and a tireless commitment, the store began to grow. Over the past few years a few more people have joined the staff! As a team, they continue to branch out with the best fabrics, exclusive kits, quilt clubs, BOMs, and more. And they will always be driven by the passion that Kimberly founded the store upon, which is always giving you the best products and service!

SHOP  *  PINTEREST  *  TWITTER  *  BLOG  *  FACEBOOK  *  YOUTUBE 

We hope you enjoy visiting Fat Quarter Shop! 

Love Story Enchanted 3.JPG

This week the Fat Quarter Shop is offering the Enchanted Love Story Fat Quarter Bundle that includes TEN love-themed, colorful prints designed by my co-host Maureen Cracknell for Art Gallery Fabrics! You can find the Love Story collection in a variety of bundles, as individual prints and quilt kits available HERE at Fat Quarter Shop!

Love Story Enchanted 2.JPG

ENTER TO WIN!

Here's how: Since Maureen and I are taking turns hosting the Community Sampler Giveaway Fridays, this week is Maureen's turn so I'm sending you to Maureen Cracknell's blog to enter!

A BIG thanks to all of you who are joining the Sewcial Bee Sampler sew-along and to those who enter our Giveaway!  ♡ Sharon

Community Sampler Week #5

Community Sampler Week #5

Cactus 1 2.jpg

Welcome to week #5 of the Community Sampler sew along where we not only work on our patchwork piecing techniques but also share our makes on Instagram and have fun with a like-minded community of quilters. My co-host and sister Art Gallery Fabrics designer Maureen Cracknell and I are so happy to have you sewing with us and look forward to spending the next few months with you.

CS Promo banner 2.jpg

There are eleven blocks in our quilt and each Wednesday will be a new PDF block release or finishing step for the quilt. If you are just joining us, pick up the Introduction PDF on the Sew Along page and you'll get a material list along with coloring pages so you can get started planning your quilt. Then, work your way through the first Community Sampler post to the present.

Many of the patchwork units (like Quick-Corner, Flying Geese, Half-Square Triangle, and Square-in-Square units) used in this year's sampler have already been oversized to allow for trimming and squaring of units before assembling your block. Please cut your pieces EXACTLY as given in each of the PDF instructions because bumping up the size of the pieces from the measurements give will not bring great results in some cases--especially in this week's block. Cut carefully and as stated in the instructions. Take advantage of my in-blog tutorials for each of the different quilting techniques used in our sampler.

Accurate cutting and use of a true 1/4'' seam allowance is a must for successful patchwork piecing. All your blocks will measure 12-1/2'' square (unfinished). Review how to cut strips, sew with a true 1/4'' seam allowance, and other helpful piecing tips on my "Are You Ready to Sew" post.

Week #5-01.jpg

Let's start sewing the Cactus block. Here we make two, half-blocks that fill positions 4 and 5 in our quilt. Download the free PDF on the Sew Along page.

Tutorial for Piecing the Cactus Block

The success of this block rest solely in your ability to cut and sew accurately. You'll be put to the test here and hopefully rewarded for your efforts.

If you're wanting to use directional prints for either the HST units or the rectangle units you may want to check out my tutorial for controlling directional prints that was posted during the Sewcial Bee Sampler sew along. 

Rectangle Units

Cactus 1.jpg

Cut your A and B pieces exactly as stated in the instructions. Yes, that means a true 7/8" on the end of those cut size numbers. The reason we are using a 7/8'' measurement rather than rounding up to the nearest full number is we are cutting our pieces on the diagonal and creating our necessary 1/4" seam allowance on our pieces and not trimming down when done. 

Draw a diagonal line on the wrong side of each 2-1/2" fabric A square. Noting orientation of the drawn line, place a marked square right sides together on a corner of a 2-1/2" x 6-7/8" fabric B rectangle as shown in the instructions. 

Sew just outside the line (a needles worth) to keep the unit square. Trim 1/4" past the sewn line (like we've done in making other types of units). Press toward the darkest fabric. 

Cactus 2.jpg

Note that I've rotated my pieced rectangle so I can align the 45° mark on my ruler with the long edge of my rectangle. Rulers vary for where these additional markings are placed and you will have to flip your ruler around a bit to get the 45° angle aligned to a long edge according to your ruler and if you're right or left handed.

Noting orientation of the seam and using the straight edges and 45° marking on a ruler, cut the opposite end of the rectangle diagonally, creating an angled end parallel (running the same direction) to the stitch line. Cut diagonally from the corner point of the rectangle on a 45° angle. This makes one A/B rectangle unit that measures 2-1/2" x 6-7/8". Make a total of four in this orientation. 

Catcus Mirror.jpg

In the same manner as in the steps above, and noting the orientation of the drawn line and parallel diagonal edge cut, make a total of four A/C rectangle units. Press seams toward the dark fabric.

Cactus 3.jpg

Notice how I've rotated my rectangle and aligned the 45° marking on my ruler on the long edge of the unit. These are just two different rulers but the results are the same, rulers can vary for where they've included these extra markings. Just make sure the diagonal cut is parallel (running the same direction) to the stitch line and cut from the corner point of the rectangle on a 45° angle. 

Cactus 4.jpg

Sew a large fabric A triangle (a 4-7/8" squares that's previously been cut in half diagonally to make two HST shapes) to a A/B rectangle unit to make a quarter section. Use the shorter of the two long edges and square short end of the rectangle to align the large triangle, right sides together. Notice how the tip of the large triangle extends past the rectangle unit. The seam line will enter right in the "V" of these two pieces. Press toward the dark fabric. 

Repeat with the mirror image A/C rectangle unit and large fabric D triangle. Sew the two quarter sections together to make one half block. Make a total of two half blocks. 

BG0A5068.jpg

I believe the success of this block comes first from good piecing and second from upping the contrast a bit so each shape can stand out. In my block there's obvious light and dark fabrics and they stand out in the solids. By always press toward the dark fabric I was assured my seams would nest when it came time to piece and this locking in of the seams made the points nice and sharp. 

It's unavoidable that the longest edge of our half blocks are bias edges. Normally these two half blocks would be sewn together into one block but for our quilt layout we need three half blocks. You may want to starch this block if you think it will get a lot of handling between now and the time the block is sewn into a top. Just take care not to stretch or vigorously press this block to avoid distortion. 

BG0A5039.jpg

You can see how this would make a beautiful full block and I have already designed a baby quilt using this block from my new spring collection for Art Gallery Fabrics (coming in May, so be watching soon for spring Market reveals). For my sampler, I'm using Art Gallery Fabrics Pure Element solids  and when it came time to photograph this block I happened to have this vintage quilt nearby and realized how the green backing of this quilt almost matches the Pistachio Creme green (PE-462) of the AGF solids!

Thank you for making this sew along so special I love seeing all the blocks being posted. Please visit Maureen's blog and see the progress she's making on her sampler quilt, using her beautiful AGF fabrics Love Story collection. Be sure to use the #CommunitySampler hashtag when posting your blocks to Instagram and tag both my @sharonhollanddesigns and @maureencracknell so we don't miss any of your beautiful work!

Community Sampler Sponsors

Don't forget that this Friday's a Giveaway Friday on the Community Sampler sew along. Maureen and I will take turns hosting a giveaway each week where one of our generous sponsors will be featured and offering amazing prizes both here on our blogs and a second chance on Instagram. Maureen will be hosting the giveaway this Friday and you'll be instructed how to enter at that time.

Happy sewing!