Community Sampler Week #7

Community Sampler Week #7

BG0A5624.jpg

My co-host and sister Art Gallery Fabrics designer Maureen Cracknell and I are so happy to have you sewing with us on this block-of-the-week sew along.

CS Layered Sharon.jpg

It's April already and we're over halfway done with our blocks! There are eleven blocks in our quilt and each Wednesday will be a new PDF block release or finishing step for the quilt. If you are just joining us, pick up the Introduction PDF on the Sew Along page and you'll get a material list along with coloring pages so you can get started planning your quilt. Then, work your way through the first Community Sampler post to the present.

Many of the patchwork units (like Quick-Corner, Flying Geese, Half-Square Triangle, and Square-in-Square units) used in this year's sampler have already been oversized to allow for trimming and squaring of units before assembling your block. Please cut your pieces EXACTLY as given in each of the PDF instructions because bumping up the size of the pieces from the measurements give will not bring great results in some cases. Take advantage of my in-blog tutorials for each of the different quilting techniques used in our sampler.

Accurate cutting and use of a true 1/4'' seam allowance is a must for successful patchwork piecing. All your blocks will measure 12-1/2'' square (unfinished). Review how to cut strips, sew with a true 1/4'' seam allowance, and other helpful piecing tips on my "Are You Ready to Sew" post.

Let's start sewing the Squaredance block. Download the free PDF on the Sew Along page.

Our block this week is a relatively easy one that uses squares and Flying Geese units. If you need to review how to make No-Waste Flying Geese, revisit my tutorial from week #3. Also, you may want to review the directional fabric tutorial if you want to control the way your prints lay in your Flying Geese units.

There'll be no new tutorials this week but instead I will give cutting information for making block variations because I ended up turning this easy block into a big production.

Since I'm sewing my sampler in only solids, that large center square intimidated me and just felt too expansive. I knew this may be an issue for me when I was designing this quilt but felt that those wanting to showcase a large print would love this opportunity and space. I ended up making seven different versions of this block and who knows, I may still may end up making more by the time I have to set them into a top. I'm still not in love with my block but thank goodness it's an easy one. 

BG0A5619.jpg

Squaredance Block Variations

You can treat this block as your wild card block and really have some fun making it your own. An 8” finished square center (8-1/2” square unfinished) is basically a nice size for a block by itself. You can utilize any of the techniques we've learned so far to make an 8-1/2” unfinished block center (maybe even look back at the Sewcial Bee Sampler blocks), work on something completely new, or stick to the pattern and make it as written with a 8-1/2” cut center square.

Now, I think all the versions I did are pretty nice so don't get me wrong, there's not an option that's right or wrong or better than the other, it simply comes down to personal choice and what works in the quilt. 

Variation 1

My first instinct to make that center square less intimidating (see block #1 in group photo) was to put a print in it. I used my Art Gallery Fabrics Tiny Dancer print from Sketchbook since it's a non-directional and organic print with colors went well with my solids in my quilt. But, with the rest of the quilt being all solids the print option just wasn't working for me and brought even more attention to that center square.

Blocks #2 and #3 are done like the pattern calls for as well but use solid fabrics for the center. I'm pretty sold on #3 and it's still in the running for making the final cut for the quilt. It was my original vision for this block and sometimes that turns out to be the best choice. That large solid center wasn't looking so bad after all and it was just a matter of the right balance of colors for me. 

Variation 2

Block #4 uses four 4" finished Half-Square Triangle (HST) units to make up the 8" finished block center. You can review how to make HSTs from the last weeks Fairground block and use those exact measurements for cutting in Variation 2. 

In my variation I cut:

  • two 5" squares of peach
  • one 5" square off-white
  • one 5" square gold

I paired a peach square with each of the other colors to make a total of four HST units. I trimmed my units to 4-1/2" square before sewing them together into a Four-Patch center square that measured 8-1/2" square. I then used that pieced center square to take the place of 8-1/2" square in the instructions.

Variation 3

The Triple-Square Triangle units we made for the Ribbon Star block were just the right size once sewn together (Four-Patch style) to make an even more elaborate center for this block. Use the sizes given in that pattern and make four TST units.

Blocks #5 and #6 in the group photo show how I ended up making two different pieced-center blocks version. One with five different solid colors and another with four different solid colors. Just by switching the color placements and number of colors it created two very different looking blocks. This could be a neat block to explore in a quilt just of these blocks. I really love the gold and pinks block but it just wasn't right for my sampler.

My Block...for Now

BG0A5652.jpg

I ended up selecting the HST Variation 2. I kept seeing a sunflower shape in this block with petals and a large seed head center. The golden solid for the petals and the darker center of this block makes this block shine. 

BG0A5645.jpg

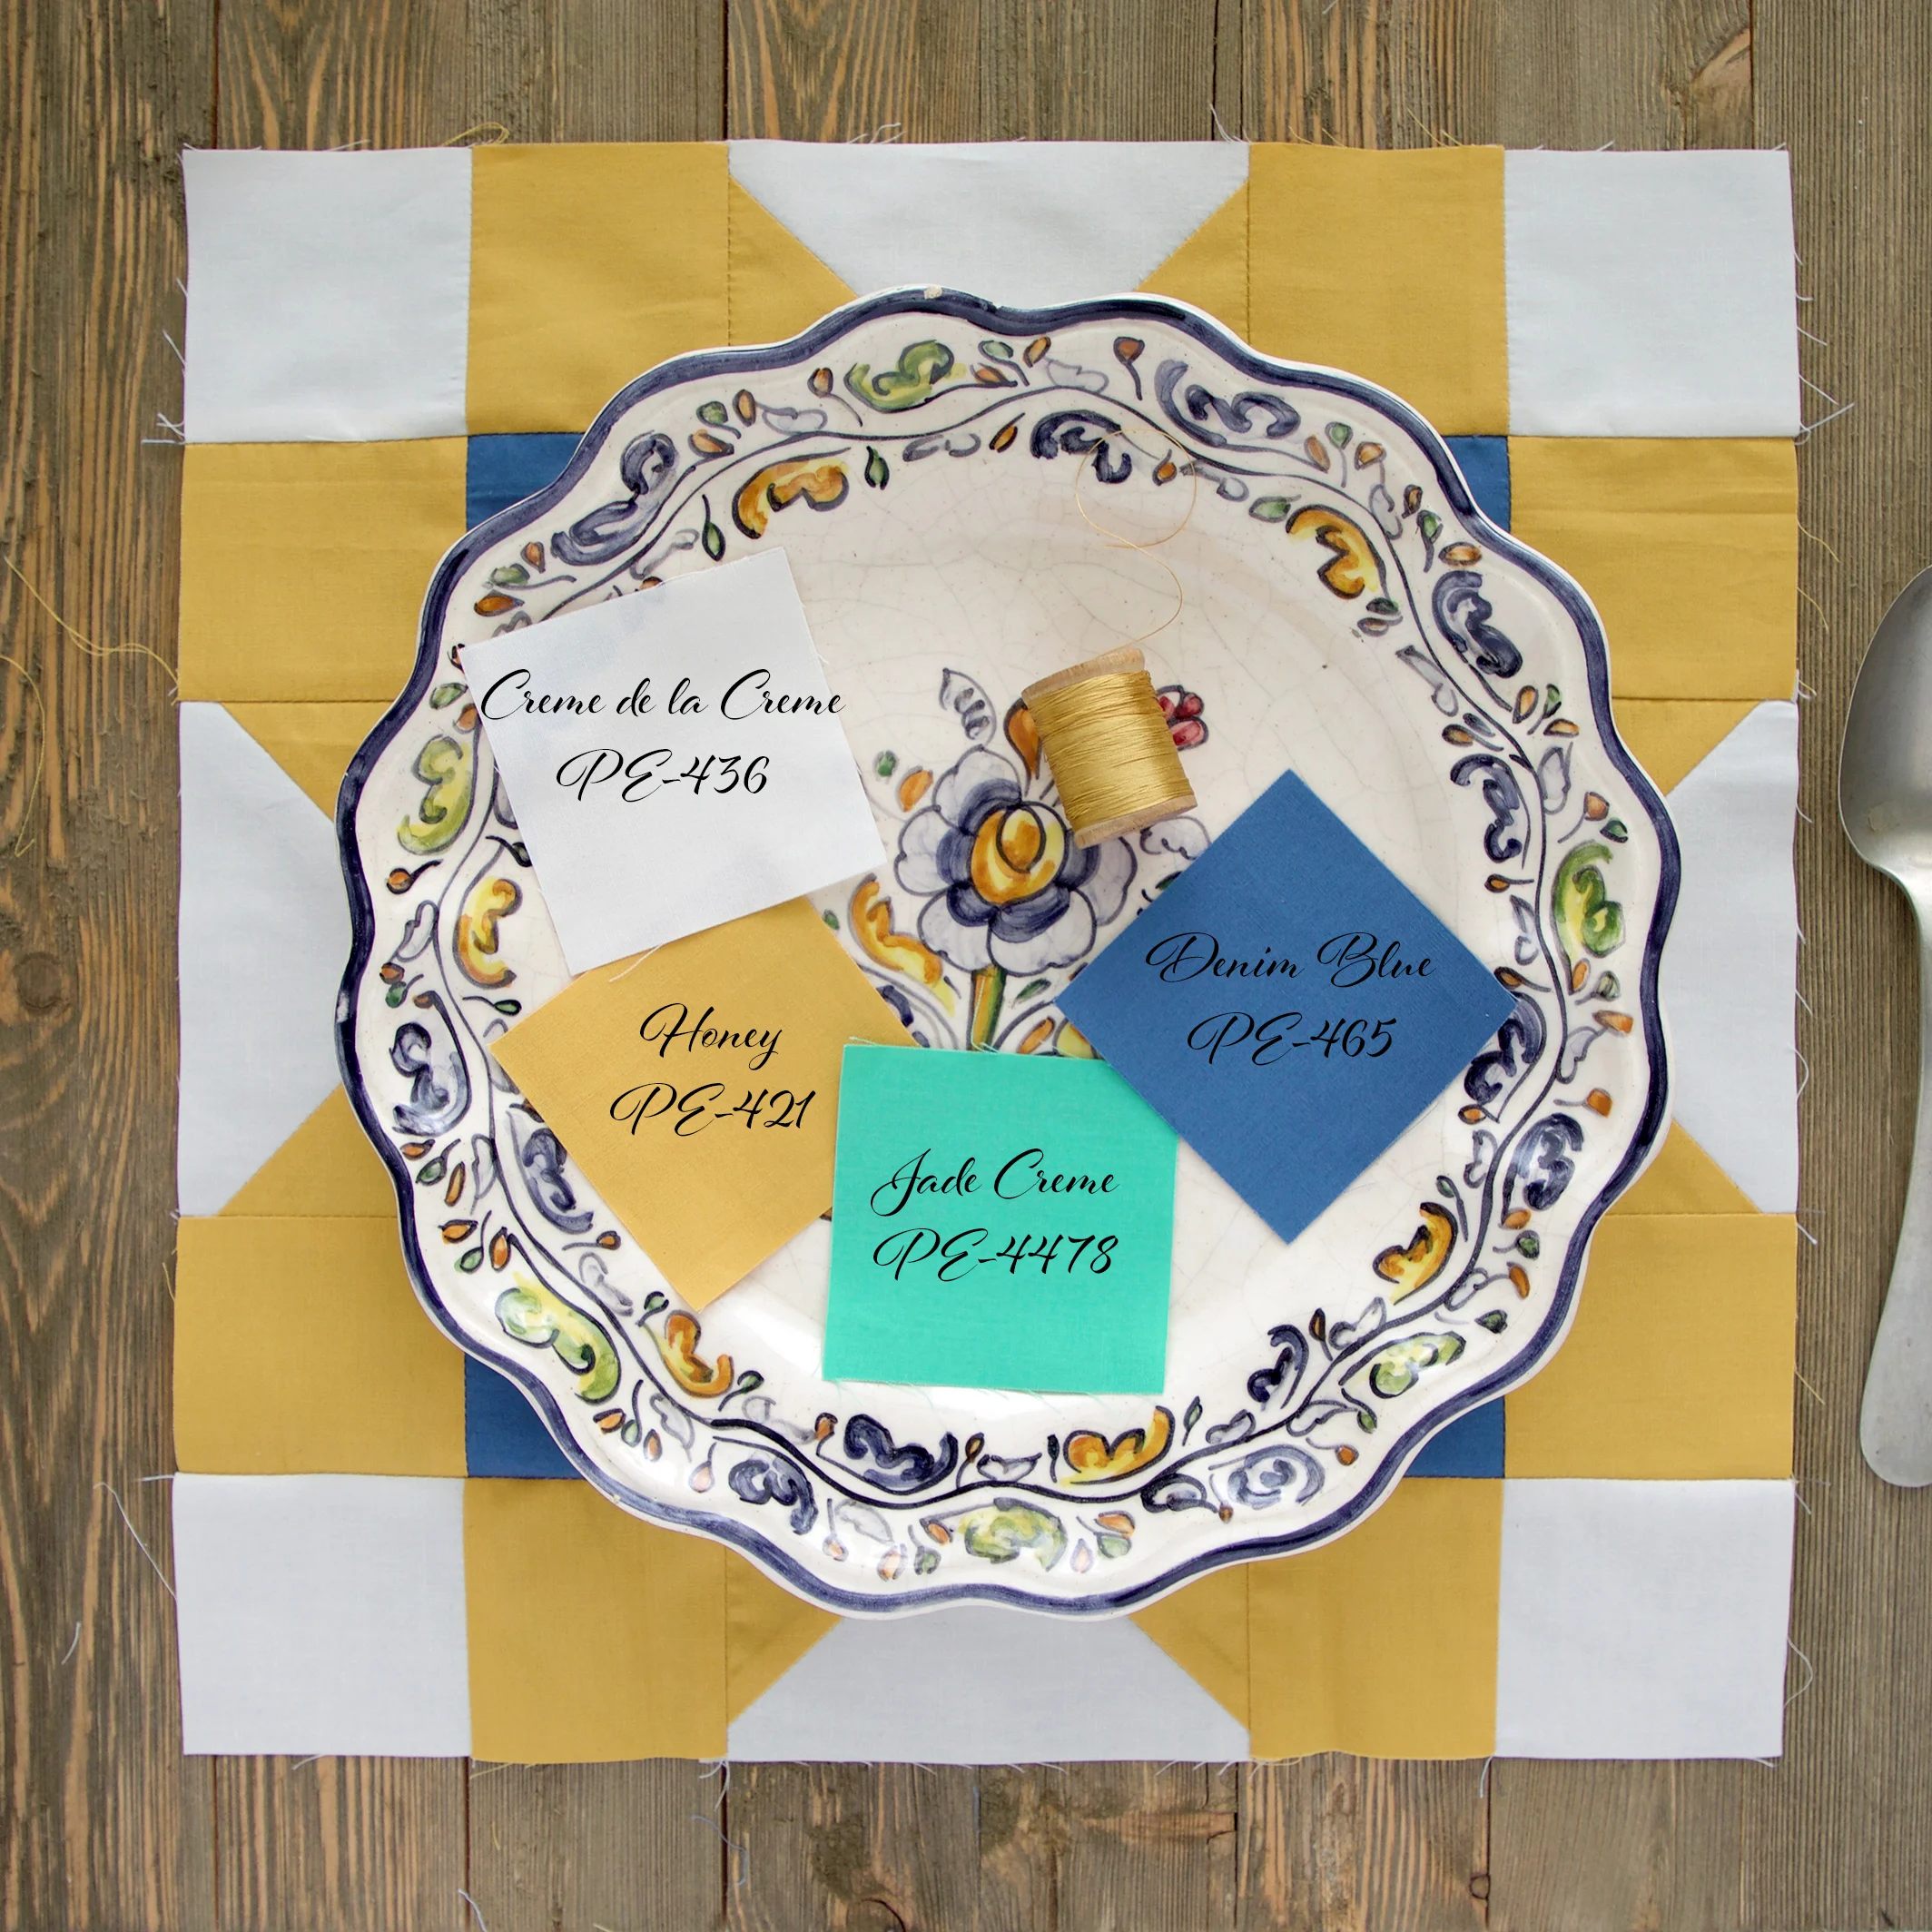
Above are my Art Gallery Fabrics Pure Elements solids selections for this block served up on the perfect plate that Van Gogh would completely approve of this palette. 

BG0A5624.jpg

There's lots of ways to dress up this block if you wanted to. If you're thinking of adding embroidery be sure to oversize your square to at least 9-1/2” square to start. Center your design and leave a good 1'' around the edges for trimming to size and the necessary seam allowance. Do any handwork to the square before it's assembled into a block. Press it well and trim to 8-1/2” square then proceed as you would for making the block. 

The same would go if you're doing improv piecing, or creating a label on this center square. Start larger than needed and trim to the required size. Don't forget to put your design on-point as the block will be set on-point once sewn together in the quilt top.

Thank you for making this sew along so special I love seeing all the blocks being posted and can't wait to see what you do with this wild card block. Please visit Maureen's blog and see the progress she's making on her sampler quilt, using her beautiful AGF fabrics Love Story collection. Be sure to use the #CommunitySampler hashtag when posting your blocks to Instagram and tag both my @sharonhollanddesigns and @maureencracknell so we don't miss any of your beautiful work!

COMMUNITY SAMPLER SPONSORS

Don't forget that this Friday's a Giveaway Friday on the Community Sampler sew along. Maureen and I will take turns hosting a giveaway each week where one of our generous sponsors will be featured and offering amazing prizes both here on our blogs and also on Instagram. Maureen will be hosting the giveaway this Friday and you'll be instructed how to enter at that time.

Flight Quilt

Flight.jpg

On a side note, I've just published the PDF pattern for my Flight quilt first seen in Modern Patchwork magazine March/April 2017 issue. I had to wait a year for it to be out of contract before I could publish it as a stand alone pattern but it's now available on my Craftsy pattern page

Photo courtesy of All People Quilt

Photo courtesy of All People Quilt

This fun and easy quilt design was pieced with all Art Gallery Fabrics Pure Elements solid fabrics. The design for the quilt was inspired by a floating staircase and I used some color theory and artsy tricks for fabric placements.

First I wanted to create the illusion of depth so I placed the vibrate saturated colors in the foreground (bottom of the staircase, closest to the viewer) and used muted, dustier tones at the top of the stairs to make them appear further away. That's the same way you create depth in landscape paintings. 

By separating the diagonal sides of the quilt into light and shade it was not only another excuse to use another fabric color but again added weight and a light and shadow effect to the design. 

This quilt is a departure for me but I had a lot of fun with it and is one of the three all solids quilts I mentioned at the beginning of the Community Sampler sew along. I've not worked with solids exclusively very often but each time I have it's always turned out well. 

View all my patterns for sale on my Pattern page. They are all available on Craftsy and selected patterns are available at Connecting Threads and UpCrafts Club.

Sewcial Bee Sampler Block #24

Sewcial Bee Sampler Block #24

IMG_3923.jpg

This is our second to last block and many of you are wondering about how to put your quilts together and the finishing. Here's the breakdown: Next Wednesday will be our last block release. The following Wednesday (the last week of July) we will post the instructions for Assembling and Finishing your quilt. This will include how to add the sashing, layering the quilt sandwich, and binding. The very first Wednesday of August will be reveal week so everyone can show off their finished quilts, quilt tops, or progress so far. There will be a grand finale prize package on the last Giveaway Friday that will knock your socks off, so stick around, we're almost there!

Sewcial Bee Sampler large white banner-01.jpg

As we near the end of this incredible journey, my co-host, Maureen Cracknell and I are thinking about future collaborations. The success of the Sewcial Bee Sampler (SBS) has been phenomenal and mostly because of your participation and the remarkable community you've created out of this sew along.  

To help us better understand what you're looking for in a future sew along, Maureen and I have prepared an 8 question survey. This quick questionnaire is completely anonymous and your answers will give us better insight into serving your needs as a quilter. To ensure the most accurate results, please only take the survey once. Many thanks to those who've participated in the SBS questionnaire already. If you've not yet had a chance to take the survey, please do, we're only keeping it open now through the end of the SBS sew along and then we'll close the survey. The link provided on both our blogs will link to the same survey. So, if you access the questionnaire from either Maureen's site or mine, your answers are compiled to the same place.  

I'm not sure how many new Makers we've got joining our sew along at this late point but anyone just starting may want to take advantage of the in-blog tutorials for the different patchwork techniques used throughout the Sewcial Bee Sampler. Pick up tips and block variations beginning with the first blog post The Start of Something Sewcial. Both Maureen and I will leave all the SBS downloads up on our blogs for you to download long after this event is done. 

Time to get sewing this week's block #24--Crosses and Losses. Download the free PDf for the blocks on my Sew Along page.

According to The Denver Post, Crosses and Losses was first published December 6, 1931 and credited to Ruby Short McKIm.

[media-credit name=”Denver Post File” align=”aligncenter” width=”495″][/media-credit] 

[media-credit name=”Denver Post File” align=”aligncenter” width=”495″][/media-credit] 

Have to love the add for developing your bust for $1--totally over priced if you ask me! Anyway, back to the block, instead of cutting out the individual shapes for our block like the original pattern, we utilize the 2-at-a-time Half Square Triangle (HST) technique in two different sizes. Refer back to our past tutorial if you need a refresher on how to make your units. We will be making 2-1/2" and 4-1/2" (unfinished) HST units for this block. Be mindful and accurate with your seam allowance for maintaining the points of the units when assembling. 

For my Crosses and Losses block I'm using prints from my Bountiful fabrics collection and Pure Elements solids both from Art Gallery Fabrics and decided to incorporate 4 prints as a variation on the PDF pattern instructions for 3 prints. To find shops that carry my Bountiful fabrics, visit my Shop Fabrics page. If you'd like to make this variation you will need to cut the following:

(2) 2-7/8" squares and (4) 2-1/2" squares fabric A

(1) 4-7/8" square fabric B

(2) 2-7/8" squares fabric C

(1) 4-7/8" square fabric D

I know I've said this before but now that we have 24 blocks done, I can safely say THIS is my favorite block! I think what I like best is how I used the different prints and the scale of the prints to add depth. There's something very pleasing to me about how it all came together with it's contrast and texture.

This last photo was a great op to show off my little (live) succulent plant in the cement pot I got for $1 on clearance. Now that's a better way to spend $1 rather than on bust development!!!!!

Don't forget that this Friday's Giveaway Friday and this week Maureen be hosting the giveaway from her blog. We've got a great giveaway planned from Lady Belle Fabrics you won't want to miss!

Sewcial Bee Sampler Block #6

Hello Sewcial Bee Sampler Makers, it's time to start our second row of blocks!

Since this week's block will be using techniques we've already used in the first five blocks I thought I'd have a little fun and give you some construction options. Go ahead and download block #6--The Seasons from the Sew Along page.

Of course the PDF pattern download has everything you'll need to make the block but I like to add extra tips and hints into my blog post to support beginning quilters. If you're just joining the SBS sew along then you may want to start at the very beginning with the introduction post and work your way up to the present. 

Now that we're on our sixth block, you're probably realizing there's more than one way to make patchwork units. I want to take everything we've learned so far and show you four options to make this week's block using those different techniques. Please excuse my photos this week, I made these at the end of a rainy day yesterday (Tuesday) and the lighting was terrible!

The Seasons

The Seasons block is made up of (4) 2-1/2" squares and (12) 2-1/2" half-square triangles (HST) units for an 8-1/2" block (unfinished and before frames). There's a lot of seams in this block. With that said, I will continue to sound like a broken record each week, and stress the importance of a true 1/4" seam allowance. If your seams are off, even a fraction, that will amount to a big discrepancy in the end because of all the seams involved. If you need to review my tips on how to check your seam allowance refer back to the Perfect Patchwork post. Also remember that if you're not comfortable cutting the pieces to the exact sizes needed per the instructions and would rather square up your units after sewing to size, refer to the SBS Extras post. Just note that if you are adding 1/8" to the squares on the Flying Geese units from block #5, be sure to add 1/8" (.125) to the large square as well to keep everything in porportion.

Option 1:

To make the block as written in the instructions with two different fabrics, follow along with the 2-at-a-time half-square triangle tutorial and make according to the instructions.

Option 2: 

To make the block look more like a compass I decided to add additional fabrics and visually divide up the center of the block in a checkerboard effect. To achieve this I used the 8-at-a-time HST technique from block #1 and the 2-at-a-time HST technique from Block #2.

Cut:

(1) 5-3/4" square fabric A

(1) 2-7/8" square fabric A

(1) 5-3/4" square fabric B

(4) 2-1/2" squares fabric B

(2) 2-7/8" squares fabric C

(1) 2-7/8" square fabric D

This will yield 8 matching HSTs (2-1/2" square unfinished), 2 matching HST units (2-1/2" unfinished) of one combo (mine are navy and weave print) and another 2 matching HST units (2-1/2" unfinished) of another combo (navy and peach) for the center of the block. Assemble the block in the same way as given for block #6 in the PDF.

The Seasons block made with my new Art Gallery Fabrics collection Bountiful and Pure Element solids. Here's what all six of my Bountiful fabrics sampler looks like so far with PE-433 Snow Pure Elements solid frames.


Option 3:

The third way I wanted to play with dividing the four points into four different fabrics. To achieve this look I used the 2-at-a-time HST technique as given in the PDF instructions for this block and from Block #2. 

Cut:

(2) 2-7/8" squares fabric A

(1) 2-1/2" square fabric A

(2) 2-7/8" squares fabric B

(1) 2-1/2" square fabric B

(2) 2-7/8" squares fabric C

(1) 2-1/2" square fabric C

(2) 2-7/8" squares fabric D

(1) 2-1/2" square fabric D

(8) 2-7/8" squares fabric E

Note: This options will leave 4 unused HST units. Sew units and pieces together as given in PDF.


The Seasons block made using fabrics from my Gossamer, Sketchbook, and Tapestry fabric collections for Art Gallery Fabrics. Here's what my Tiny Dancer sampler quilt looks like with all six blocks that also include fabrics from my Coastline collection and the two newly re-colored Gossamer prints in the new AGF Fusions fabrics. These blocks are framed with Speckled Lapis from my Sketchbook fabric collection. Again, sorry about the terrible photography!


Option 4:

This is for all those fussy cutting lovers out there that may want to have a solid center block for to showcase a special print. This option uses the Flying Geese technique from block #5 and a variation of the Quick Corner units from Block #2.

Cut:

(1) 5-1/4" square fabric A

(1) 4-1/2" square fabric A (for center square) Note: This fabric could be a third print (fabric C)

(4) 2-7/8" squares fabric B

(8) 2-1/2" squares fabric B

Make four matching Flying Geese units that measure 2-1/2" x 4-1/2". 

When adding the Quick Corners to the 4-1/2" square, work on diagonally opposite corners when adding fabric. Stitch the small square to the corner of the fussy cut square, trim, and press corner open before adding additional corners. 

To sew an Option 4 block, arrange the Flying Geese units, center square unit, and (4) 2-1/2" squares into 3 rows of 3 units/squares each. Join the rows.

The Seasons block made with my Tapestry and Bountiful fabrics for Art Gallery Fabrics. This is a bonus block and I don't have a third sampler quilt going so this orphan block with get put into something down the line.

I hope with wasn't too confusing?!? I just wanted to show you that the power of knowing different patchwork techniques can help you customize your sewing experience on this sew along. Each week you will have the chance to continue to perfect those skills and grow as a quilter. My co-host Maureen Cracknell and I are continually amazed by the beautiful blocks being posted every week and the joy and excitement each of you bring to our virtual community. Thank you for making this sew along so special. Please be sure to visit Maureen's blog and see the progress she's making on her sampler quilts, she's making two as well using her beautiful AGF fabric collections. 

Aurifil      Circa 15      The Intrepid Thread      Fat Quarter Shop      Omnigrid      Llama Fabrics      Color Girl     Lady Belle Fabric      Needle in a Fabric Stash      Dritz      Knotted Thread    NeedleandFoot      Stash Builder Box

Also, don't forget that Friday is Giveaway Friday and this week Maureen will be hosting the giveaway from her blog. We've got a great giveaway planned from Intrepid Thread I know you'll not want to miss! 

SBS Extras

With so many new-to-quilting sewers joining the Sewcial Bee Samplers everyday, I'm constantly asking our followers how Maureen Cracknell and I can make this the best sewing experience for everyone. 

Many of you commented back to my weekend Instagram survey that you'd like to better understand half-square triangles (HSTs) as well as how to continue to improve your patchwork. 

If you're new to the SBS sew along or haven't already read some of my helpful posts with tips and tutorials, please refer back to these posts: Perfect Patchwork, Sewcial Bee Sampler Block #1, Sewcial Bee Sampler Block #2, and Sewcial Bee Sampler Block #3.

I cannot stress enough how important it is to start with accurately cut quilt pieces and to sew with a true 1/4" seam allowance. Everything after that is just perfecting and getting comfortable with the different techniques. 

Reading the Blocks

I've prepared a supplemental PDF print out to help you learn how to read an SBS block and helpful HST charts. This way you will be able to figure out exactly what size your units should be measuring at as you sew the patchwork part of your blocks together. Also, if you prefer to start with a larger HST unit and trim it down to size, you'll know exactly what to trim it down to. Head over to the Sew Along page and download the SBS Extras PDF.

THE BLOCKS

Each of the 25 blocks in the Sewcial Bee Sampler quilt will finish to 12” square (12-½” before setting into sashing). Many (but not all) of the blocks call for additional strips of fabric to frame out the patchwork block to bring all the blocks up to the same finished 12’’ square size. Knowing the finished size of the block will help you understand what size pieces and units are needed to make up the patchwork square.

Clues in the Cutting

1. If the block uses framing, look at the shortest frame length to know the unfinished size of that patchwork block. Example: Block #1 the short frame strip is 8-½” long. The block before framing should measure 8-½” square. 

2. Once you understand the size of the (unframed) patchwork, the size of the individual units can be figured out using a little math. Block #1 would require (16) 2” finished HST units to make an 8” finished square. But, since we need seam allowances in patchwork piecing, we would require (16) 2-½” square HST units. In the same manner, you can figure the pieces and units for Blocks #2 through #25.

Block #2

Block #2

 
Block #3

Block #3


2-in-1 HST Units

Use the handy math formula for figuring what size square to cut for 2-in-1 half-square triangle units. 

Know what size finished square you need then add .875 (⅞”) to the finished size. Tip: If you would rather square up your HST then round up the calculated cutting size to the nearest ½’’ or full inch increment. 


8-in-1 HST Units

Use the handy math formula for figuring what size square to cut for 8-in-1 half-square triangle units. 

Know what size finished square is needed and add .875 (⅞”) then times that number by 2 for cutting size. Tip: If you prefer to square up your HSTs then round up the calculated cutting size to the nearest 1” for trimming. 

Our goal with this sampler sew along is for you to become a confident quilter and to make patchwork piecing an enjoyable experience. Maureen and I love hearing your comments and seeing your posted blocks. We look forward to helping you in the weeks to come and we can all learn as we sew along. See you back here on Wednesday for the release of block #4!