
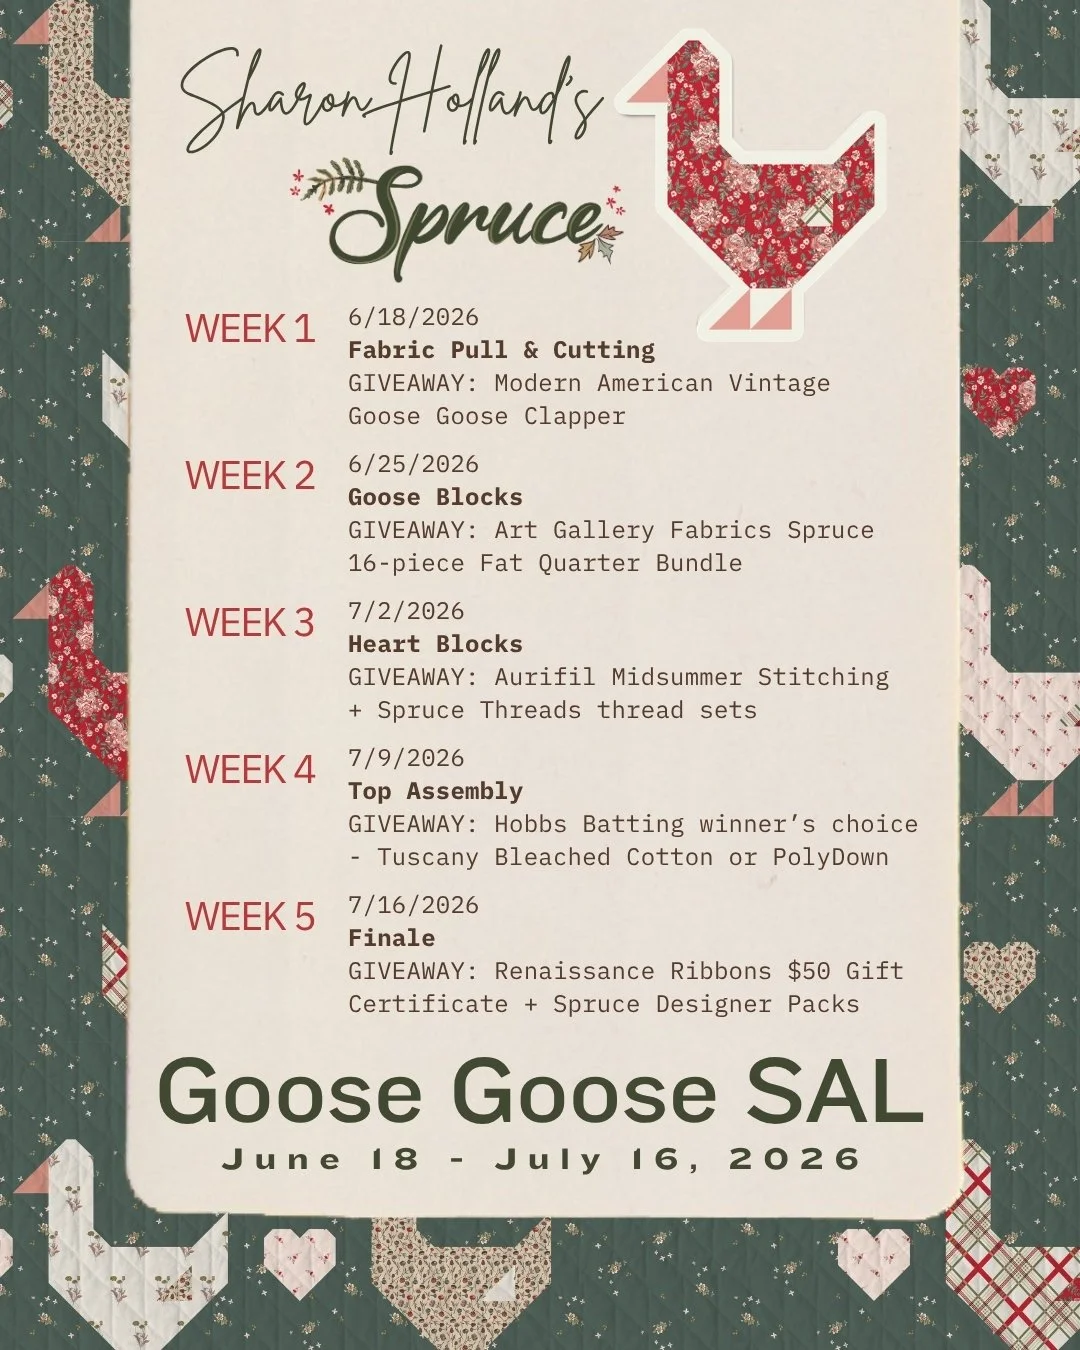
It’s the final week of the Goose Goose Sew Along, and this week focuses on the finished quilt — plus the last giveaway prize drawing!
If you missed the start of the sew along, take a look at the Goose Goose SAL Week 1 post, then come back here when you’re caught up and ready.
HOW THE SEW ALONG WORKS
There’s no signup for this event, and the five Goose Goose Sew Along blog posts will remain evergreen on my blog so you can come back anytime you want to sew a Goose Goose quilt at your own pace. Simply purchase the Goose Goose PDF pattern from my website SHOP and follow the 5 SAL blog posts, stitching when it fits your schedule. The giveaways, unfortunately, are not evergreen, and this is our final Goose Goose SAL giveaway—see this week’s giveaway at the end of this post to enter the Week 5 drawing, where three lucky winners will receive either a $50 Renaissance Ribbons gift certificate (first place) or one of two Spruce Designer Ribbon packs (second place winners).
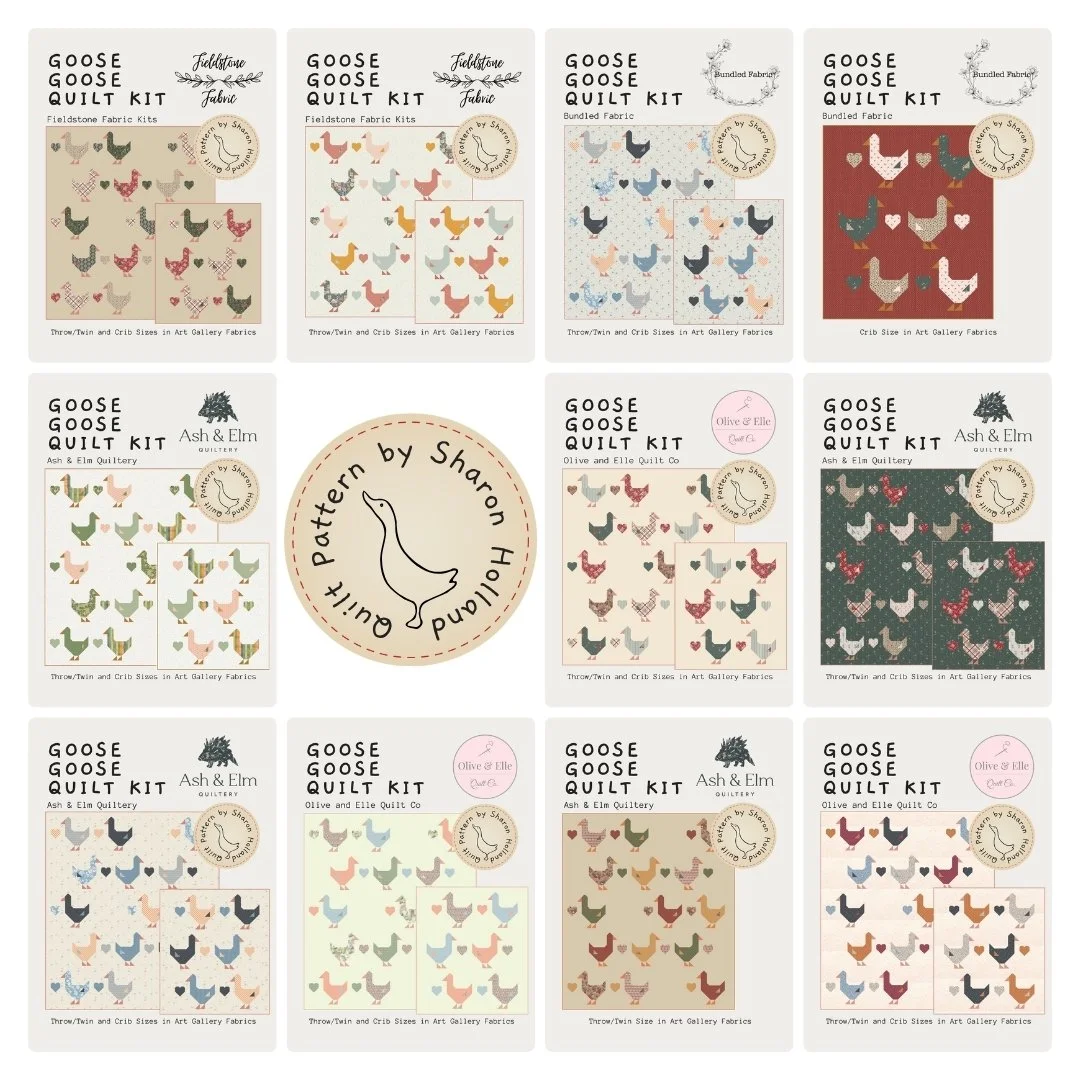
You may finish your current Goose Goose quilt and want to turn around and want to make another! Kits make it easy. I’m collaborating with several shops to bring you Goose Goose quilt kits in both crib and throw/twin sizes, so you’ll have options if you don’t want to source the fabrics on your own. All their Goose Goose kits are made with Art Gallery Fabrics and the pattern is sold separately from my website SHOP.
GOOSE GOOSE KITS
Ash & Elm Quiltery (US) - Several Goose Goose version options plus the Spruce Goose Goose kit to match my SAL quilt
Bundled Fabric (CA) - Pattern cover quilt option and a Spruce version
Fieldstone Fabrics (US) - Size a version options
Olive and Elle Quilt Co (US) - Several Goose Goose version options and sizes
WEEK 5 - Finishing
Turning your Top into a quilt
Whether you’re sending your quilt out for longarm quilting, tackling edge-to-edge quilting yourself, practicing free-motion designs, or hand-quilting the top, this is where the real transformation occurs — it stops being simply fabric and becomes a cherished, finished QUILT!
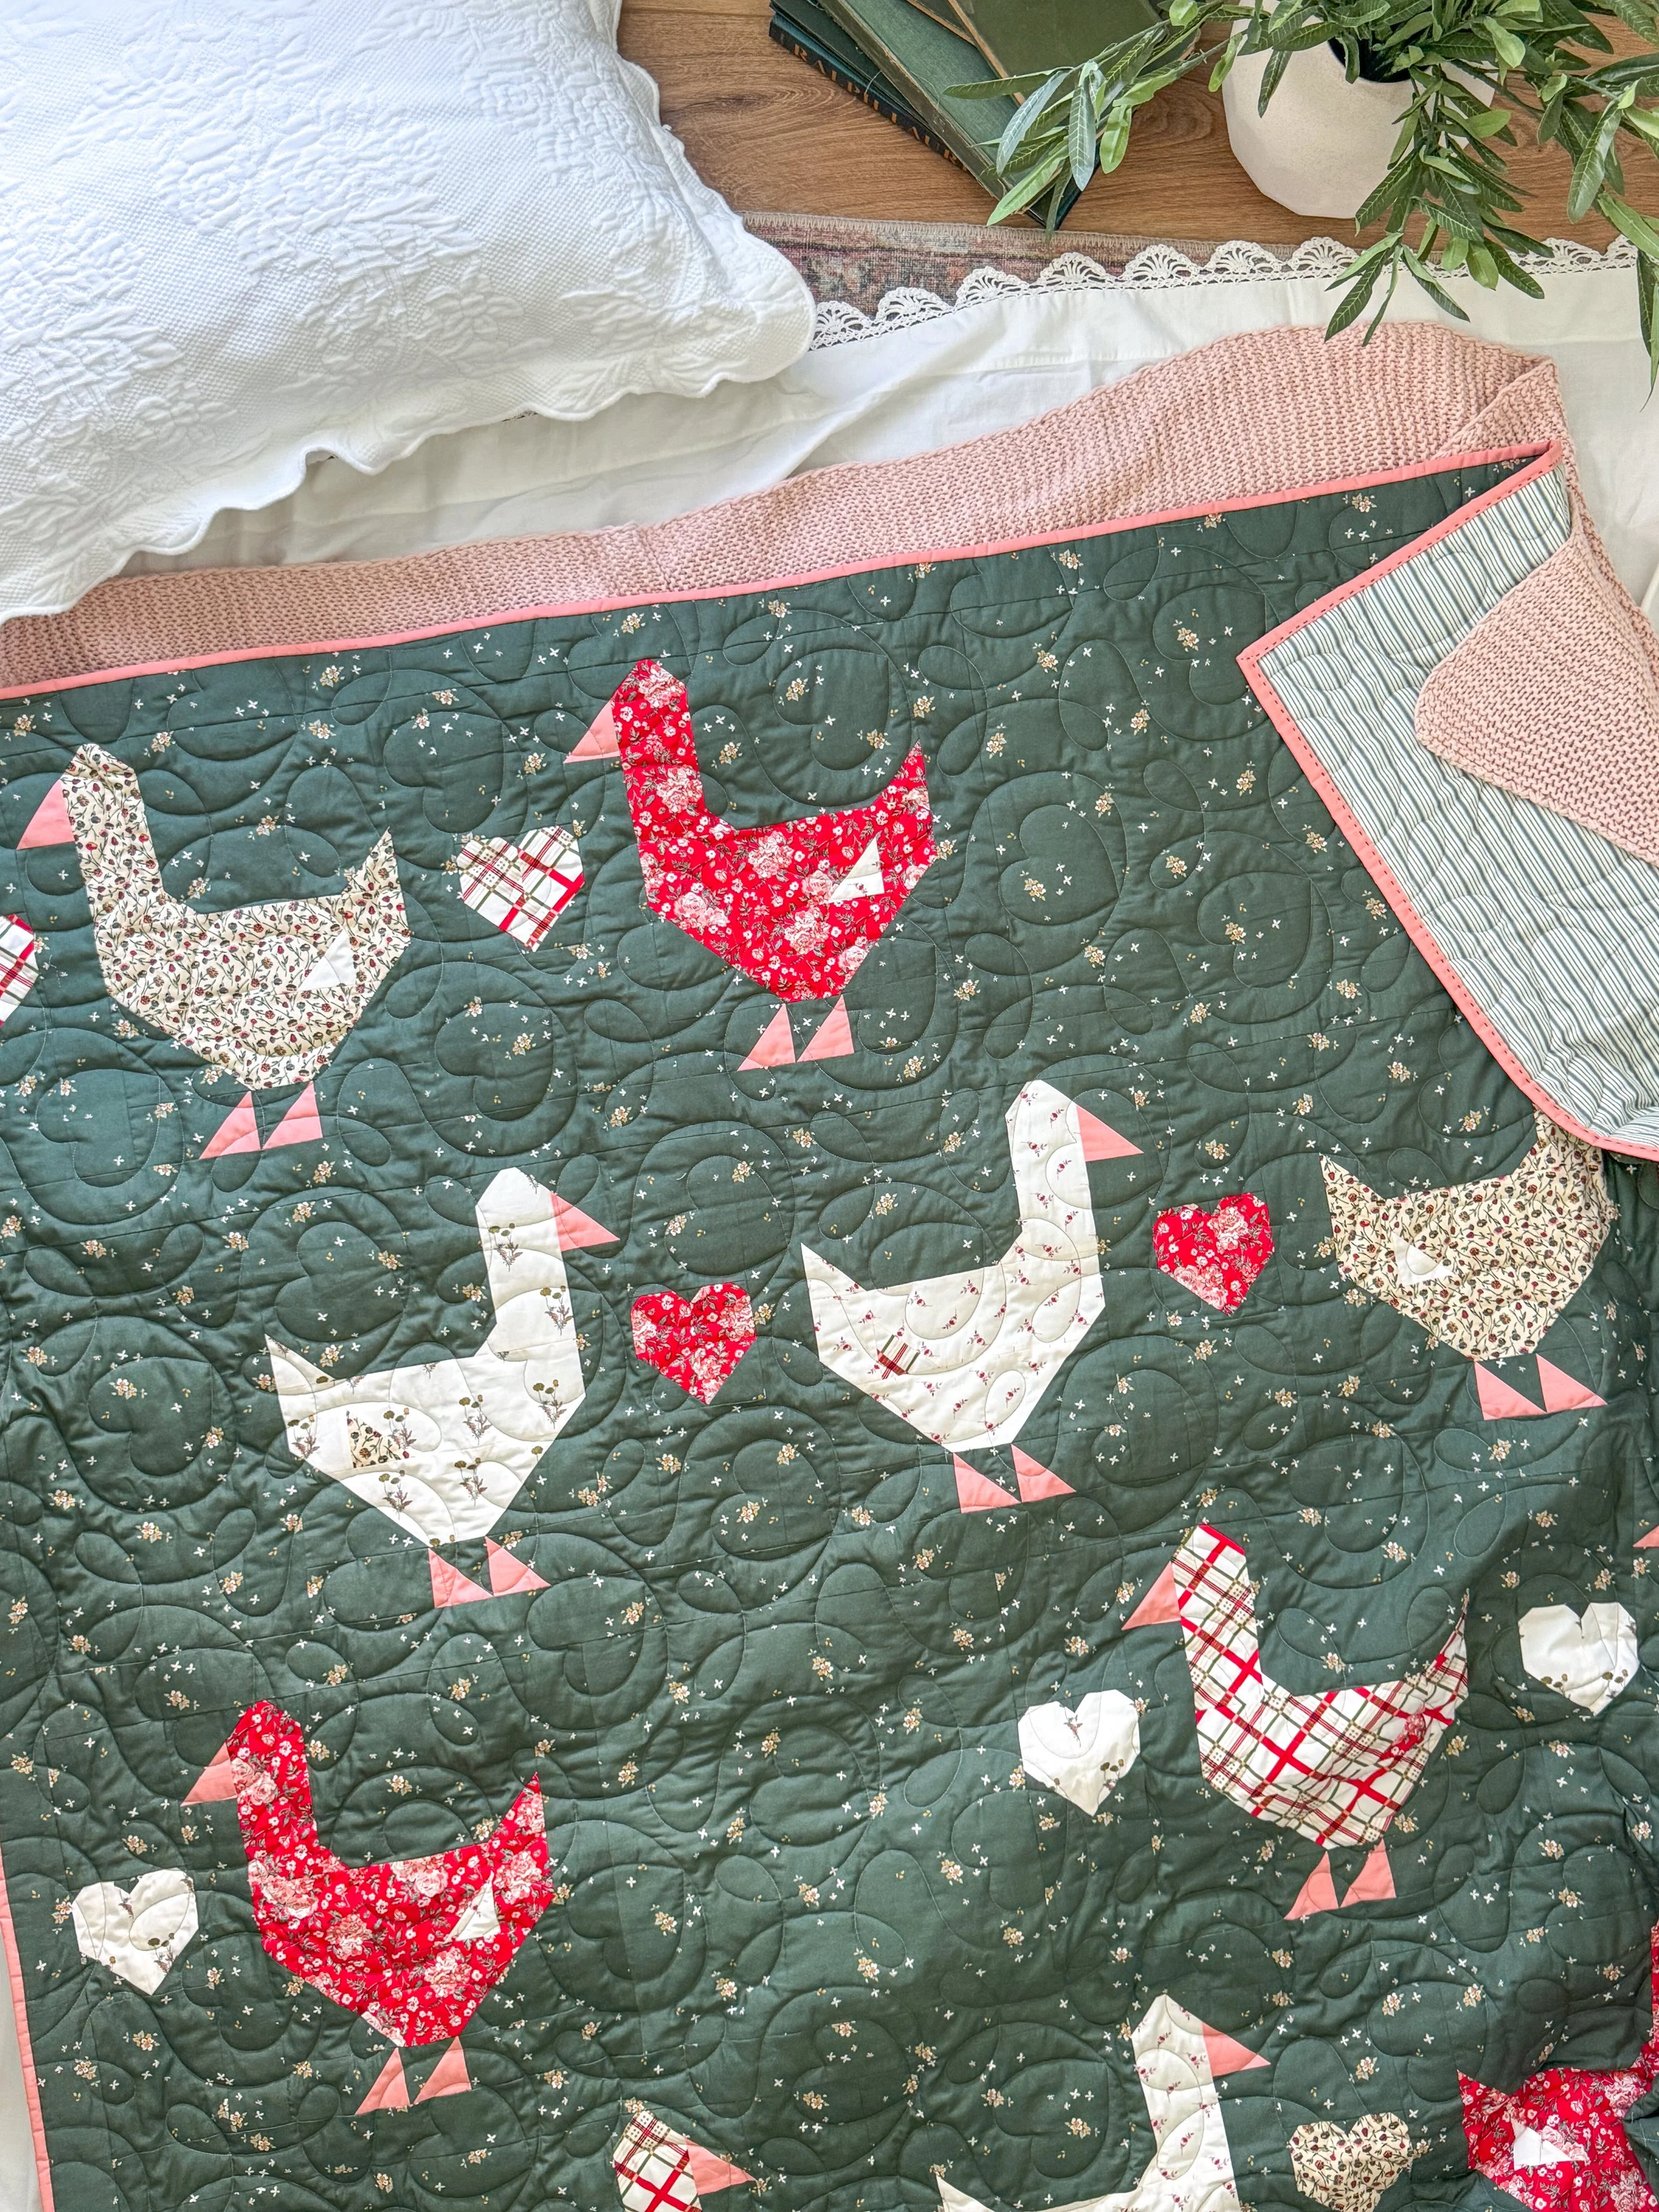
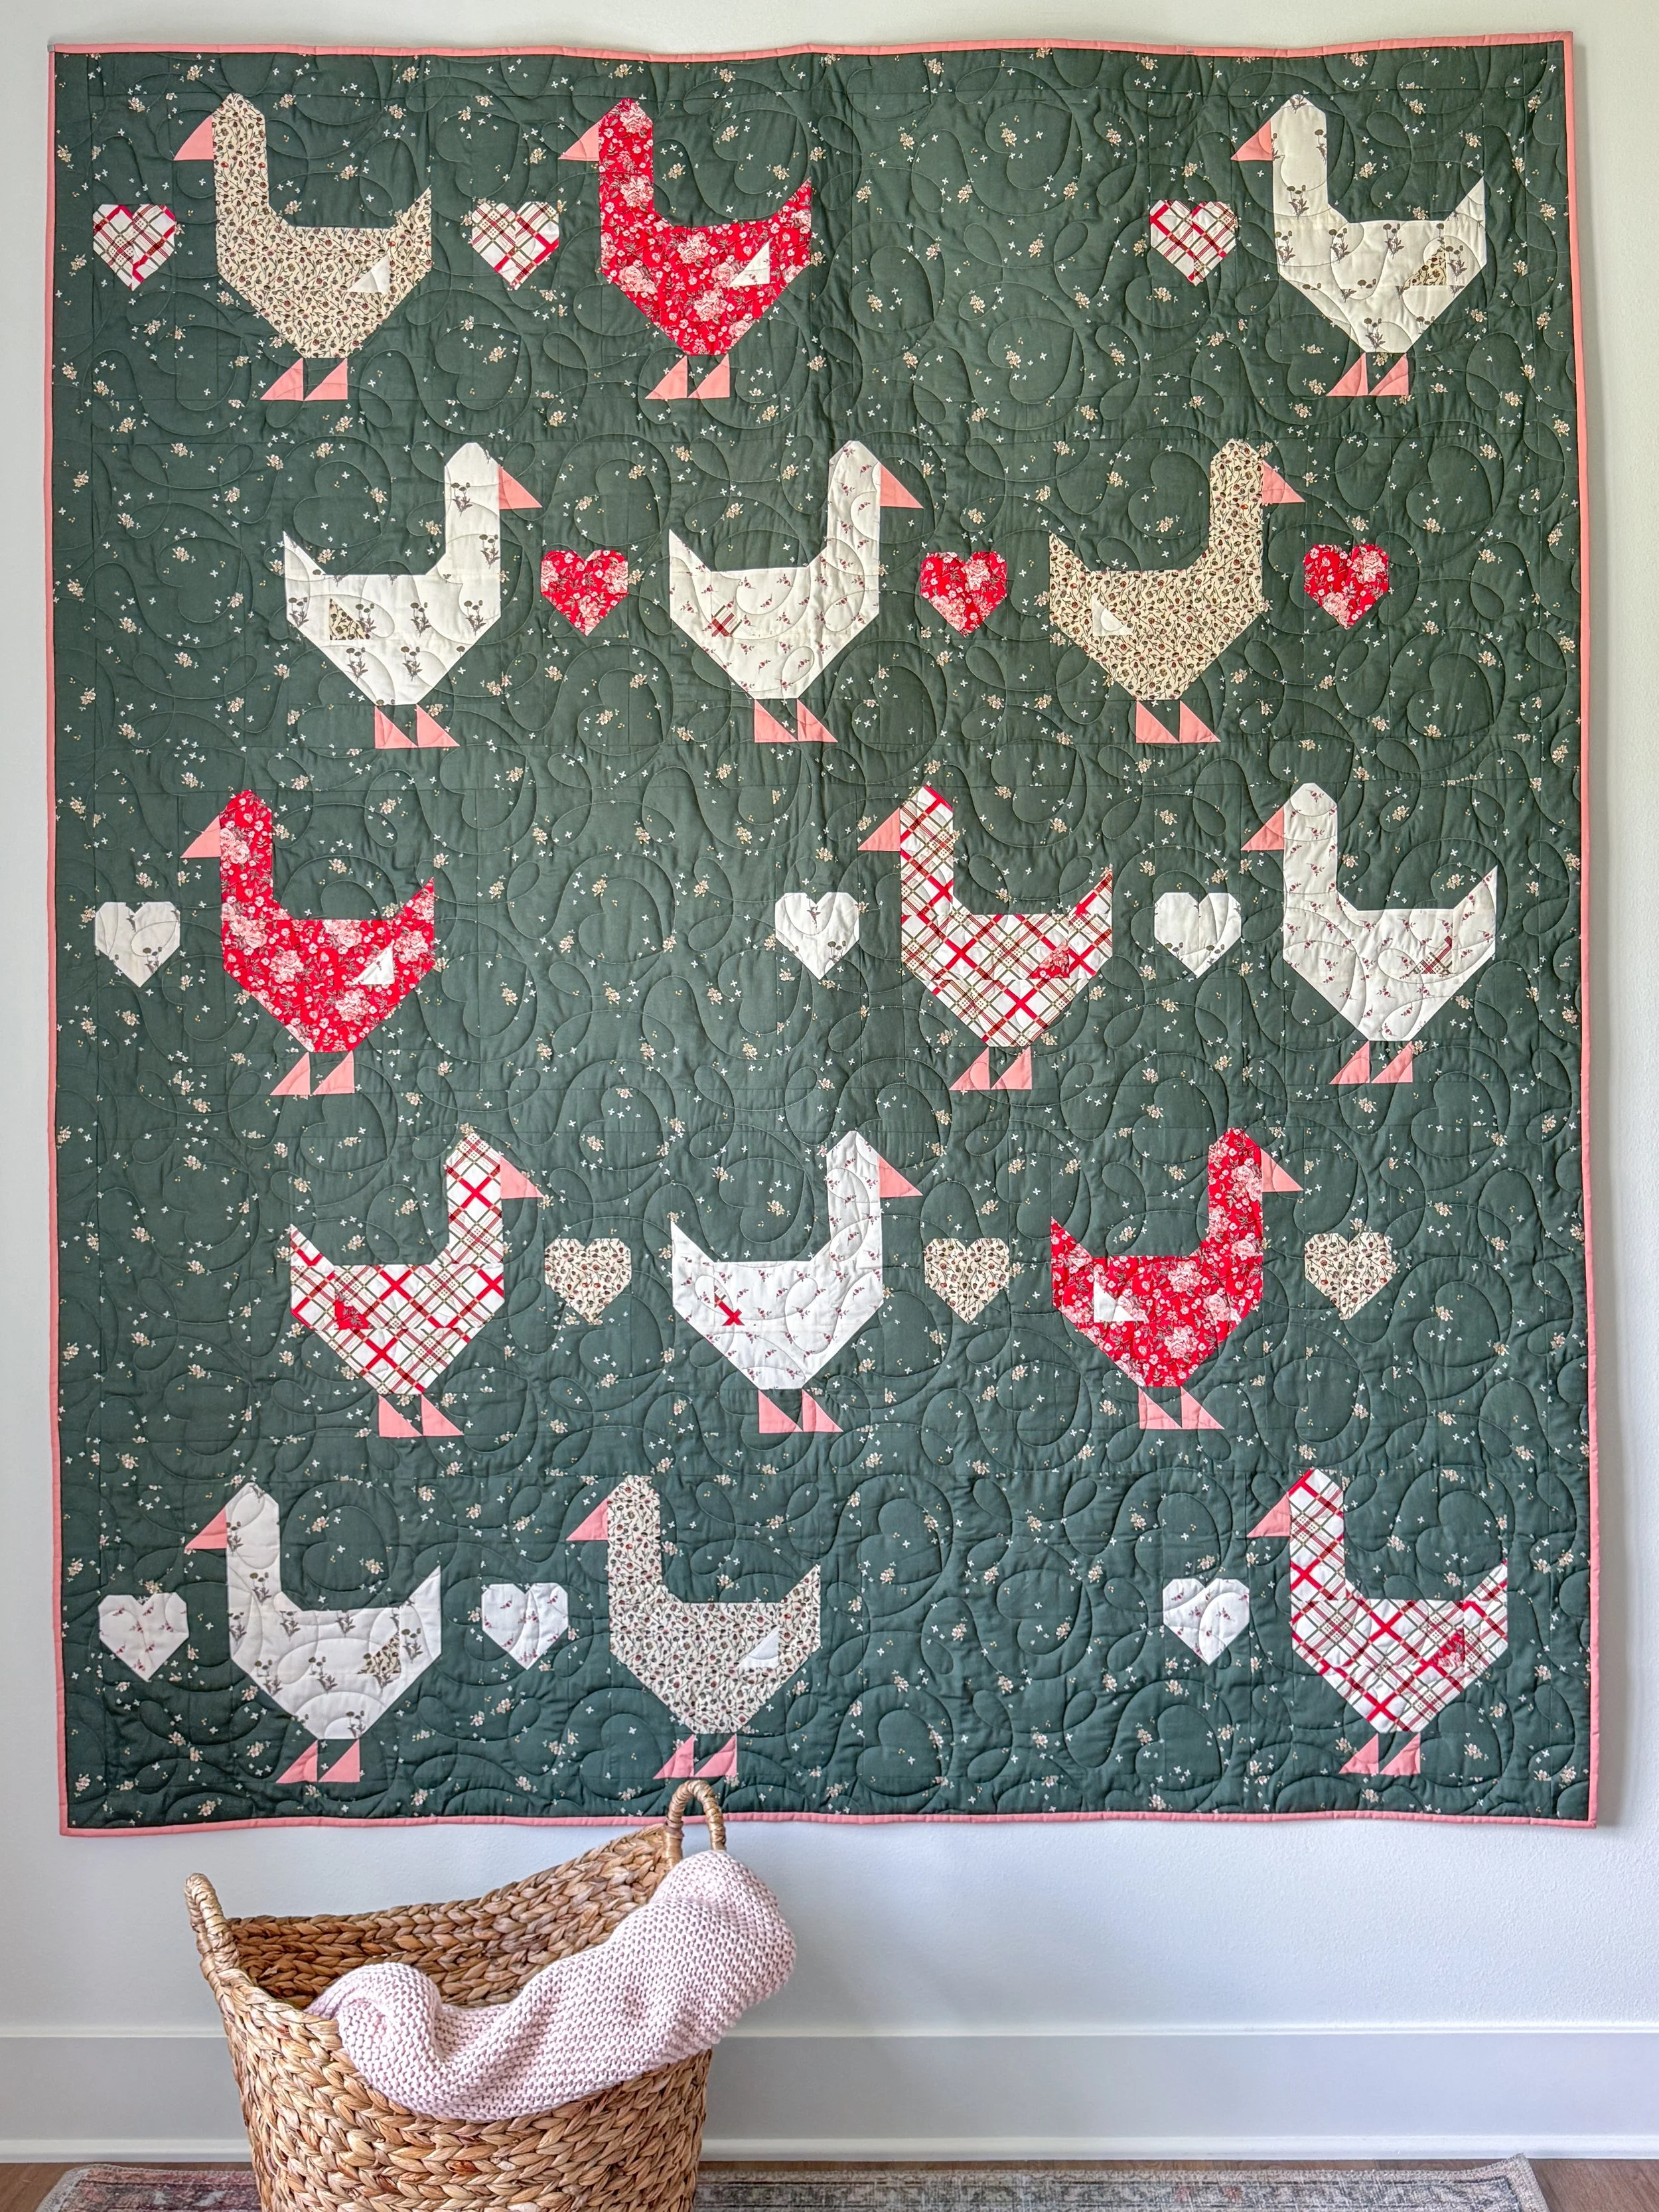
In all three of my Goose Goose quilts I’ve used Hobbs Batting Polydown batting because I love the puffy, light-weight loft and comfy drape of their downy polyester batting. The Spruce Goose Goose version was longarm quilted by Joyce Ulm of Eva Mae’s Custom Quilts using the Ginger Heart Pantograph by Apricot Moon.
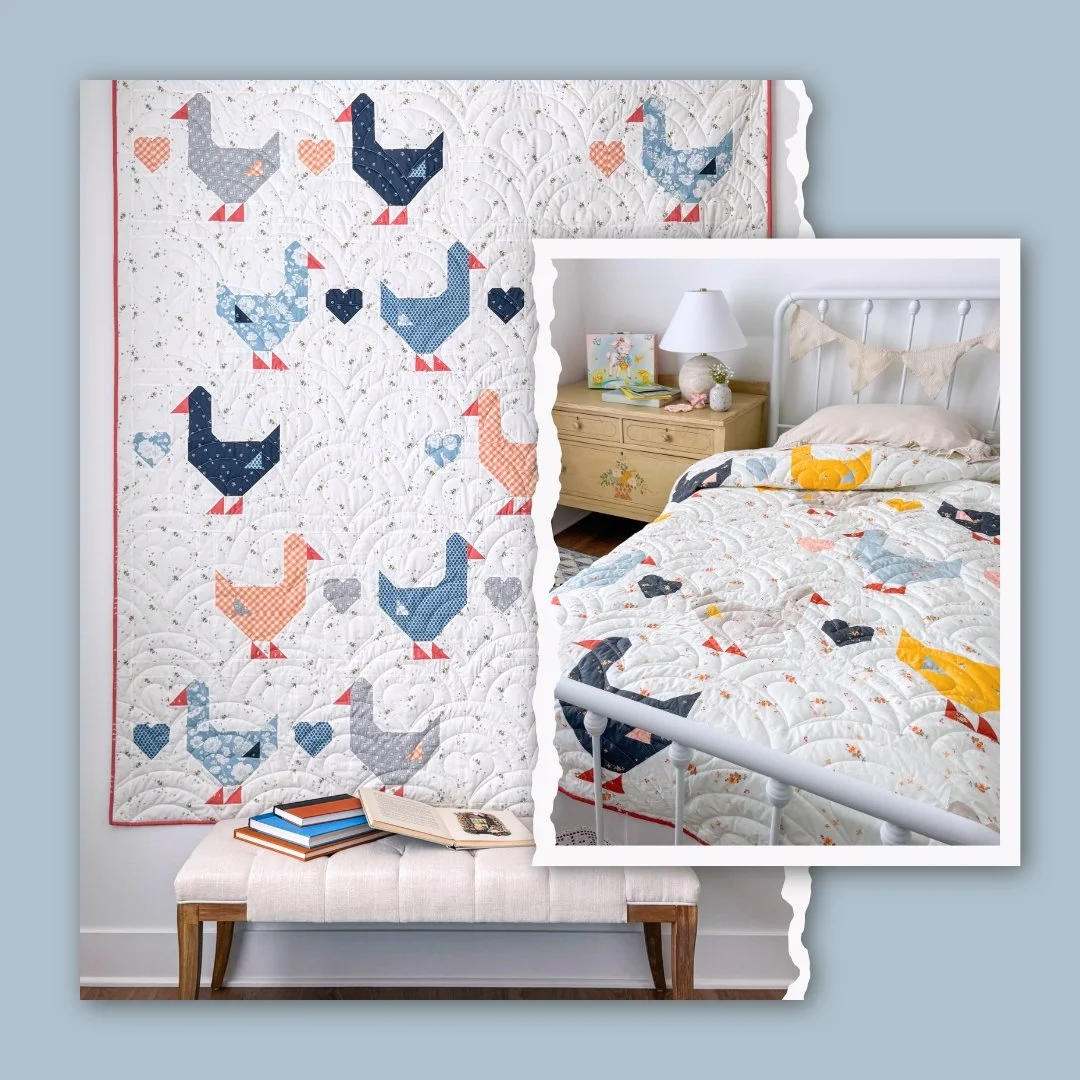
The Goose Goose cover quilt (above on the left) was quilted by Dearly Quilted. The original Goose Goose quilt made for my youngest granddaughter (above on the right) was quilted by Lady Belle Fabric and both use the same Rainbow Hearts pantograph by Keryn Emmerson and Hobbs Polydown batting.
I have a true-life funny story to share about my Goose Goose quilts. As I mentioned, I gave the very first Goose Goose quilt to my youngest granddaughter when she transitioned from a crib to her big girl bed. She absolutely adores that quilt I made—she refers to it proudly as the quilt “Mimi made.” One weekend they came to stay and I set up a little bed for her using a plain, nothing-special blanket, and she took one look and immediately asked where her Goose Goose quilt was! Fortunately, I still had the original Goose Goose cover quilt here, and I had just finished the Spruce Goose Goose quilt for this sew-along. I let her choose which one she wanted to sleep with while at Mimi’s house, and she picked the cover quilt without hesitation probably because it was closest in fabrics to her quilt at home. She was a very happy guest that weekend. Her older brother, meanwhile, has already declared that he wants a Christmas Goose Goose quilt—and he insists on picking the fabrics himself—so I can definitely see a fourth Goose Goose quilt in the very near future. I truly love how much they both cherish this quilt pattern.
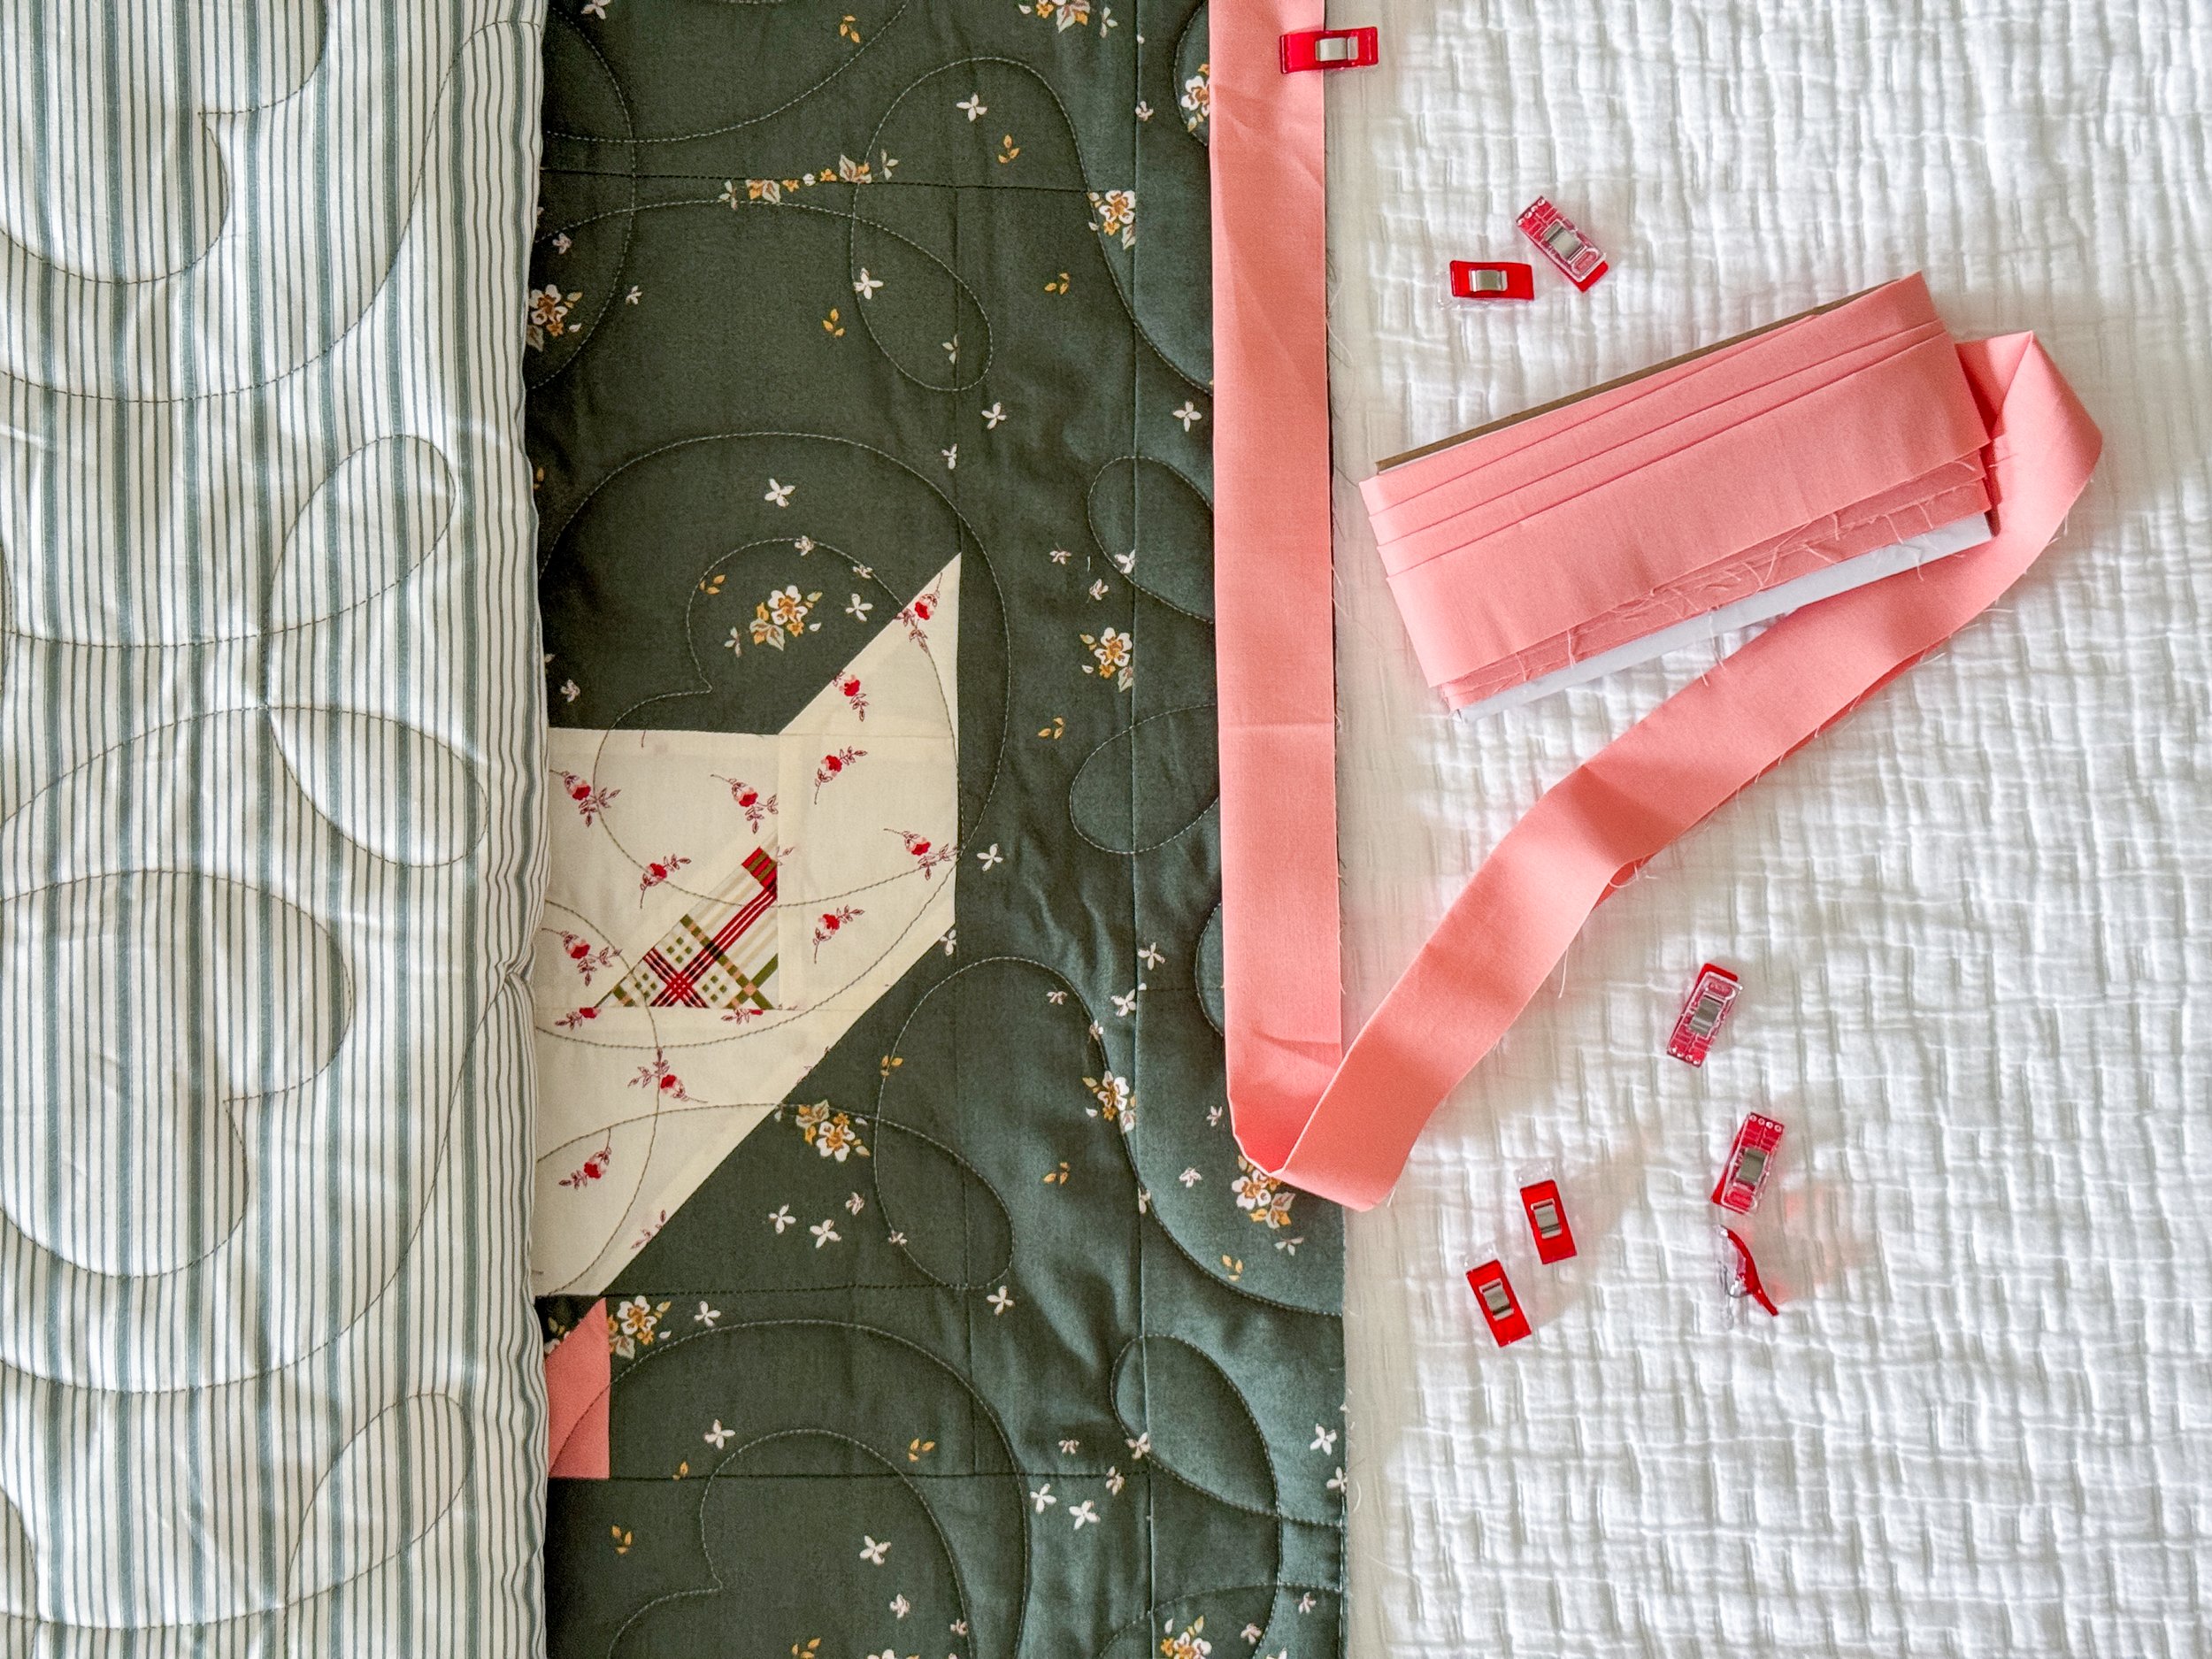
One of my many favorite parts of making a quilt is adding the binding. I attach my binding first by machine, then almost always hand-stitch it down for a hand-stitched finishing touch. I enjoy the bonding time—snuggling under the quilt and doing some slow stitching; it feels almost meditative and really lets me savor the project. For a video tutorial on how to add and finish off a Traditional Double-Fold Binding, see my tutorial on the Sweet Home QAL Tutorials page.

For the Spruce Goose Goose quilt I hand-stitched the binding using the 12 wt Wool thread from my Aurifil Threads Spruce Threads set. It’s the perfect weight and texture for a cozy winter quilt, giving a subtle, durable finish that feels right for cold-weather projects. I know many of you add quilt labels to your quilts — I’ve tried to form that habit myself, but I’ve never been able to make it stick, so my quilts remain unlabeled. If you do like to include a label, though, this is a great moment to add that small, meaningful detail into the binding edge or to the back of your quilt; it’s an easy way to personalize and finish your beautiful work.
WEEK 5 GIVEAWAY!
This is our last week of the sew-along and our final giveaway for the event. I want to thank all of our generous sponsors for their prizes and for creating such wonderful products for quilters and makers to use and enjoy.
HUGE THANK YOU TO Renaissance Ribbons FOR THIS WEEK’S GENEROUS GIVEAWAY PRIZE!
Renaissance Ribbons was originally started in the late 1980s by Edith Minne. Over the years she became a respected force in the quilting and trims world, building a prosperous business known for carrying some of the biggest names in the industry, including Tula Pink, Kaffe Fassett, and many more. In 2023 Chelsea O’Hayre, owner of Pink Door Fabrics, purchased Renaissance Ribbons when Edith chose to retire. Edith felt Chelsea “would be a great fit for the company,” and Chelsea believed in her heart that this acquisition would be an excellent opportunity to showcase the ribbons in fresh ways, bring additional designers on board, and further expand the company’s already extensive catalog of beautiful ribbons.
Follow Renaissance Ribbons: renaissanceribbons.com website * @renaissanceribbons on Instagram * Renaissance Ribbons on Facebook
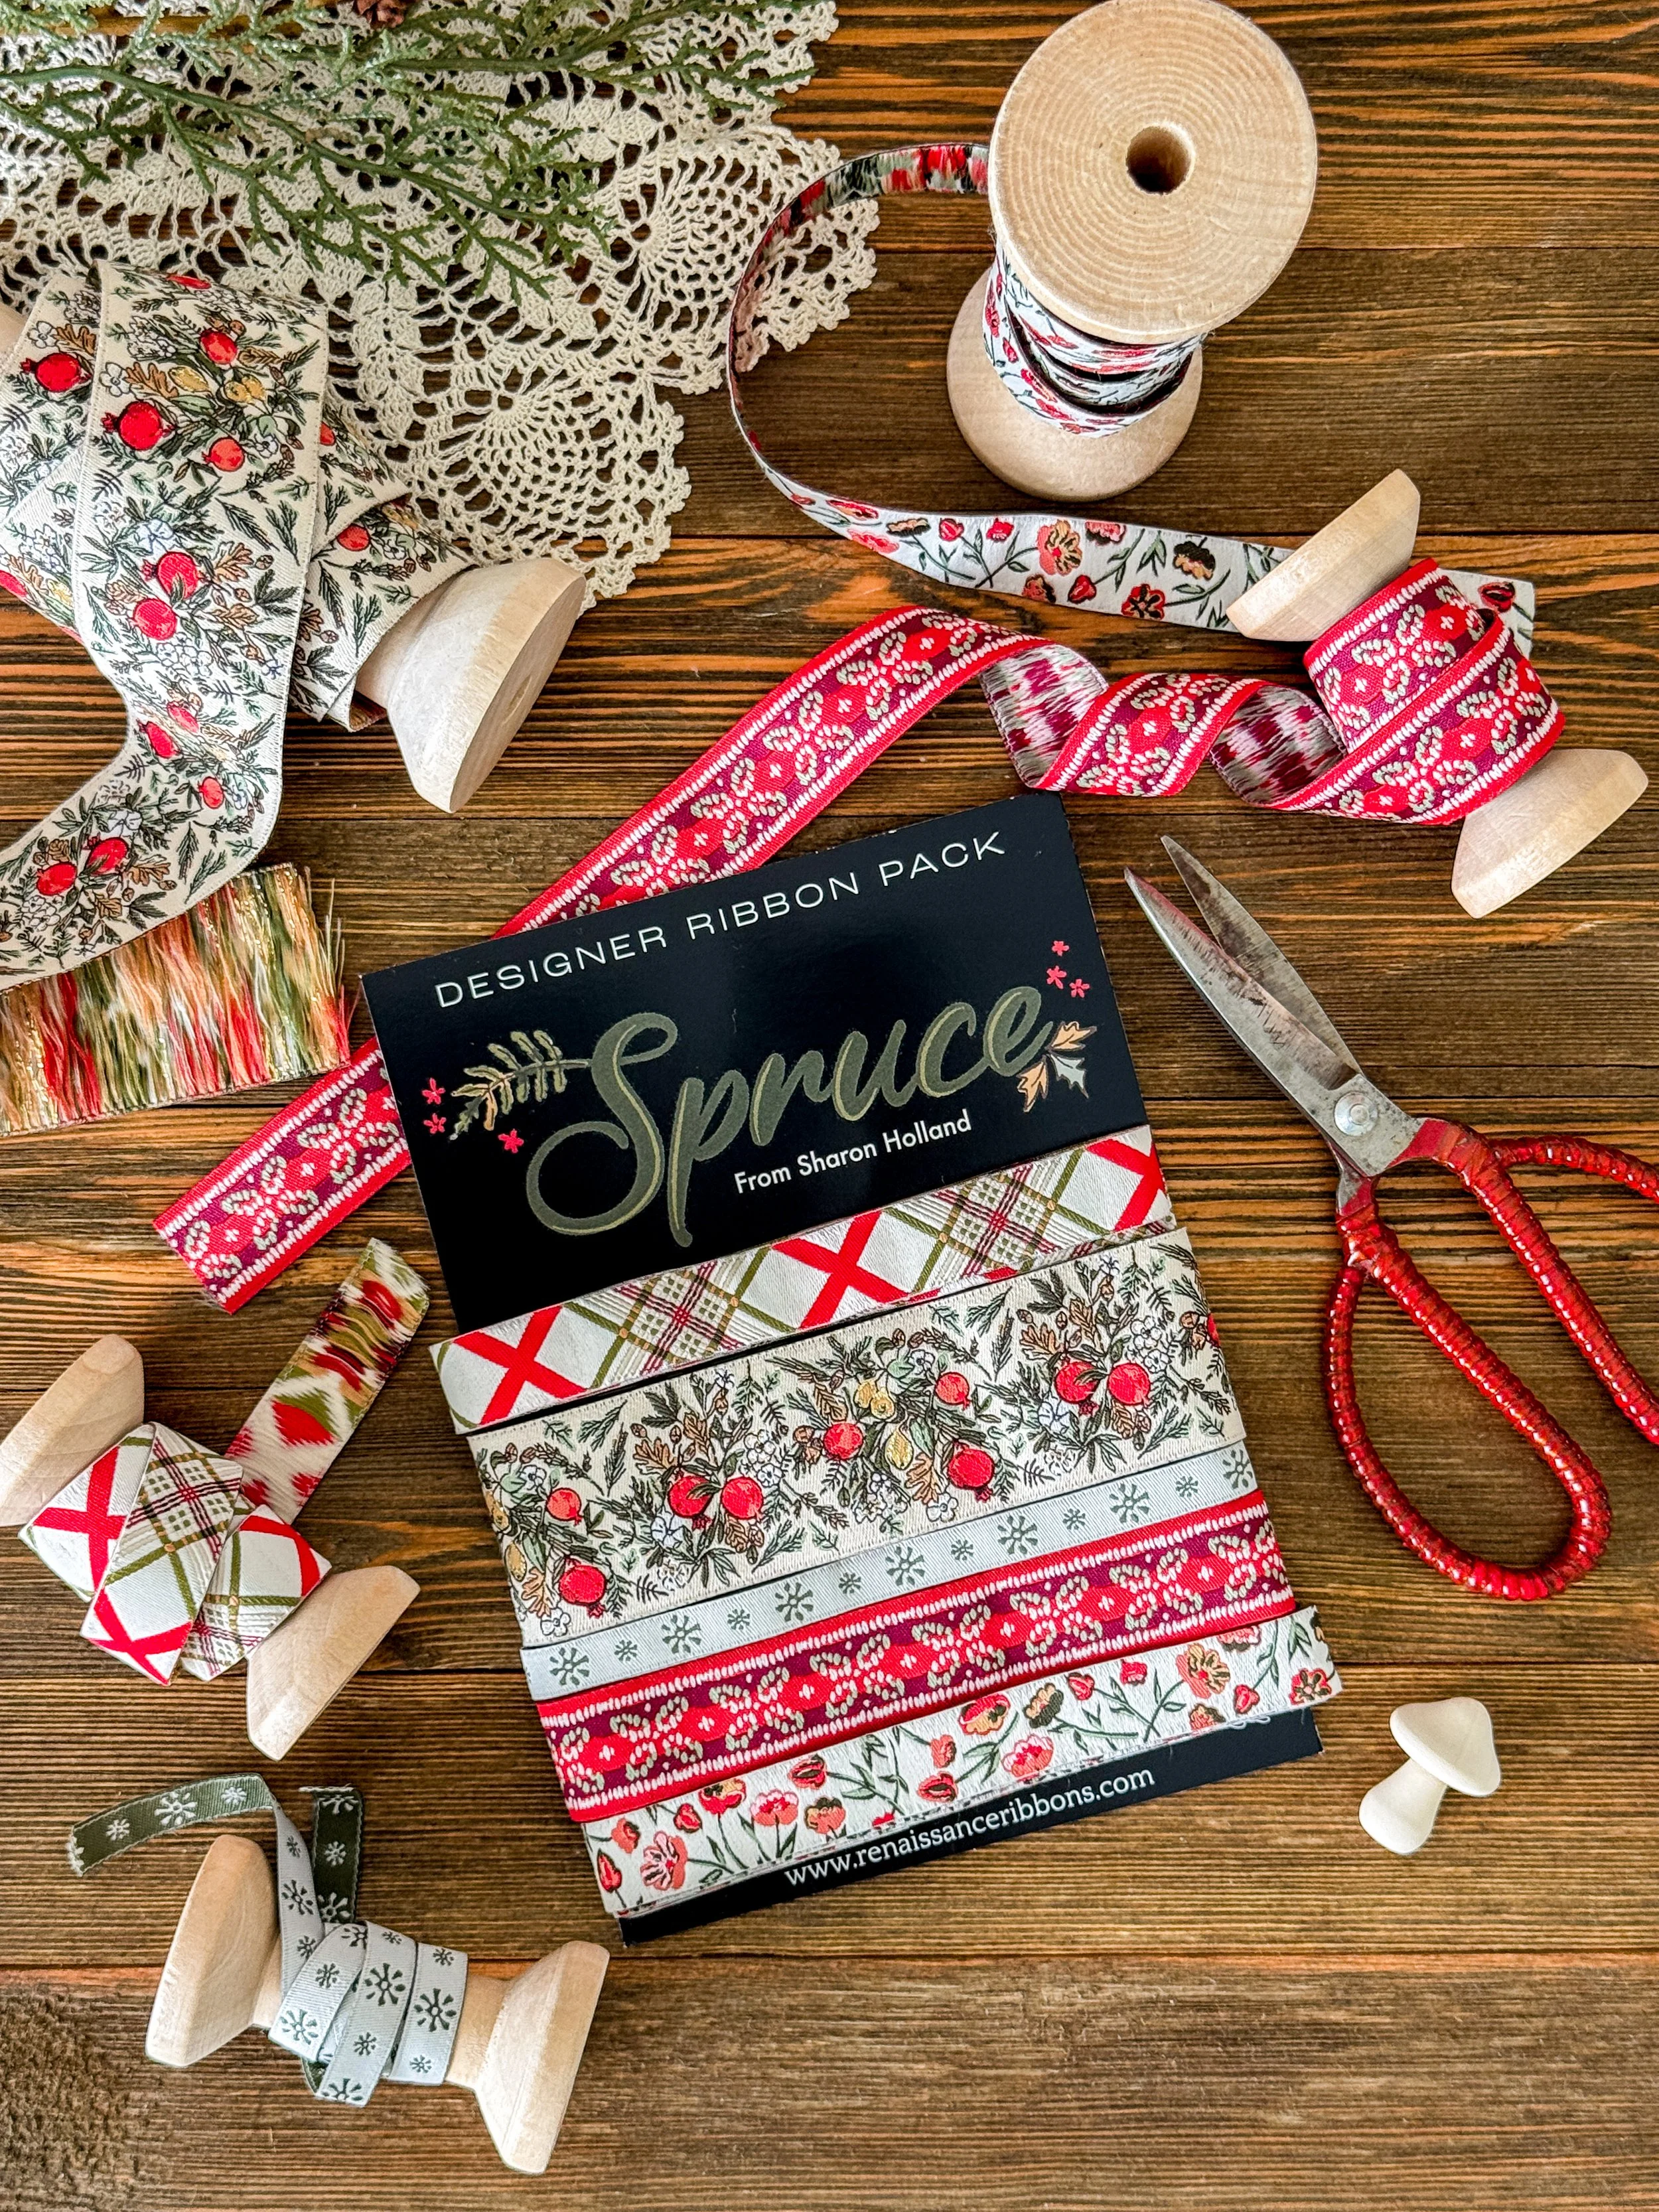
I’m still pinching myself that I have a Renaissance Ribbons collection to coordinate with my Spruce fabric collection! There are 10 different ribbon designs on spools, plus a 5-ribbon Designer Ribbon Pack that offers a sampler of smaller cuts. Each ribbon is beautifully stitched with rich color and fine detailing; these are woven ribbons, not printed, so the design is integrated into the fabric. They’re made from durable, washable polyester fibers for easy care.
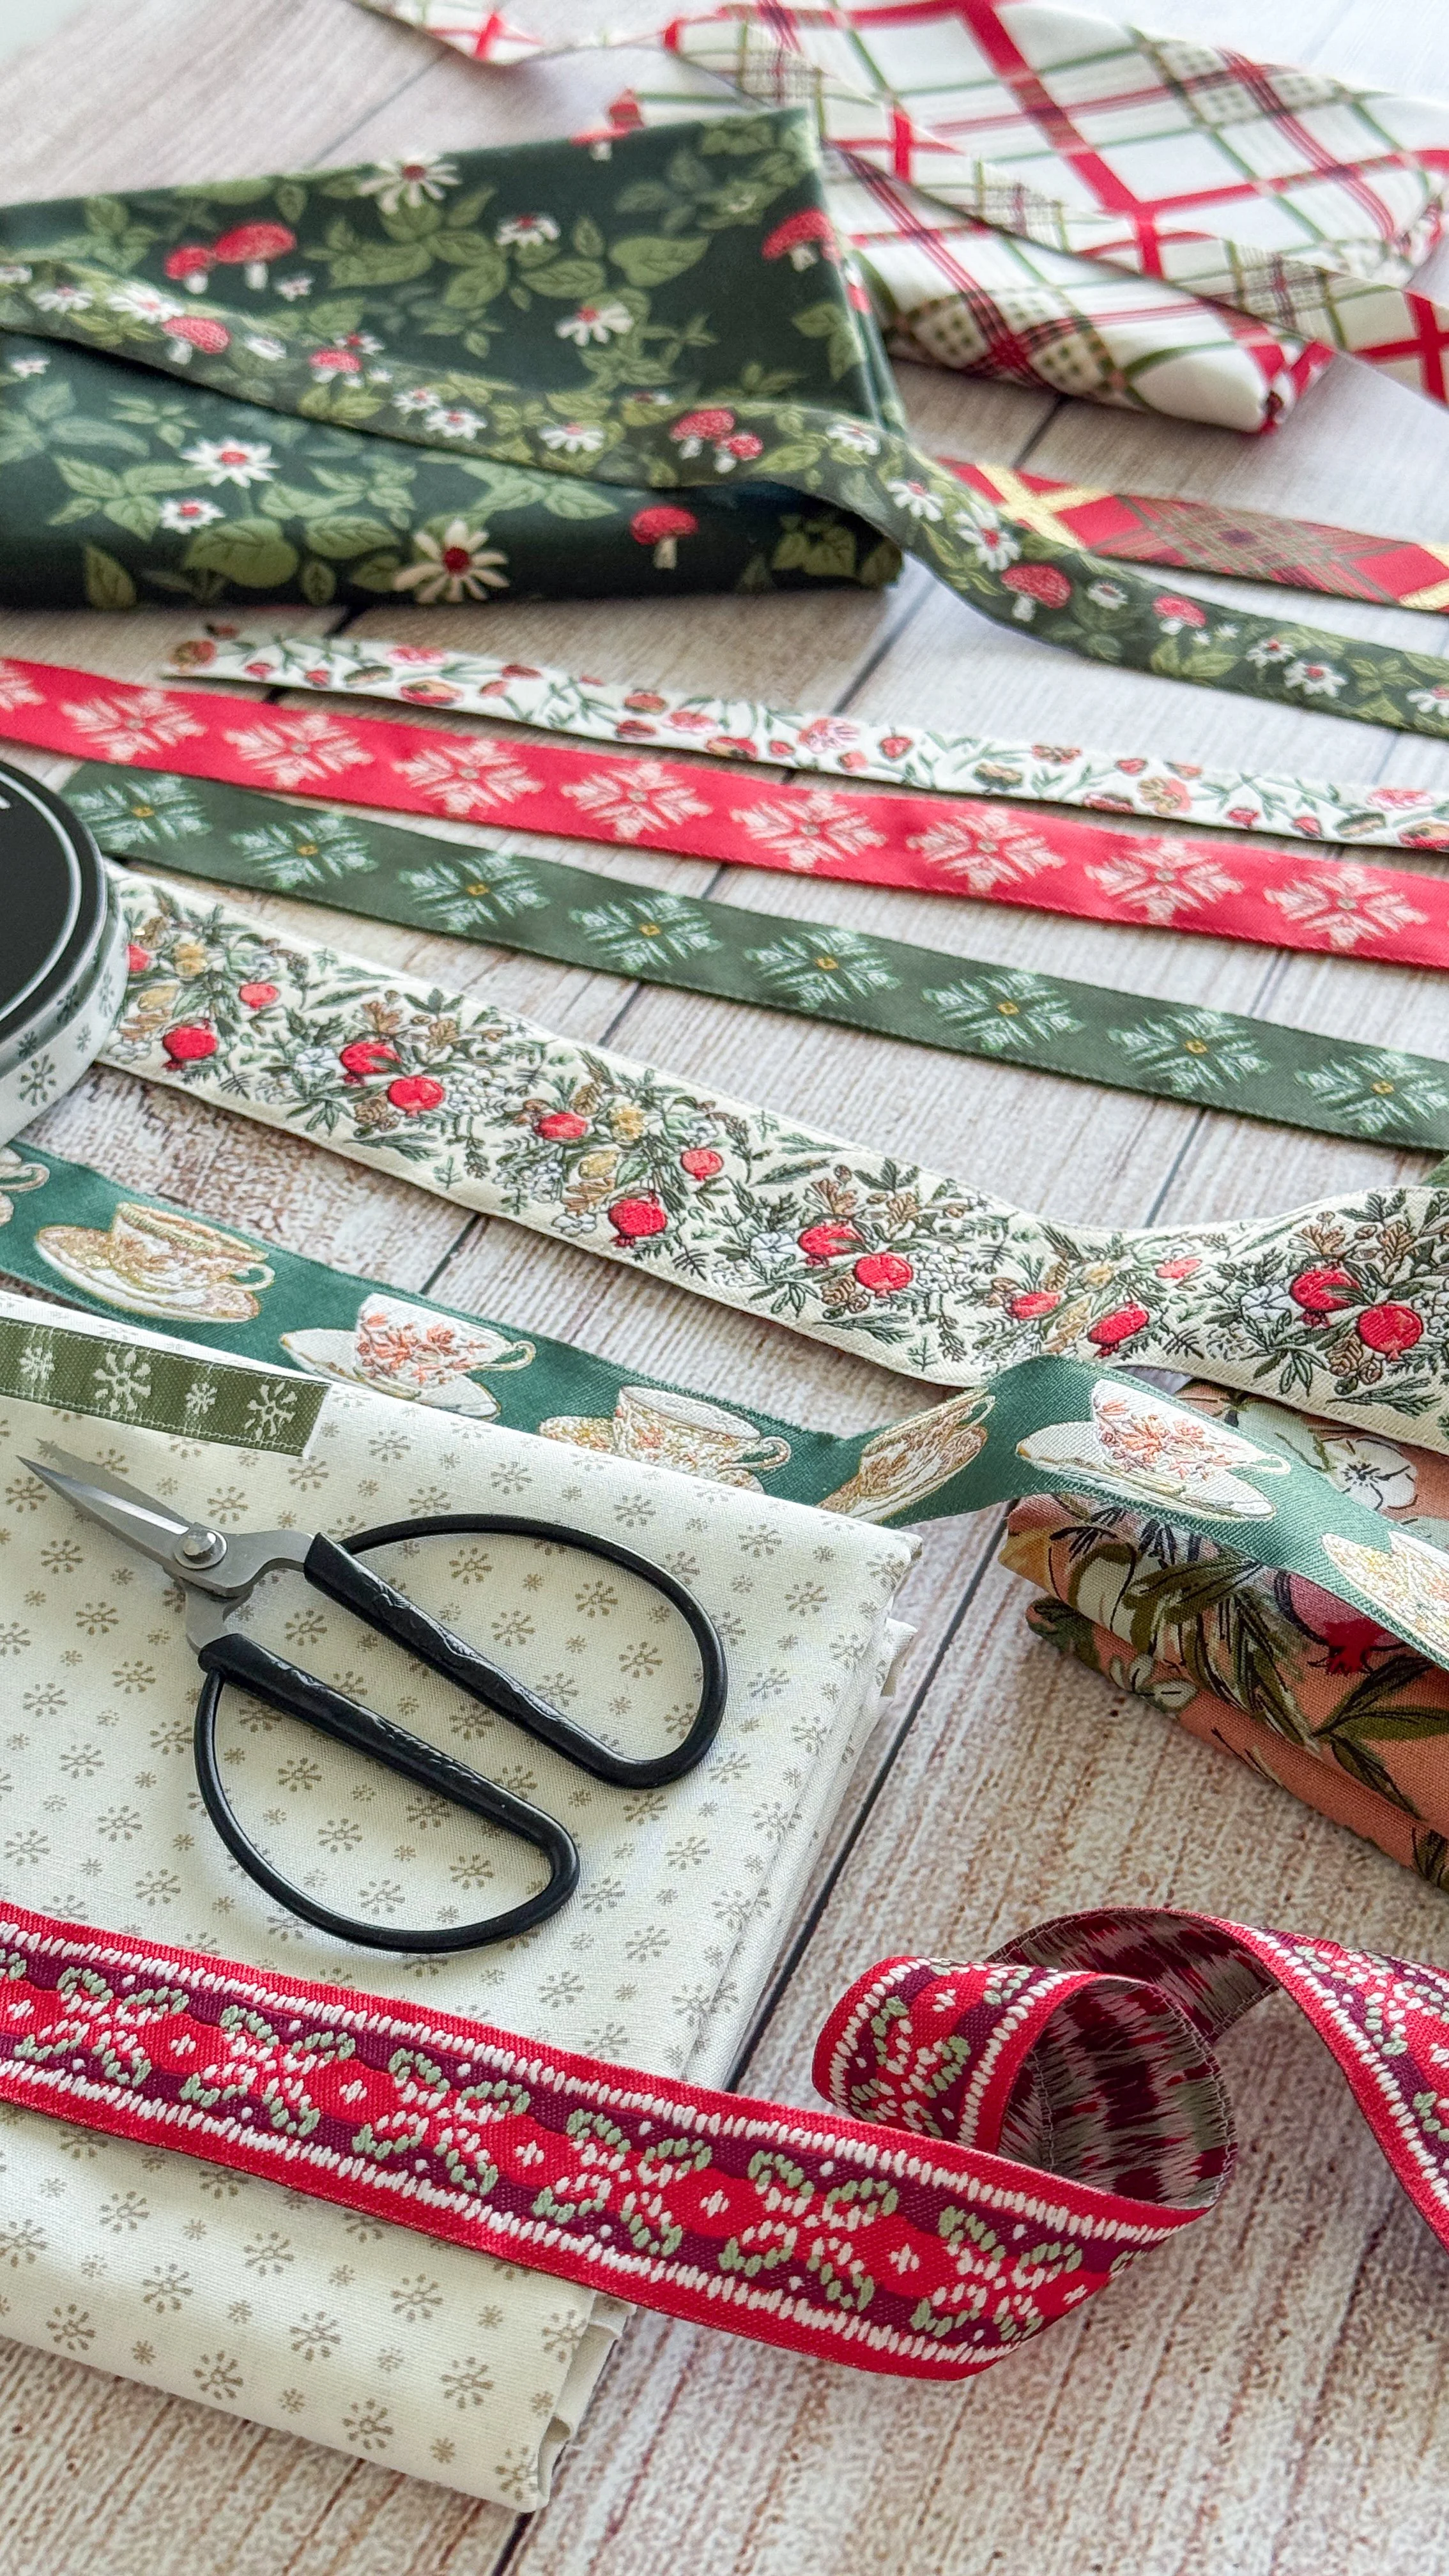
I used the red stylized leaves ribbon as part of my straps for a Goose Goose bag, stitching the ribbon to canvas strapping.

Here’s an example of taking the two Goose Goose blocks that were meant for pillows and transforming them into a practical tote bag instead. I followed Tamara Darragh of Remi Vail Studio “How to Make a Quilted Tote From Any Quilt Block” tutorial for constructing my bag, which can be used for any of your orphan blocks. I hand-quilted my bag using the 12 wt wool thread from my Aurifil Spruce Threads set and added two layers of Hobbs Batting Tuscany Bleached 100% cotton inside for a wonderfully substantial weight and soft, luxurious feel. You can see how each of the giveaway products showcased over the last 5 weeks can be easily incorporated into your sewing projects and how beautifully they look and perform.
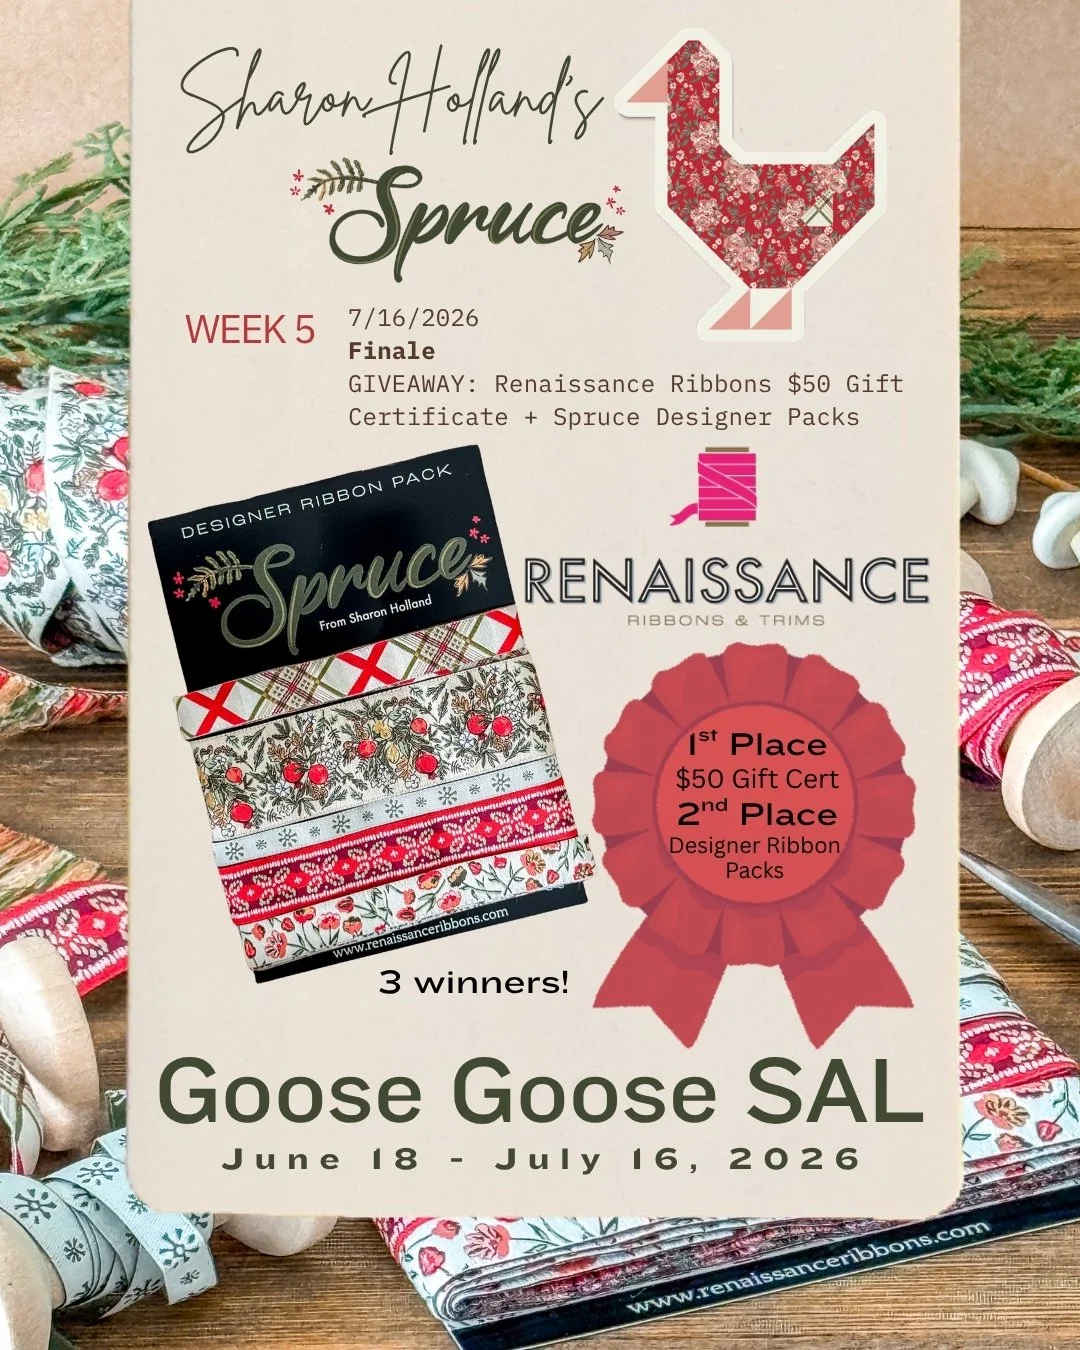
Three winners will be drawn from this week’s comment pool. The first-place winner will receive a $50 gift certificate from Renaissance Ribbons to spend on any of their wonderful products, including ribbons, patches, webbing, zippers, labels, and more. In addition, there will be two second-place drawings, and each of those winners will receive a Spruce Designer Ribbon Pack.
Giveaway is now closed
Congratulations to: Brandy Mushroom 1st Place winner and Elaine E. and Sharon Aurora 2nd Place winners
*Note: This giveaway is open to US addresses only, sorry no international shipping. If you're a "no reply" or anonymous commenter, please remember to include your email address in your comment--you can't win if I can't contact you!
1. Simply leave a comment in the comments section (below) on this Week 5 post and tell me if you’re sewing along with us! (Counts as a separate entry number (1) one.)
2. Leave a comment and tell me how you’d incorporate Renaissance Ribbons into your sewing. (This comment counts as a separate entry number (2) two).
3. Be following me (Sharon) on Instagram @sharonhollanddesigns and/or be signed up for my blog post newsletters AND be following Renaissance Ribbons on Instagram or Facebook (counts as your number (3) three separate entry) when you let me know you’re following us in a comment.
That’s THREE possible entries and up to three chances to win one of two Aurifil Thread thread sets! Enter now through Monday, July 20, 2026. I’ll draw two lucky winners from the comments pool on this post. The winning comments will be picked at random around 4 pm Central on Monday. I’ll post the name of the winners on this post once they've been notified and have responded back to my email.