
Heart Quilt Sew Along - Week 2

Welcome back for the second week of the Heart Quilt sew along hosted by myself and Maureen Cracknell! If you’re just joining us, you’ll want to get up to speed by reading last weeks post announcing the sew along. If you’re already making heart block or at the point to start adding the sashing and borders—this post is all about getting that top pieced!

The design for the heart block comes from Allison Harris of Cluck Cluck Sew. For this sew along we have Allison’s permission to use her block and we’ve selected and designed a quilt using an 8” square block, sashing, and border layout to make a 52’’ x 61’’ throw-size quilt. You’ll find a free download for our quilt layout, coloring sheet, and fabric requirements on the Sew Along page.
You may want to design a different layout for your heart blocks or follow Allison’s quilt tutorial from her site—Feel free to be creative! This is a casual sew along and perfect as a customizable project! Just be aware that the material list and cutting information on our sew along handout may not work if you’re changing the block size and layout. These sew along blog post support the sew along PDF handout.
We’ve not included piecing instructions in our free download because the Heart Block tutorial at Cluck Cluck Sew will cover what you’ll need to know about making the heart blocks. However, I’m adding some quick tips and tricks on cutting and piecing in the form of videos to my Stories on Instagram. You’ll also find these same videos archived in my Highlights under the #agfLOVEquilt circle.
Sharon Holland Designs Instagram Feed
Be sure to follow along with Maureen on her Instagram page as she makes two heart quilts using new Art Gallery Fabrics from Amy Sinabaldi’s MayFair and the new Foresta Fusion collections.
Find quilt kits and bundles for the fabrics used in Maureen’s quilt at Lady Belle Fabric.

Maureen Cracknell Instagram Feed
Adding Sashing and Borders
Once all your blocks are pieced it’s time to add the sashing and borders to complete the quilt top.
I’ve not given any instructions in the PDF for adding the sashing and borders other than material lists and cutting information. This blog post and supplemental Stories videos on my Instagram feed will be the pattern support and tutorial for piecing together the quilt top.

Heart Quilt Assembly Diagram
Start by adding one 1-1/2” x 8-1/2” horizontal sashing strip to all 30 blocks. Note that I’ve added the horizontal sashing to the tops of the block to hold the tiny flipped corners down for easier assembly.
Arrange your single-sashed blocks into 5 vertical rows of 6 blocks each. Add the last 5 horizontal sashes to the bottom 5 blocks.
Join the sashed blocks into five vertical block rows of six blocks each as shown on the above Quilt Assembly Diagram.

Now it’s time to add the long vertical sashing between the block rows. Here’s where you’ll use those (9) 1-1/2” x 42” strips held in reserve. We’ll be sewing those reserve strips into one long strip and then sub cutting them to make the vertical sashing needed for the top.
You can, of course, simply sew the long strips right sides together on the short ends to get the desired sashing lengths but I have a nicer way to make your sashing and here’s how I prefer to do it:
Make One Long Strip
Place (2) 1-1/2” x 42” strips right sides together at right angles. Sew with a diagonal seam as shown in the illustration below.
Continue adding strips in the same manner to make one long strip.
Trim seams to 1/4” and press seams open.

By creating a diagonal seam you will make a stronger seam because of its longer surface area and the seam will be less noticeable on the quilt. Pressing the seams open helps the seam to lay nice and flat.
Cut Sashing to Size
Measure the vertical block rows and average those number to determine the vertical sashing length. Note: If you’ve sewn your blocks true-to-size up to this point your vertical sashing rows size will measure 55-1/2’’ long but everybody sews differently so measure first to check the size you’ll need for your quilt.
Cut 6 strips from the long strip to your measurement. Tip: Cutting from one continuous strip helps to stagger where the seams will land on the quilt and give a nicer overall appearance.
Sew the vertical sashing strips alternately with the block rows.

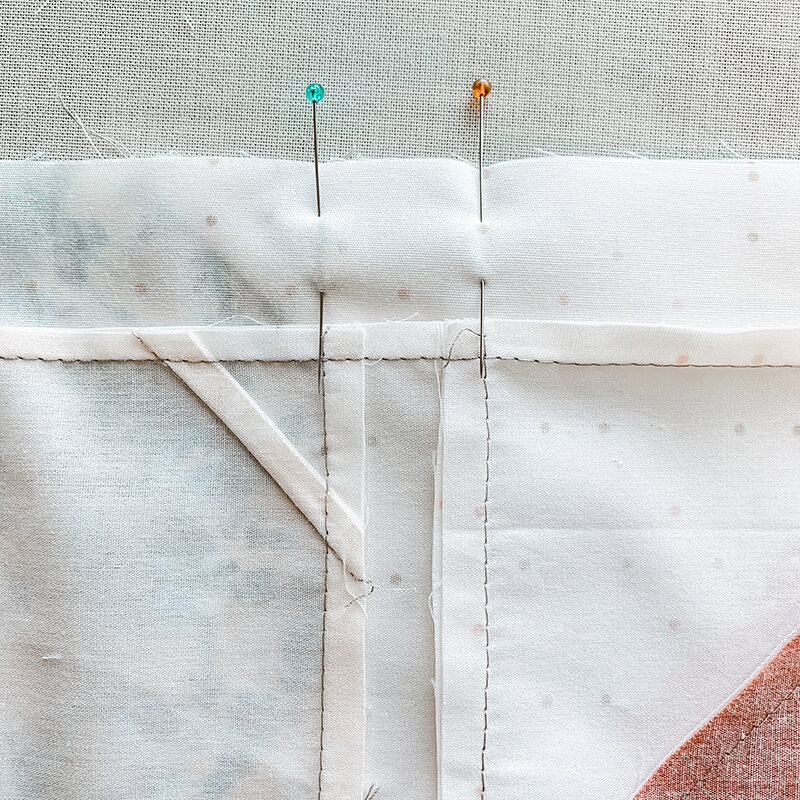
Tip: When attaching sashing to your vertical block rows, use the previous block rows to help keep everything lined up. Notice how I’ve pinned at the horizontal sashing seam line and lined up those seams with the sashing of the row next to it.
Pressing is your friend! Press every step of the way when assembling your quilt top for better results.
Adding Borders
In the same manner as making the vertical sashing, sew the (6) 3-1/2” x 42” strips together to make one long strip.
Measure the two sides of the quilt and average those numbers. Cut 2 strips to this size. Note: If you’ve sewn your top true-to-size up to this point your vertical border (for the sides) will measure 55-1/2’’ long but everybody sews differently so measure first to check the size you’ll need for your quilt.
Stitch to the sides of the quilt.
Measure the top and bottom of the quilt including the border. Average those numbers and cut 2 strips to this measurement. Sew to the top and bottom of the quilt. Note: If you’ve sewn your top true-to-size up to this point your horizontal border (for the top and bottom) will measure 52-1/2’’ long but everybody sews differently so measure first to check the size you’ll need for your quilt.
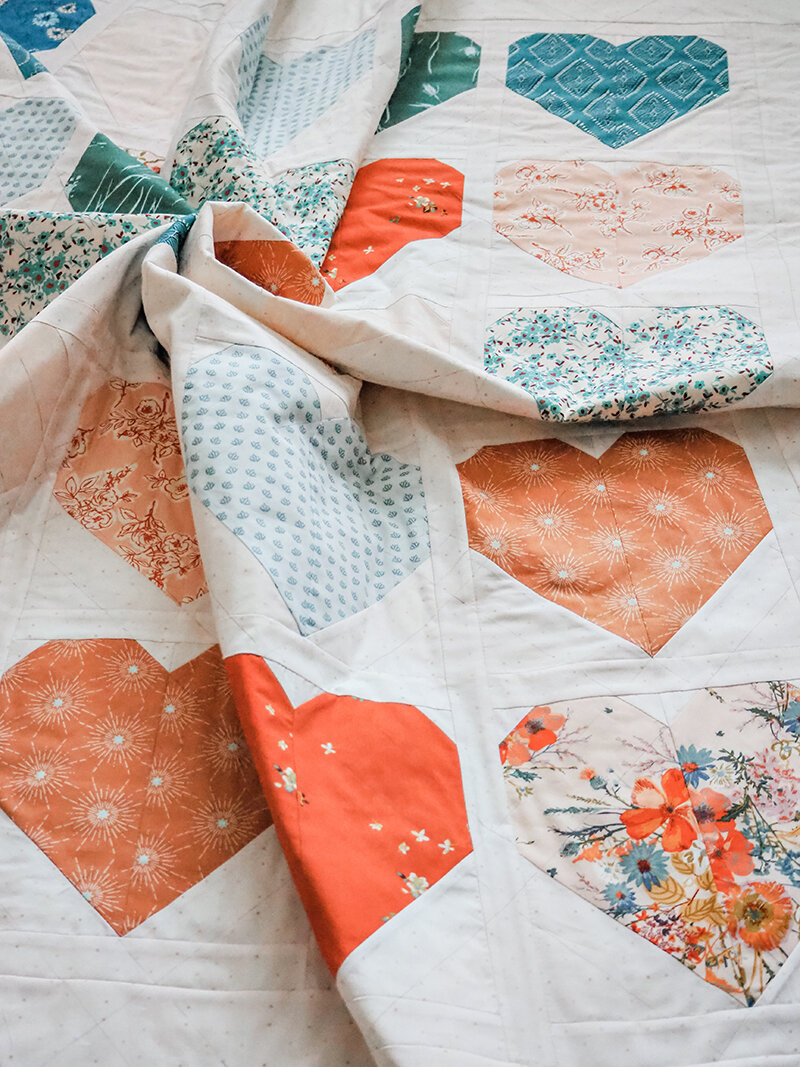
Congratulations, you just completed your Heart Quilt top!!!! Next Wednesday we’ll go over how to make the quilt sandwich, quilt with a quilting diagram of how I will quilt my top, and binding of your quilt along with the full reveals of our quilts.
Meanwhile, both Maureen and I’ll be posting our progress on Instagram and we encourage you to follow along and share your fabric pull and block progress as well. When posting your quilt to Instagram use the sew along hashtag of #agfLOVEquilt and be sure to tag @sharonhollanddesigns @maureencracknell and @cluckclucksew so we can see your progress! If you’re sewing with Art Gallery Fabrics don’t forget to tag them too as they love to see what Makers are making with @artgalleryfabrics !
I am an Amazon Associate site and earn from qualifying purchases on the products I’ve linked below. The helpful products selected are the same or similar to materials used to make the project(s) in this blog post or related items I think you may enjoy.