
Rambler Quilt

Rambler Quilt by Sharon Holland
There’s been a lot going on since my last post! Have you heard that my new Kismet fabric collection for Art Gallery Fabrics is now available in your favorite quilt shop? Yes!!! I normally would have shops listed on my FABRICS page with online shops carrying my newest collection but one, I’ve been too busy with projects to work on compiling the list and two, many shops sell out of their inventory of Kismet about as fast as they get it in so to keep it current is not doable at this time. The best thing is to check your local or favorite online shops first and then do an internet search for Kismet by Sharon Holland or Art Gallery Fabrics Kismet and see what pops up. Inventories change daily and more Kismet is coming soon so be patient and persistent. Once I have a bit more time I’ll start adding to my stock list Fabric page.
Rambler
There’s a new quilt in my SHOP and it’s called Rambler. I love that name for a quilt and I love this quilt. In fact I love it so much I made three versions! Prepare yourself for an epic blog post and virtual quilt show of Rambler quilts because there’s my quilts to show you and the quilt of six of my testers.

Rambler in Kismet fabrics by Sharon Holland
The first quilt to show is the one that started the whole Rambler parade. It’s made with my new Kismet fabrics from Art Gallery Fabrics and has a wonderful retro 70’s look of a kitted afghan. This big boy is 72-1/2’’ x 86-1/2’’ and is available as a kit from Cottoneer (more on that, keep reading).
The pattern has a very fun technique for making, what I call, Blunt Flying Geese and has very little fabric waste compared to a Flippy Corner technique. The pattern even has coloring pages for you to play around with color variations and comes in two sizes: A full-size quilt and an 18-1/2’’ x 75-1/2’’ table runner.

Both my full size quilts have Hobbs Heirloom Cotton inside for a traditional drape and feel. Because of time crunch I ended up quilting all three of my Rambler makes (two full quilts and one runner). The big quilts are free motion leaves and stylized flower and it turned out pretty good! I like the dense, organic rambling roses effect.

On my Kismet Rambler I used the Fleuron Haven print from the Kismet collection and I’m crazy over this floral as a backing! Having a backing like this makes a quilt double-sided in my book.

I’m excited to be collaborating with Andrea Patton at Cottoneer to bring you kits of the Kismet Rambler. Cottoneer has a huge selection of your favorite fabrics as well as beautifully curated bundles—you’re going to love shopping for all your fabric needs at Cottoneer. The Rambler quilt kit will have all the fabrics I used in my quilt and you can get that amazing floral for the backing while you’re there—how easy is that??!!
For any of the Rambler kits you’ll need to purchase the PDF pattern separately from my SHOP.

Photo courtesy of Cottoneer
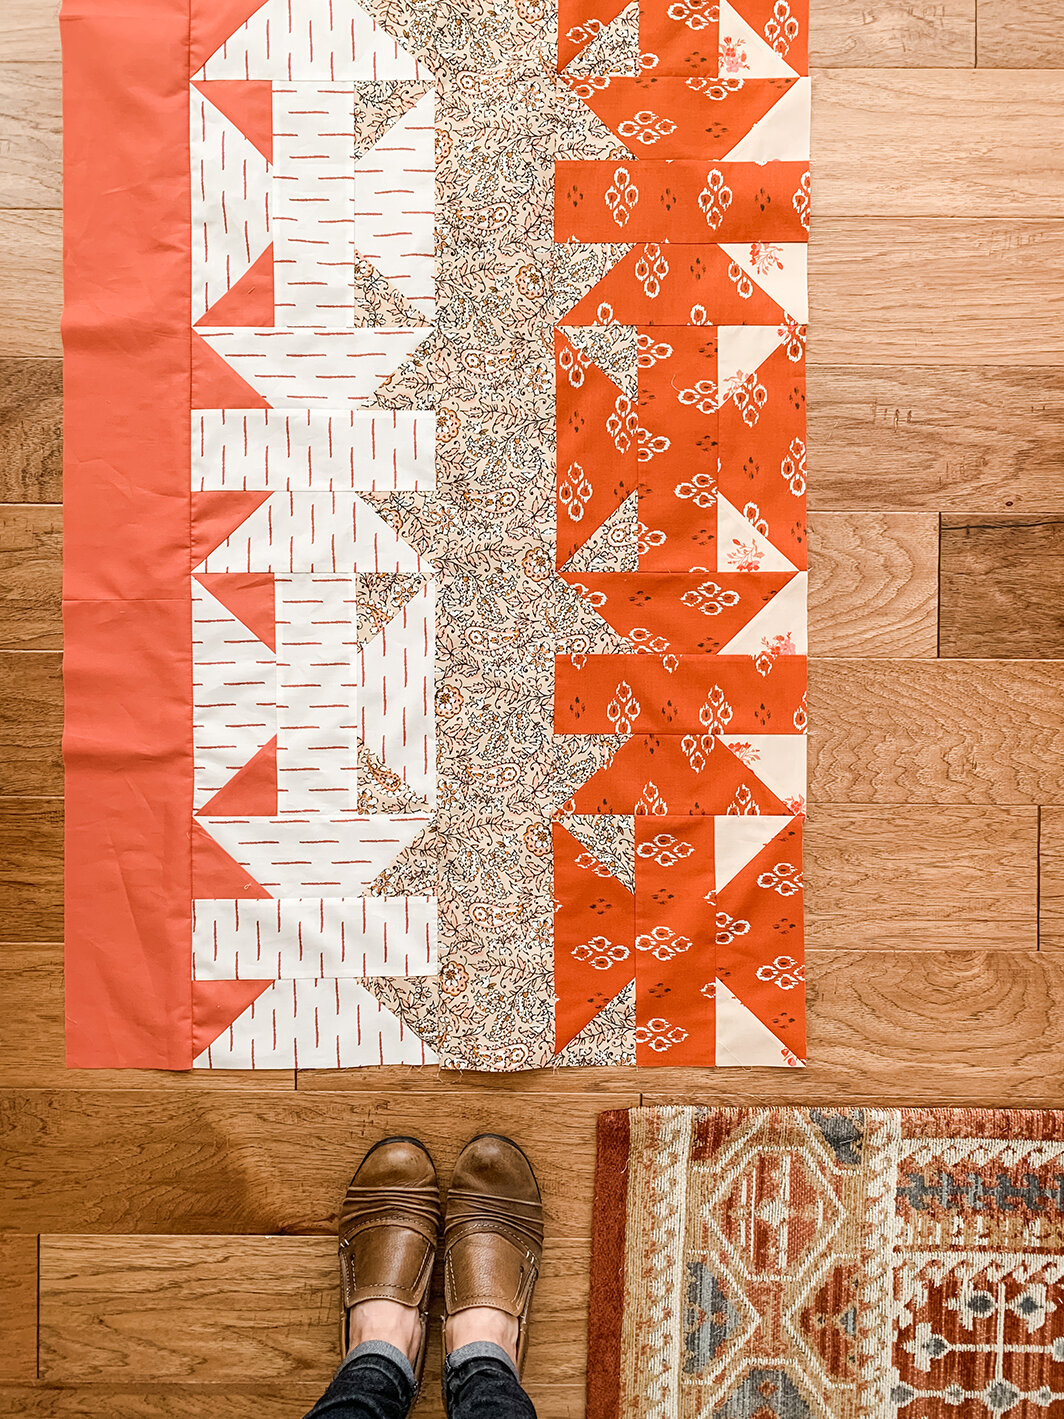
While I was waiting for my Kismet fabric to arrive I was anxious to begin work on testing out this quilt pattern and making a sample quilt. I took a look at my fabric collections and curated a peach and spruce quilt I’m calling the Just Peachy Rambler. You know I love these soft peach tones and normally I tend toward peach and teals but the new spruce greens have me heading in a new direction!

For this quilt I selected prints from my Signature and Spirited lines with the addition of my prints found in Ballerina Fusions and Serenity Fusions. Throw in the beautiful new Northern Waters Pure Solid and some Smooth Denim for the binding and you have this soft, peach and spruce version of Rambler.

Don’t worry about trying to source all these fabrics on your own because Victoria Newmyer at Midlife Quilter will be carrying kits of my Just Peachy Rambler quilt. I know you’ll love Victoria’s shop and services!


I quilted this one exactly the same as I had the Kismet version and they feel like brother and sister quilts. I used the butterfly print from my Signature fabric line to back my quilt but you’ll be able to find many beautiful backing options at Victoria’s shop.

Photo courtesy of Midlife Quilter
Victoria even has the sweetest “pretty things inside” muslin bags she sends the fabrics in and made special sized ones for the quilt kits!


Rambler Runner
The additional size option on the Rambler quilt pattern is instructions for a table runner. I personally love table runners because they’re a small project for time and materials, easy to quilt on your own (or even hand quilt), and it’s pretty much my only seasonal decorating change in my house so a fast decor item to your table!

For a festive holiday look that will take me through Valentine’s Day, I chose the Kismet Fleuron Sanctuary print in cranberry tones and Dashing Cinnamon (lines) print. You could easily make this runner in a weekend!

For quilting, I went with a very easy and simple diagonal crosshatch quilting and did it on my domestic sewing machine. I marked out lines with a friction pen and followed the lines of the blocks then went back in and quilted halfway between with more diagonal lines.

I used Kismet Mudcloth Berries both for the backing and the binding. I’m excited to put this into use and start pulling out a few Christmas items. I think I need to make some napkins in this print, too!
Meet the Testers
Now’s the part in my post where I introduce the fabulous testers that worked on this quilt pattern with their own selection of Art Gallery Fabrics. It’s amazing to see how this quilt changes depending upon fabric selection, prints, colors, and placement. To see more of their work, be sure to follow them on the provided links.

Rambler Quilt make by Tracey Taber-Perry
This gorgeous, serene Rambler quilt was made by pattern tester Tracey Taber-Perry @ttabes80 . Tracey is a new comer to quilting but does the nicest work you’d think she’s been quilting for years! She used Art Gallery Fabrics new Serenity Fusions line for her palette and I think this has a beach vibe with the soothing colors as well as a wintery look to it—so it’s perfect year round and would work in any decor!

Rambler quilt make by Marija Vujcic
Marija Vujcic is an amazing sewist and quilter and I recommend you follow her blog at Mara Quilt Designs. Marija pulled fabrics from her stash of assorted Art Gallery Fabrics to make a quilt for her son and made this bold blue beauty! She’ll be free motion quilting her top and I believe plans to back with Minky so you’ll want to check in with her to see the progress and finished quilt—it’s sure to be stunning!

Rambler quilt make by Lindsey Fuessley
Lindsey Fuessley as put a color wheel spin on the Rambler with a palette of muted orange-red, mustard yellow, sage greens, and denim blues. Another feature of Lindsey’s quilt is that her fabrics are mostly blenders or solids and has a very modern feel and graphic pop. Follow Lindsey on her Instagram account @lindseymakes —it’s a quilt feast for the eyes!
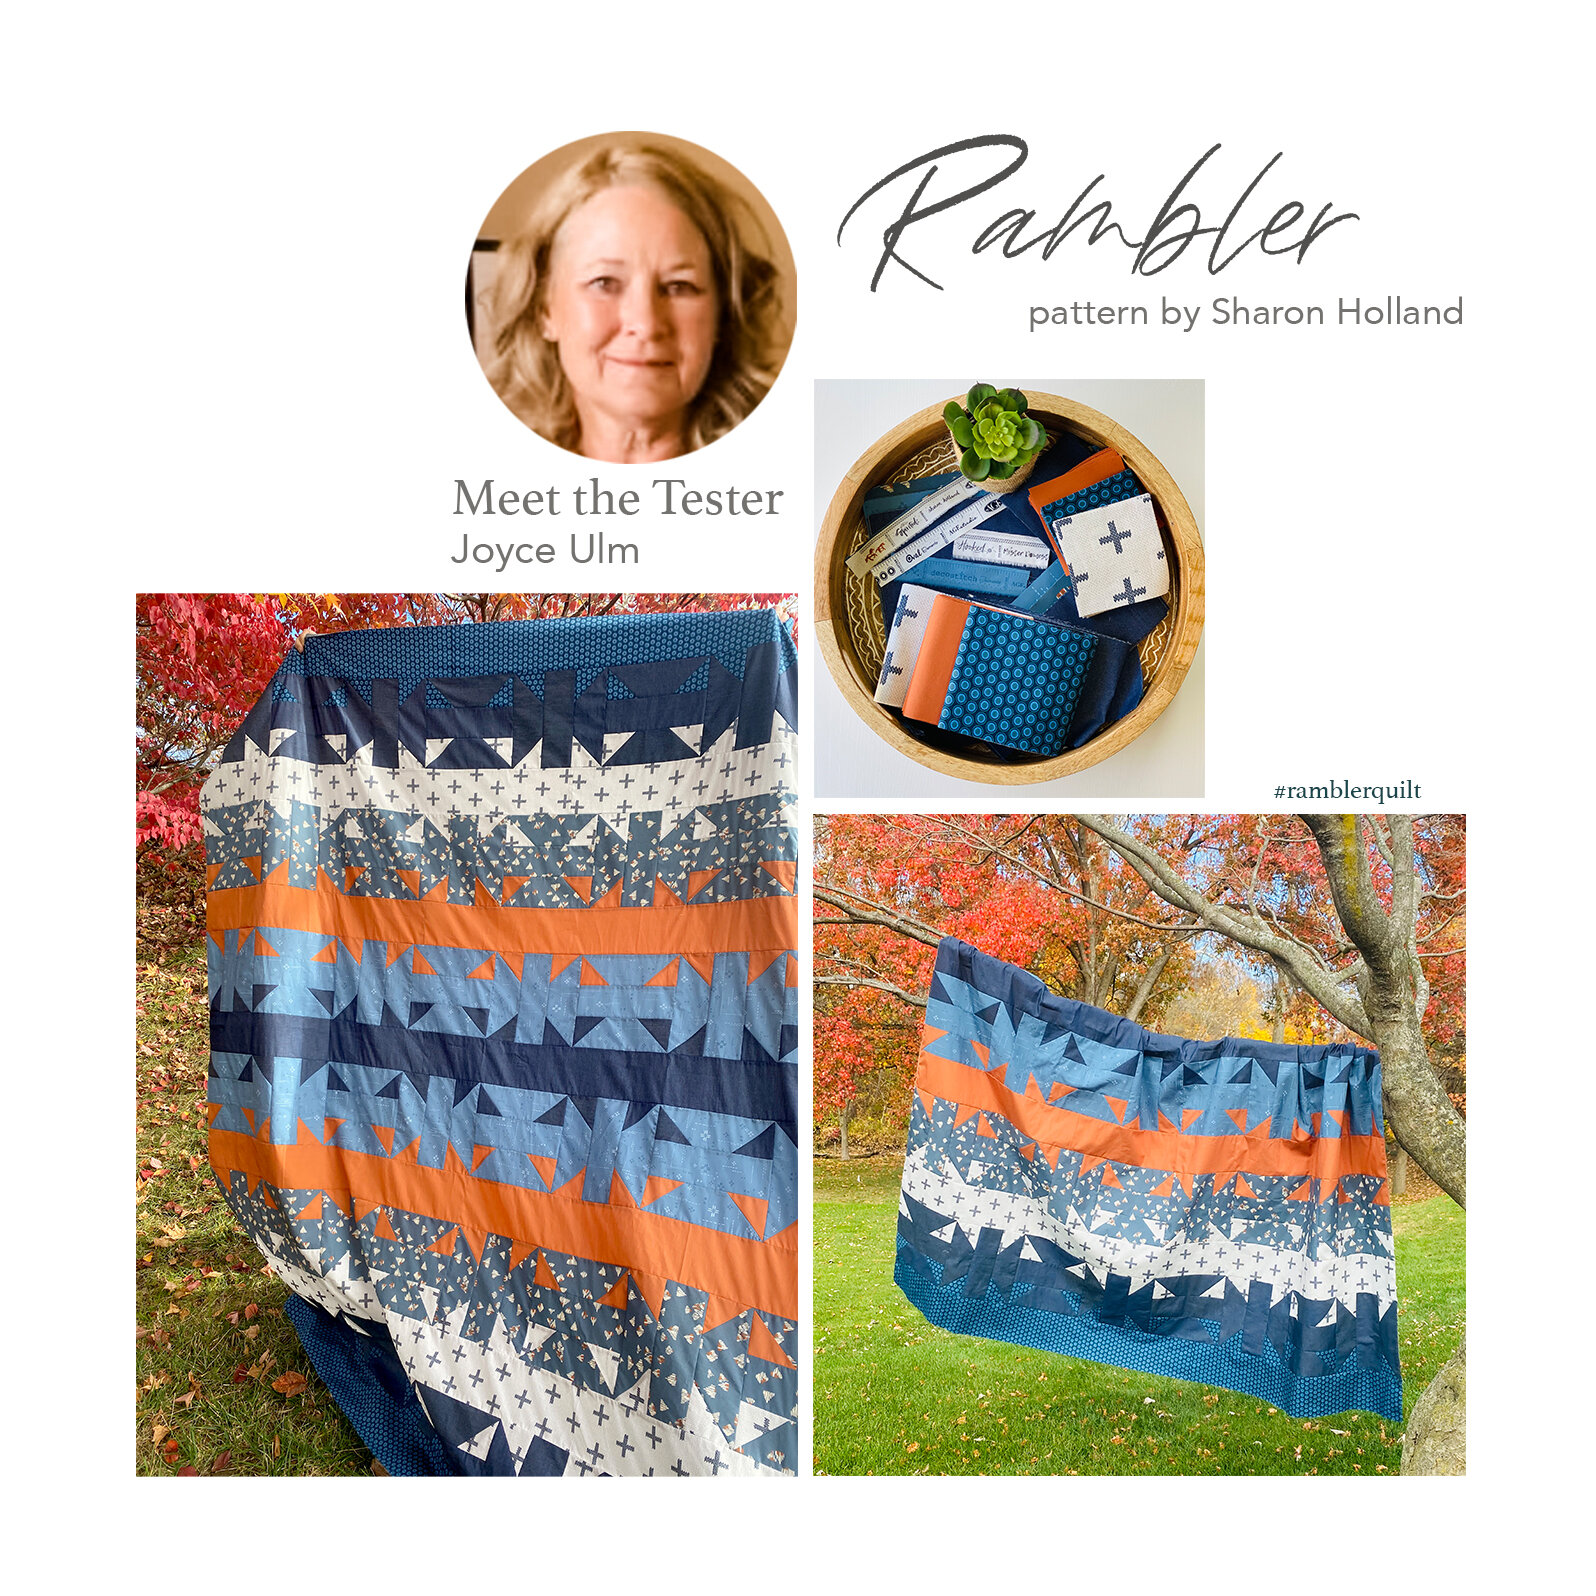
Rambler quilt make by Joyce Ulm
Joyce Ulm is a prolific quilter and has done it again with her Rambler make of complimentary blues and rusty orange all in Art Gallery Fabrics solids, blenders, and geometric prints. This would make a great quilt for a guy on your gift list! I know Joyce already has this quilted since this picture collage was made so check out her IG account to see the full reveal. See more of Joyce’s work on Instagram @evamaecustomquilts, Etsy shop, and on her Facebook blog HERE.

Rambler quilt make by Jennifer Cannon
Jennifer Cannon has a keen eye for putting together great fabric combinations and her Rambler make is no exception! This mod pop of teal, mauve, black, and burgundy are pulled from a variety of AGF collections. You can make a quilt just like this because Jennifer is offering Tidal Pool Rambler quilt kits in her Piper Autumn Designs shop. You’ll also love her Etsy shop filled with your favorite fabrics and fabulous bundles.

Rambler quilt make by Christine Trotta
Last, but not least is Christine Trotta’s Rambler quilt make. Christine has collaborated with Victoria Newmyer of Midlife Quilter to curate an Art Gallery Fabrics bundle for the Trellis Rambler version. Burgundy, cream, denim blue, and latte make this palette timeless. The fun mix of lattice geometrics, denim, and florals have a fresh air look to this lovely quilt. For more images of this quilt finished be sure to visit Christines Etsy Shop and Blog as well as her Instagram account @serendipityinlovecreations.

Find the Trellis Rambler kit at Midlife Quilter in all the fabrics seen here plus the binding (not pictured) to make your own!

Photo courtesy of Midlife Quilter
I hope you enjoyed that Rambler parade of quilts and are inspired to make one, or two, or three for yourself or those on your gift list. Find the pattern in my SHOP and follow me on Instagram @sharonhollanddesigns as I post and share more Rambler makes.
GIVEAWAY NOW Closed
Congratulations to: Mackenzie, Sharon, and Angela Miller!!!
* Note * This giveaway is open to EVERYONE! If you're a "no reply" or anonymous commenter, please remember to include your email address in your comment--you can't win if I can't get a hold of you!
1. Simply leave a comment here under this post! (First comment entry).
2. My followers get a third entry! If you follow via subscribing to my posts, through Bloglovin (or other service), or on Instagram, just let me know by making a separate comment here to record that entry. (Separate comment counts as second entry). Note: I'm no longer on Facebook.
3. Help spread the word!! I know that many of you already do, so I thought it would be nice to add that as another way to enter! Spread the word about this giveaway on YOUR instagram, facebook, tweet, pin, blog post, etc... (separate comment counts as a third entry).
That’s THREE possible entries! Enter now through Friday, November 20, 2020. I’ll be drawing names for three winners. The winning comments will be picked at random around 4pm Eastern. I’ll post the name of the winners on this post once they've been notified and responded to my email.
Happy sewing,
Sharon
I am an Amazon Associate site and earn from qualifying purchases on the products I’ve linked below. The helpful products selected are the same or similar to materials used to make the project(s) in this blog post or related items I think you may enjoy.