Hold Tight Quilt

Hold Tight Quilt

Hold Tight Baby Quilt by Sharon Holland Designs

Hold Tight Baby Quilt by Sharon Holland Designs

I’m so excited to bring you this new PDF quilt pattern! I swear this is has been the most fun I’ve ever had designing and making of a quilt.

Pure Solids Selection.jpg

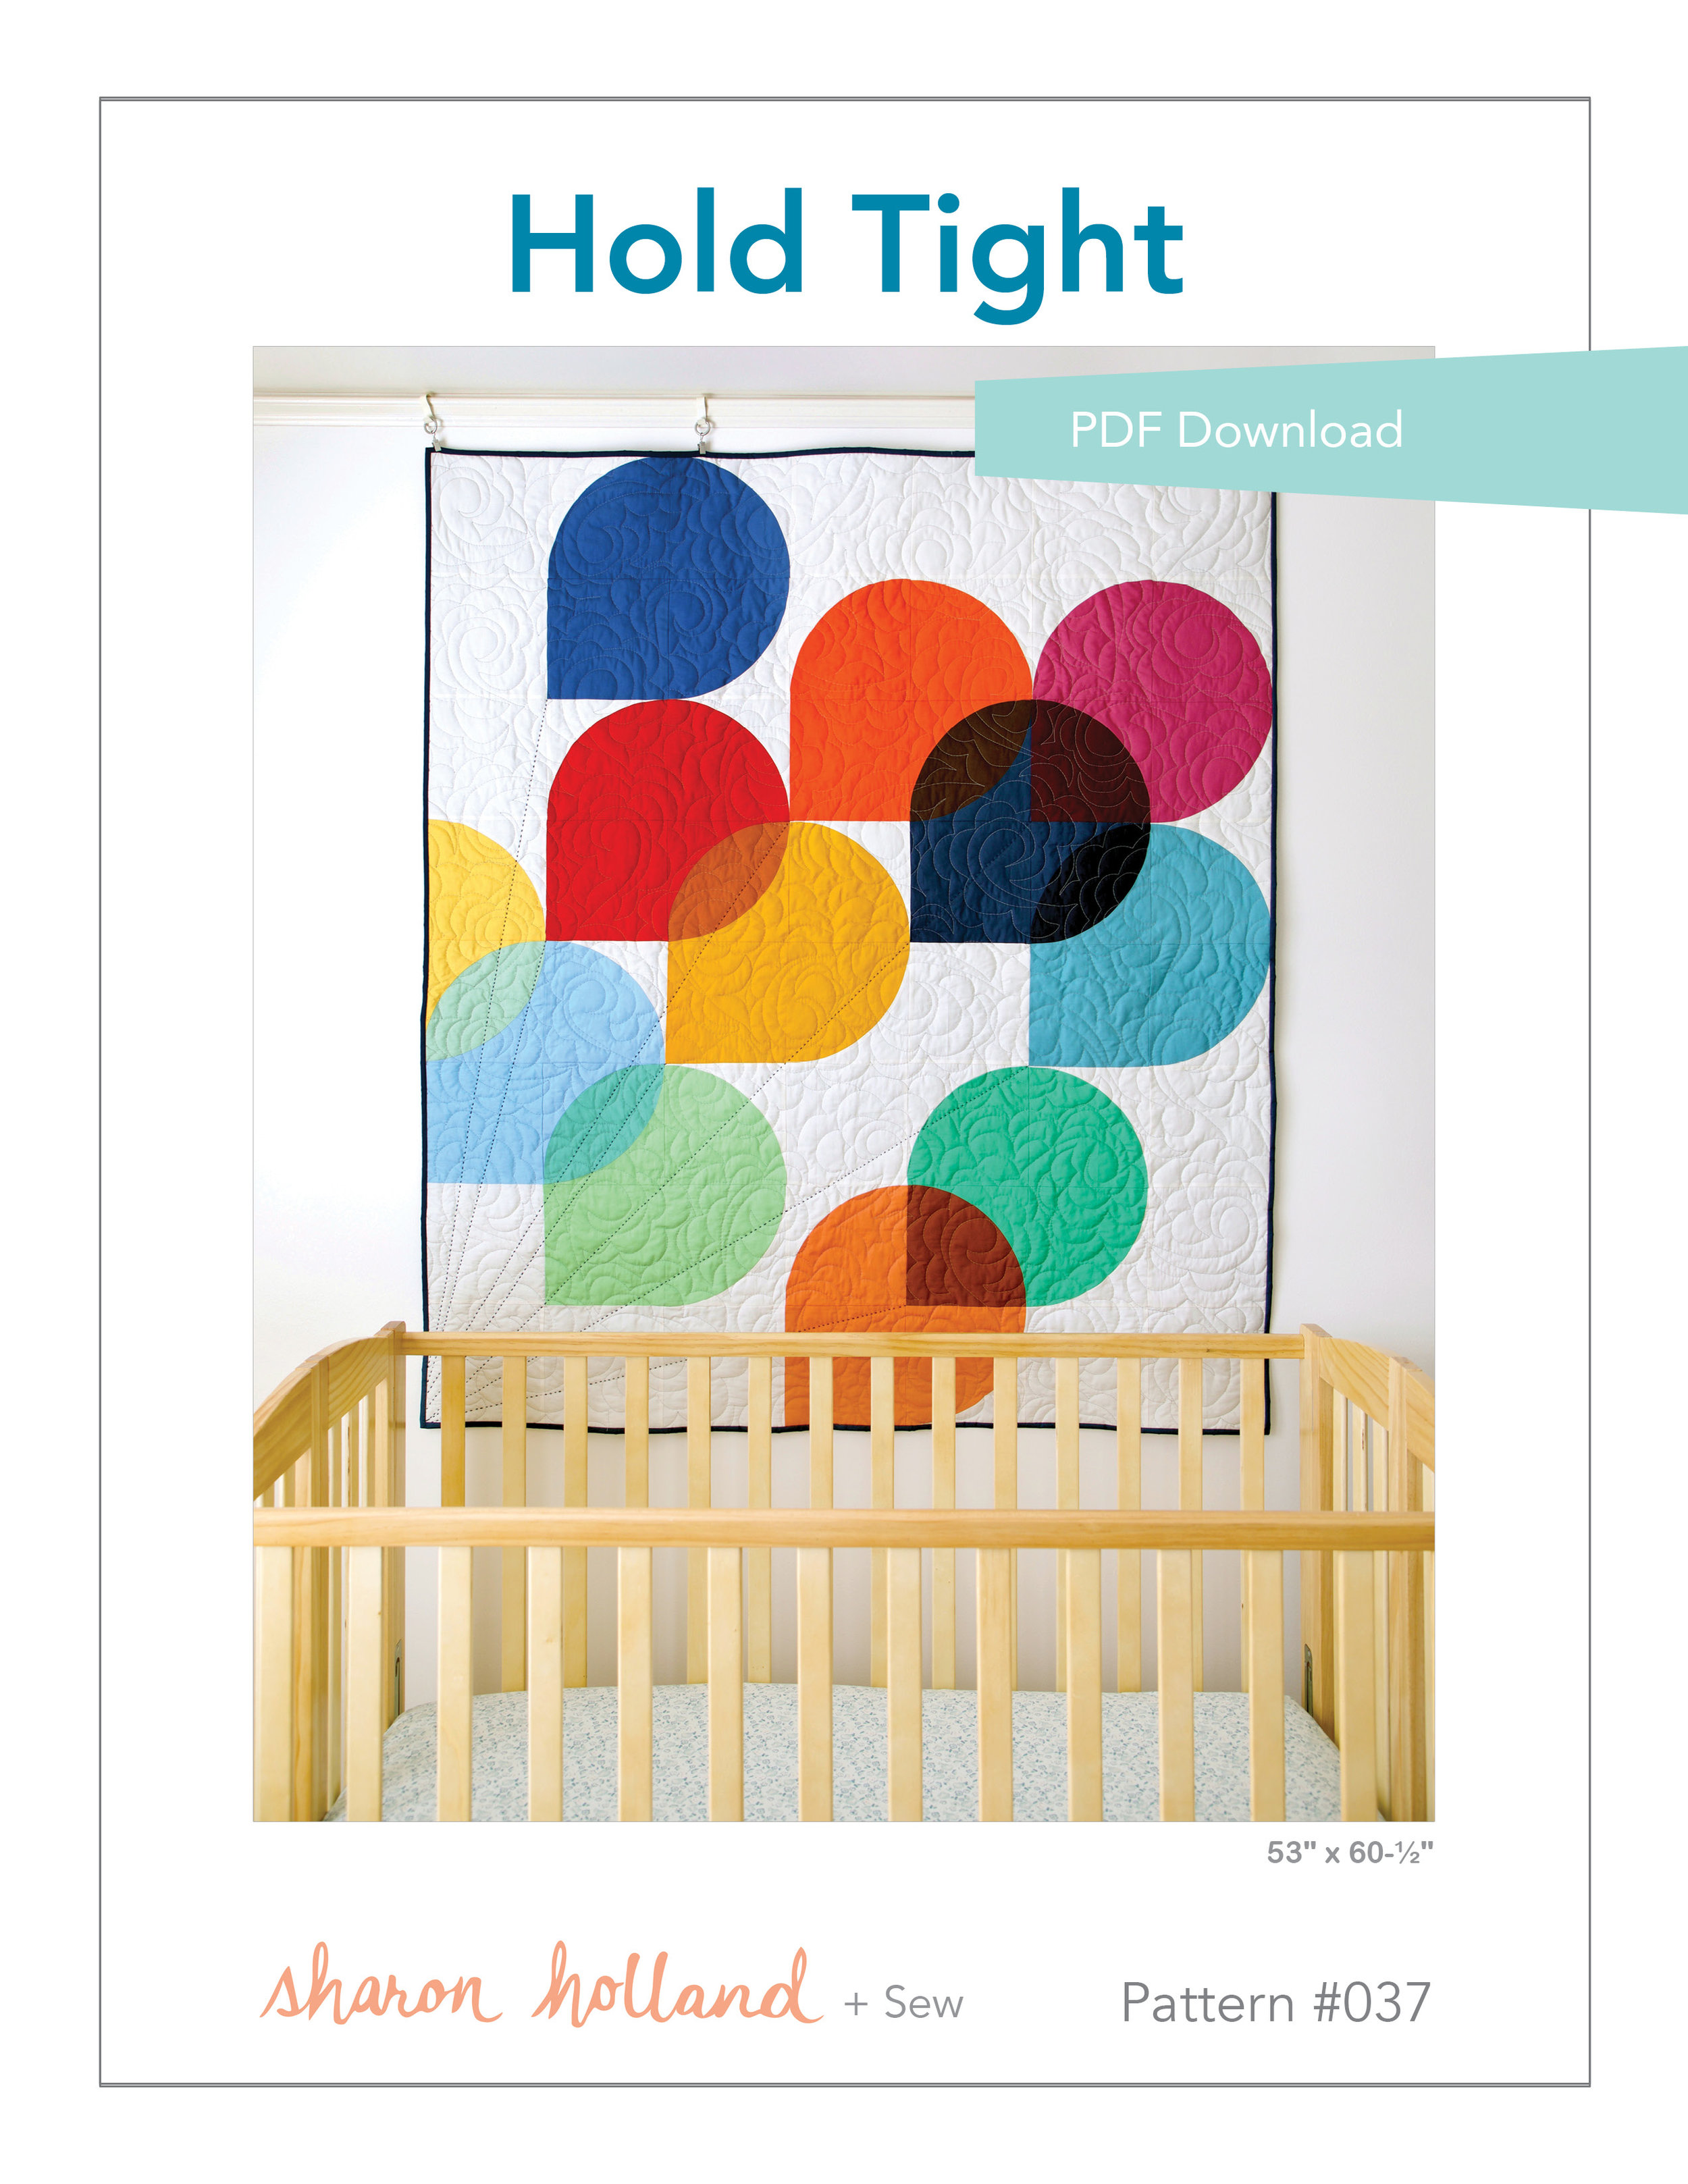
My niece is having their first baby and is decorating the nursery in an Up theme from the movie by that name. Balloons are an important part of the movie and I certainly had a challenge on my hands to create a special quilt that carried (pardon the pun) that fun and colorful aspect of the storyline.

I knew right away this would be an all solids quilt and since I sew with nothing else but Art Gallery Fabrics I got out all my Pure Solids and made some fabric choices. The image above was an early fabric pull and you’ll notice some colors changed in the final quilt design.

Hold Tight draped.jpg

This baby quilt is purposely over-sized as it will be a great design for baby to grow into. I envision blanket forts, snuggles at story time, and naps out on the sofa well past toddler years.

Gender-neutral, colorful balloons are given an extra layer of fun with playful transparency overlapping colors. This quilt uses 20 different Art Gallery Fabrics Pure Solids (that number includes the background) and the possibilities are endless for creating looks and nursery color matching. Playing with color is the so much fun that I’ve included a coloring page in the PDF pattern so you can test out different options.

Hold Tight Quilt Hand Stitching.jpg

Since this quilt will surely be laundered a lot and I wanted it snuggly warm I used Hobbs Tuscany Collection 100% Premium Polyester batting for extra loft, durability, and warmth.

As if this quilt wasn’t fun enough I added some chunky hand stitching in Aurifloss 6-strand thread to make “strings” for the balloons after it was machine quilted and before binding.

This pattern is available to purchase as a PDF download on my SHOP page. Because of the curved piecing I am labeling this an Intermediate level quilt pattern but I feel a confident beginner will also achieve great results.

Included in the that PDF pattern is a block squaring template for perfect results every time. I highly suggest using Dritz brand Heavy Duty Template Plastic for making your templates from the PDF templates and a 28 mm rotary cutter for cutting curved pieces. See full materials list on the listing for the pattern and affiliate links at the end of this post for my Amazon picks.

Hold Tight close.jpg

I can’t wait to see your Hold Tight quilt make for your special little someone. Be sure to tag me @sharonhollanddesigns and use the hashtag #HoldTightQuilt and #SharonHollandQuilts when posting to social media and if you’re using Art Gallery Fabric Pure Solids don’t forget to tag @ArtGalleryFabrics and use the hashtags #AGFPureSolids and #PureSolids so they can also see your beautiful sewing!

Yo-Yo Pillow

Yo-Yo Pillow

Signature Yo-yos Pillow.jpg

The final installment in my pillow series is this fun Yo-Yo Pillow. Yo-yos and pillows made from yo-yos are nothing new but it's something I've not seen done for awhile and there may be lots of new sewers out there that don't know how to make them.

Making Yo-yos.jpg

Yo-yos are hand stitched from circles of fabric. I used a 6'' diameter circle to make mine but you can use whatever size you'd like. The smaller the starting circle, the smaller your finished yo-yo will be. They shrink considerably once stitched up and my finished yo-yos measured around 2-1/2'' across.

Yo-Yo Pillow

Materials needed to make an 18'' square finished pillow

  • For front foundation and backing: Two 18-1/2'' squares for 1/4'' seams Lapped Zipper Back or two 19'' squares for 1/2'' seams Hidden Zipper back
  • For yo-yos: Sixty-four 6'' diameter fabric circles
  • One 14'' invisible zipper
  • Aleene's No-Sew Fabric Glue
  • One package 1/4'' -wide Dritz Wash Away Wonder Tape
  • Zipper foot attachment
  • Needle and thread
  • Embroidery thread and needle
  • Marking tool and ruler
yo-yos pink-01.jpg

Knot the end of a length of thread. Hiding starting knot on the wrong side of the fabric, turn circle edge 1/4'' under to wrong side while hand basting a running stitch 1/8'' from edge. Leave thread in needle and do not knot end when basting stitch reaches the starting knot. 

Pull loose thread end to gather, forming a yo-yo. The gathered edge will be pulled to the center. 

yo-yos pink-02.jpg

Flatten the yo-yo, centering the gathered closure. Secure thread with a double knot and hide thread inside the yo-yo. Make a total of 64.

signature yoyos.jpg

There's a few ways you can connect your yo-yos for a pillow top. One way would be to stitch the yo-yos together with tiny stitches along the edges at four points like a compass then attach the connected circles to the pillow top. 

Another way would be to blanket stitch the yo-yos to the pillow foundation (leaving the appropriate 1/4''-1/2'' seam allowance around the edges of the foundation for pillow assembly.

I chose a middle road and "X" stitched my yo-yos directly to the foundation at four points. 

Signature pillow assembly.jpg

Since I only had an 18-1/2'' square piece of Art Gallery Fabrics Apricot Sunrise Smooth Denim I needed to take care not to stitch my yo-yos in the 1/4'' seam allowance area. I used the 1/4'' mark on my Omnigrid ruler as a guide. 

Since my yo-yos aren't perfectly sized and I wasn't sure if the amount made would fit my pillow foundation I wanted to have all the yo-yos in place before I started sewing. To keep my yo-yos in place without pinning, I put a dab of Aleene's No-Sew Fabric Glue on the back of each yo-yo and worked from the outside edges of the foundation in toward the center.

Signature pillow assembly 1.jpg

Once all in place and working on a flat surface, I hand stitched the yo-yos to the foundation with 3-ply strands of Aurifloss embroidery thread. Tip: Leave the side of the yo-yo nearest the foundation raw edge unstitched until after pillow is assembled. By leaving these sides free, the edge yo-yos can be folded in toward the center of the pillow durning assembly and stay free of the seam allowance area.

yo-yo Signature fabrics.jpg

Stitch at four points and secure on back with double knots. 

hand stitching.jpg

Assemble the pillow using either my Lapped Zipper Back or Hidden Zipper tutorials.

I finished my pillow with a lapped zipper back in Signature fabrics Extempore Gala canvas.

Lapped Back Zipper.jpg


After the pillow has been assembled, go back and finish hand stitching the edge yo-yos to the pillow. Insert an 18'' square pillow form.

Signature Yo-yo Pillow 3.jpg

Hand stitching yo-yos is a great take along pastime and perfect for lazy summer days of relaxing, mindless sewing on the go or just sitting at home. 

Signature Yo-yo Pillow 2.jpg

I hope you enjoyed these pillow projects. I've still more projects to post here before the Signature Look Book is published so come back and visit real soon for more summer sewing ideas. 

Signature Bucket Bag

Signature Bucket Bag

BG0A6186.jpg

This month my sixth fabric collection, Signature for Art Gallery Fabrics hits the shops. I couldn't be more excited to share this collection with you in the form of new, free projects!

As the industry gathers in Portland, Oregon this weekend for the Spring Quilt Market, I'm staying home and opted out of displaying my new collection at the show. My decision not to go stemmed from several reasons. One, my second grandchild arrived in April and I took a break from work to go lend a hand. That put me way behind in my normal market prep sewing but I wouldn't have missed being present for the birth for the world! 

Two, I decided, in advance that if I stayed home I would finally remodel my sewing/guest room in my house and turn it into a proper studio space so I could stage different photography scenes for my projects. I was actually able to remodel my room and buy some new props for less than it would have cost me to go to the show and now I can bring you more and better displays here from home. 

Signature fabrics look A reduced.jpg

This is just a tiny peek into the first of several Signature Looks. Over the next few weeks I will be posting new, free projects and a closer look into each set up. As always, be sure to watch my feed and Stories on Instagram for even more, day-to-day posts.

BG0A6379.jpg

You first saw my Kantha-Style Bucket Bag when I took part in Jessica Swifts Tallinn blog tour last month. I just didn't have the time then to write up the pattern for it then, and thank you for being patient till I could get it prepared. 

Bucket Bag by Sharon Holland.jpg

There were so many asking for this pattern after I posted about it I decided to remake it in my new Signature fabrics, get the pattern written, and include it in the Signature LookBook coming out next month. 

You'll find the free PDF download for my Bucket Bag on the Free Patterns page of this blog. 

BG0A5927.jpg

Bag details include hand-quilted stitching with Aurifloss embroidery thread on the exterior of the bag, eight roomy interior pockets, and fun embellishments like Extra-Large Eyelets and Swivel Hook, and Tassel Cap from Dritz

BG0A6651.jpg

For the interior of the bag I used Art Gallery Fabrics Smooth Denim (DEN-S-2007) in Nectarine Sunrise and Lateral Bud Profusion (SGN-68710) for the pockets. 

BG0A6377.jpg

For the exterior of my bag I use (from the opening to bottom) Extempore Fancy (SGN-58700), Traveler Raindrops (SGN-58705), Lateral Bud Profusion (SGN-68710), and Small World Sprightly (SGN-68713).

For a quick tutorial on how to make a tassel using the Dritz Tassel Cap kit, take a look back at the Tallinn blog tour post.

Signature Foliar 2.jpg

There are 20 prints in the Signature collection and comes in two color ways. Between the two color ways there are 14 different prints because in some cases the print only has one coloring. That's what makes this collection so deep and interesting. I'm still making discoveries as I sew! Above is the Foliar color way and below is the Atmospheric color way.

Signature Atmospheric 2.jpg

Shops are just getting their stock of Signature in and I've begun adding a few online shop listings to my Fabrics page. Some have already sold out in the first week so keep checking back as they restock and more shops list their new inventory.

Tallinn Fabrics Blog Tour

Tallinn Fabrics Blog Tour

BG0A5829.jpg

Today's my stop on the Jessica Swift Tallinn blog tour! Tallinn is Jessica's first fabric collection for Art Gallery Fabrics. Now available in shops, Tallinn is inspired by Jessica’s travels through Eastern Europe. Picturesque Estonian villages, graceful swans, & a deep love for combining quirky folk motifs come together in her playful collection. 

TallinnFabrics-blog-tour-graphic.jpg

I was thrilled when Jessica asked if I wanted to be part of her tour and sew with these beautiful fabrics! Here's the amazing line up of talented designers also posting about their makes.

Thursday April 19 – Mathew Boudreaux | Mister Domestic 
Friday April 20 – Katie Skoog | The Simple Life Company 
Monday April 23 – Sharon Holland
Tuesday April 24 – Eleri | Sew and Tell Project
Wednesday April 25 – Paola Baker | Love of Fabrics
Thursday April 26 – Maureen Cracknell
Friday April 27 – Alexis Wright | My Sweet Sunshine Studio
Monday April 30 – Isabelle Selak | South Bay Bella Studio
Tuesday May 1 – Cassie Massolia | Lily Shine Creates
Wednesday May 2 – Becca Plymale | Sunflower Seams
Thursday May 3 – Alisa Kutsel | A Stitch In Between
Friday May 4 – Sharon McConnell | Color Girl Quilts
Monday May 7 – Karen O’Connor | Lady K Quilt Designs
Tuesday May 8 – Sarai Schuk | Sarai’s Hobbies
Wednesday May 9 – Elise Baek | Elise & Emelie
Thursday May 10 – Jessica Swift
Friday May 11 – Gwyn LaSpina
Monday May 14 – Loni Jakubowski | Havin Sew Much Fun

Kantha-Style Duffle Bag

I knew I wanted to play with texture and enhance the ethnic vibe of these prints with Aurifloss embroidery thread so I decided to make a quilted duffle bag. I want to tell you right up front there's no pattern for this bag. It's something I've designed but there just isn't enough time in the days to do it all so I'm very sorry not to be adding a pattern in with this post. Instead, we will enjoy Jessica's prints and learn more about some of the products used to make this fun bag.

BG0A5422.jpg

The fabrics used in my bag are: Tigris Indigo, Magija Pumpkin, Baltic Swans Sky, Lore Rooftop, and Odessa Dream.

Simple, varied width strips of fabric were sewn together into panels for the front and back of the bag and I free-form, hand stitched chunky running stitches with 3-ply strands of the 6-ply cotton Aurifloss embroidery thread. 

BG0A5817.jpg

To keep adding texture and interesting details to my duffle bag I incorporated Dritz Extra-Large Eyelets in this marvelous antique brass finish to the closer-edge of the bag and on the boxed corner tabs. Eyelets are super easy to apply with the kit and a hammer. 

BG0A5767.jpg
 
BG0A5806.jpg

Another Dritz product used in this project is their cording for the drawstring and a little extra bling with a tassel made using Dritz Tassel Cap kit. I loved this natural color of the Dritz Twist Cord that picked up the colors in the Odessa Dream tan floral in Jessica's collection. 

BG0A5773.jpg

Can you believe I've never made a tassel before with these awesome tassel caps!?!? It's so easy! I used Art Gallery Fabrics solid knit fabric

I simply cut a piece of knit and folded it widthwise. Then I took a pair of shears and snipped fringe through the folded layers, leaving the folded edge uncut. 

BG0A5777.jpg

To make the tassel I followed the directions on the back of the Dritz Tassel Cap package and used Aleene's No-Sew Fabric Glue to roll the knit tassel and attach to the antique brass cap. 

BG0A5807.jpg

Inside my bag I've used more of the navy Tigris Indigo print along with the fun Baltic Swans Sky print for the pockets.

BG0A5791.jpg

Plenty of pocket room to tote all your gear on your next vacation get away, quilting workshop, or wherever you wander!

BG0A5804.jpg

I hope you've enjoyed my stop on the Tallinn blog tour! Be sure to follow along with the other makers and on Instagram by following the hashtags #TallinnFabrics and #TallinnFabricsBlogTour.

BG0A5825.jpg

Explore the Tallinn Fabrics collection:The Collection | The Lookbook | On Instagram