

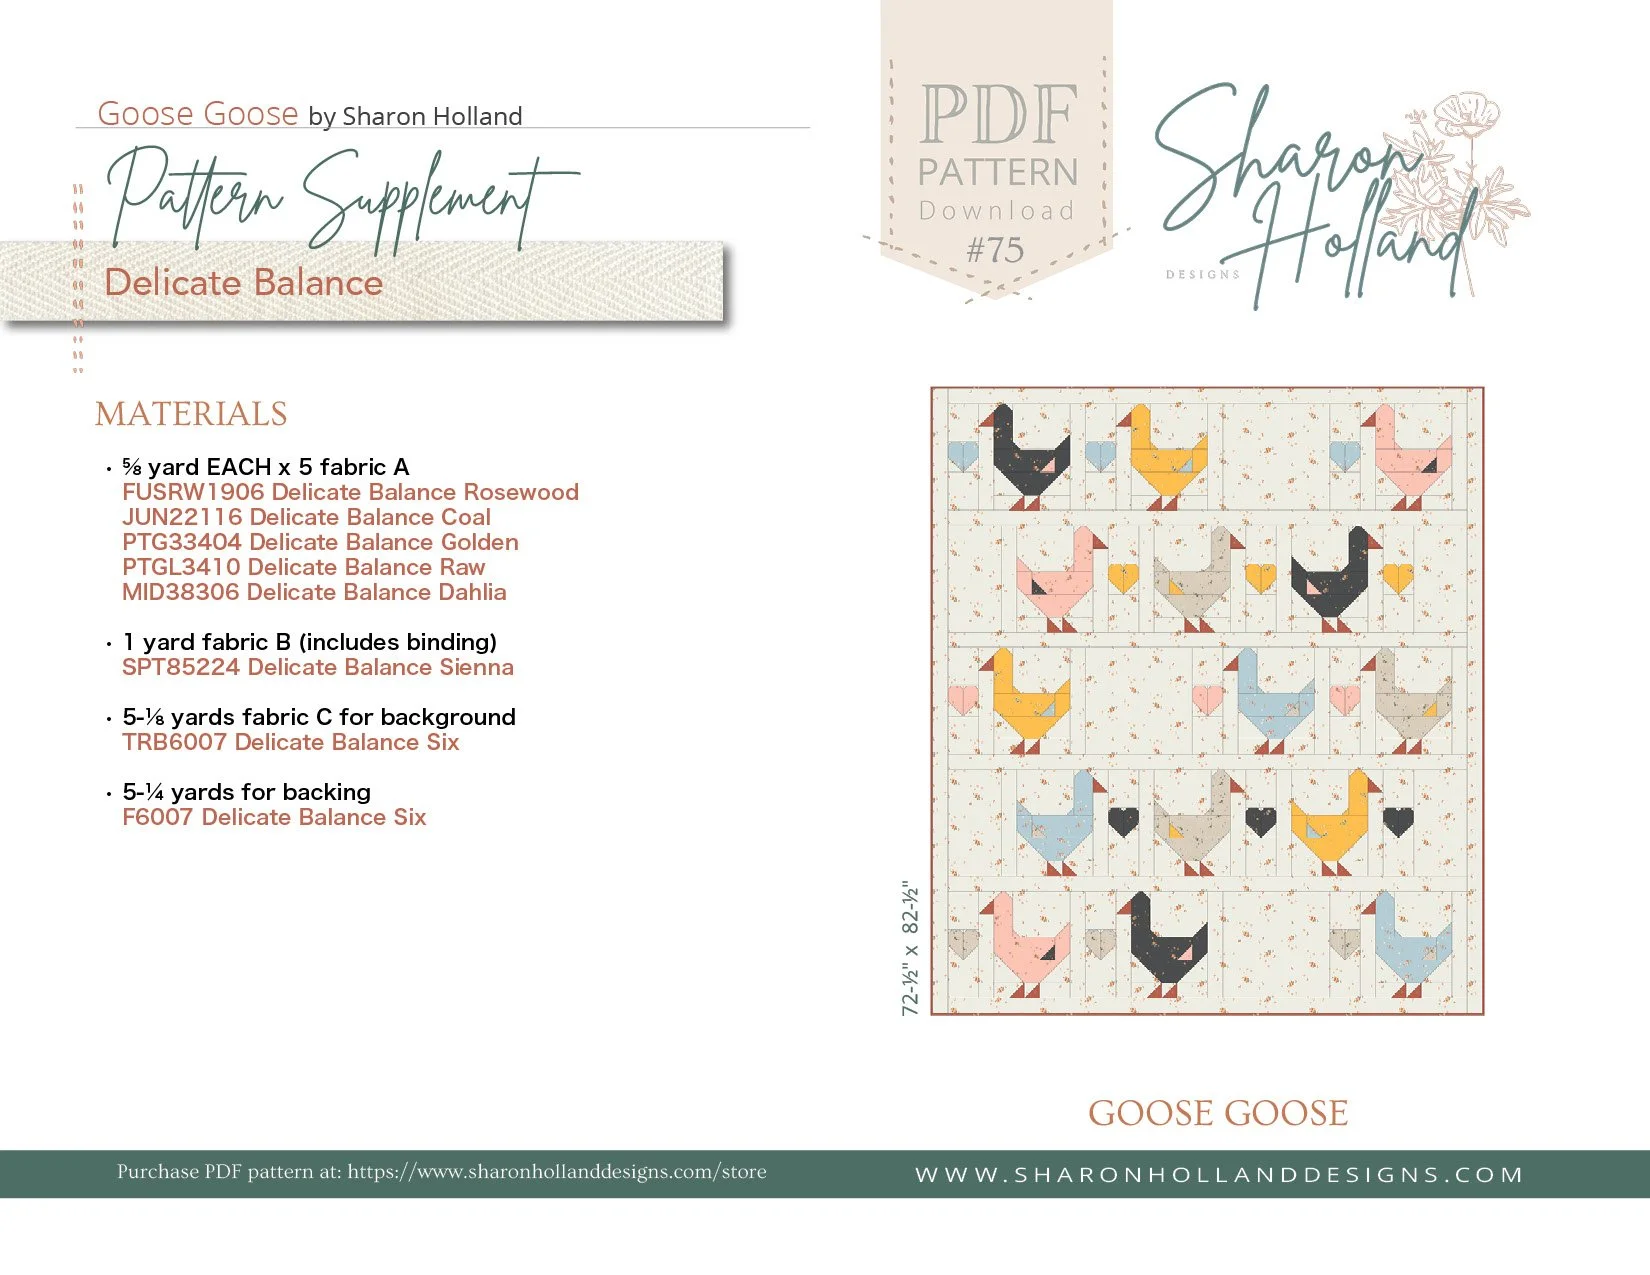
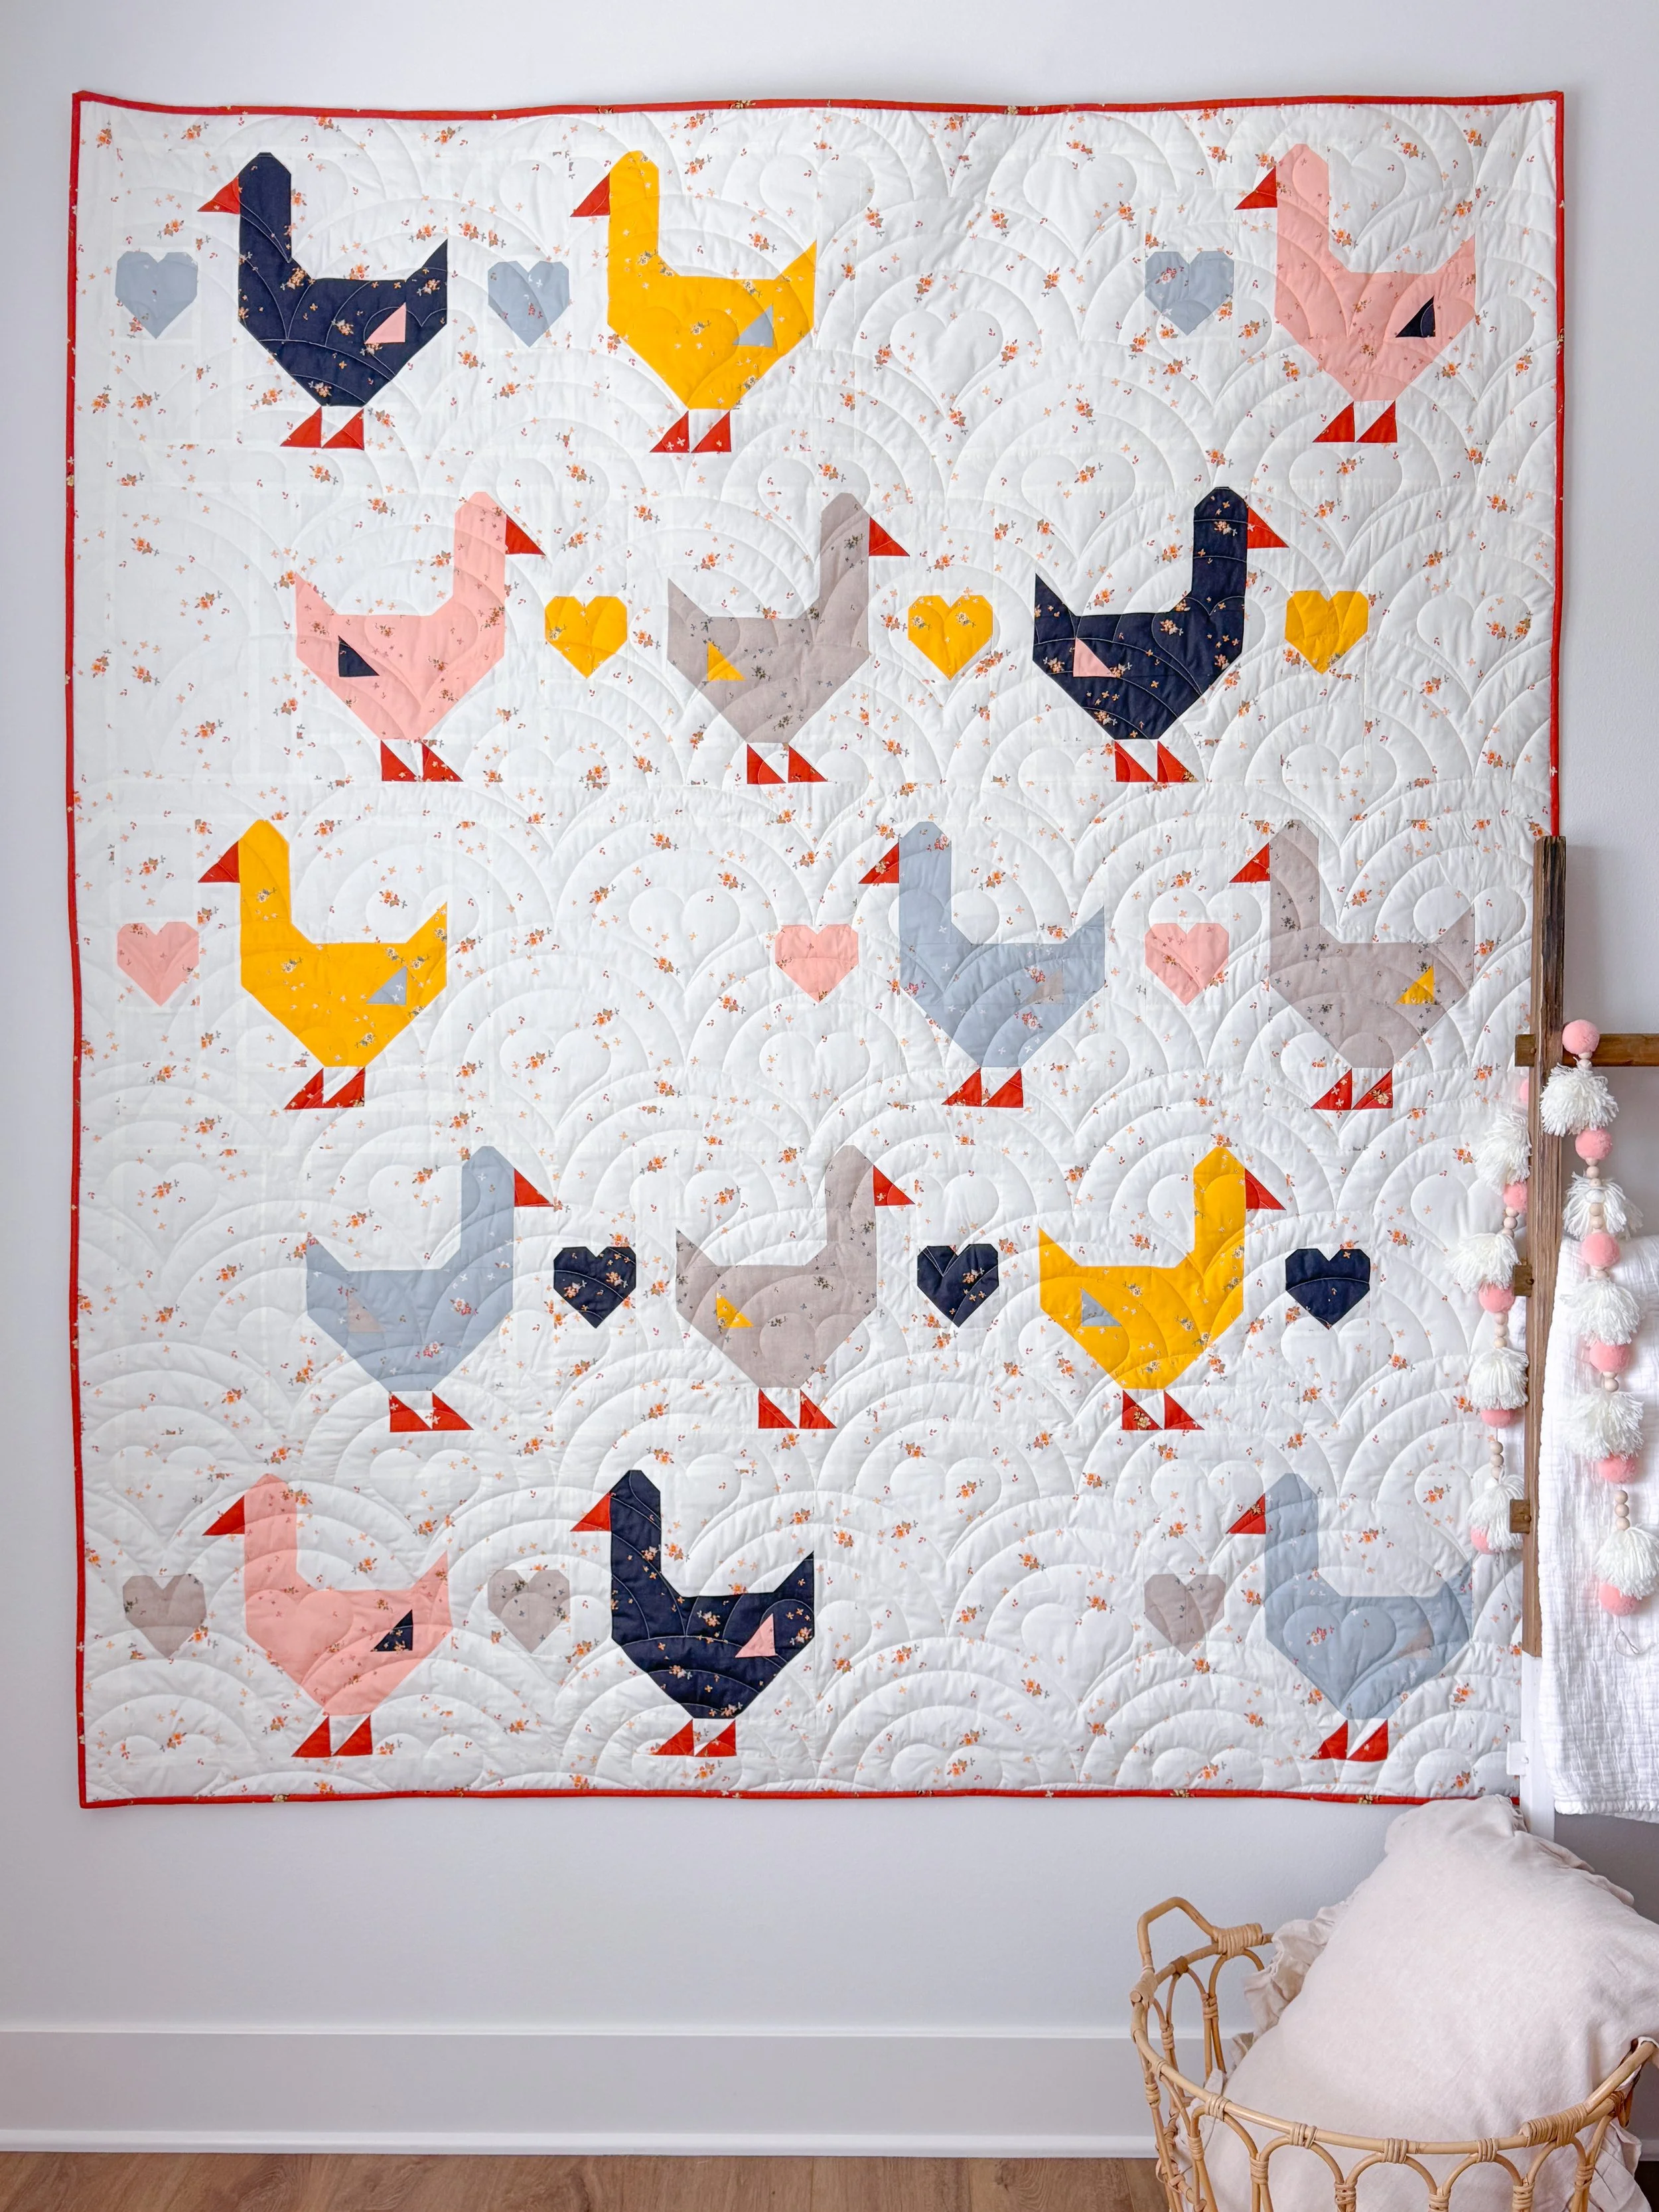
It’s a new year and a new quilt pattern release on Sharon Holland Designs. I couldn’t be happier to introduce you to the Goose Goose quilt, now available in my SHOP!
Do you remember in the ’80s to early ’90s the geese, ducks, bows, and hearts trend? That faded, sentimental aesthetic was the starting point for this quilt pattern, which I’ve gently reworked and given a fresh, modern update to suit today’s Cottagecore sensibility. I adore the result so much that I made a special quilt for my youngest granddaughter as she transitions from her crib to a big girl bed.
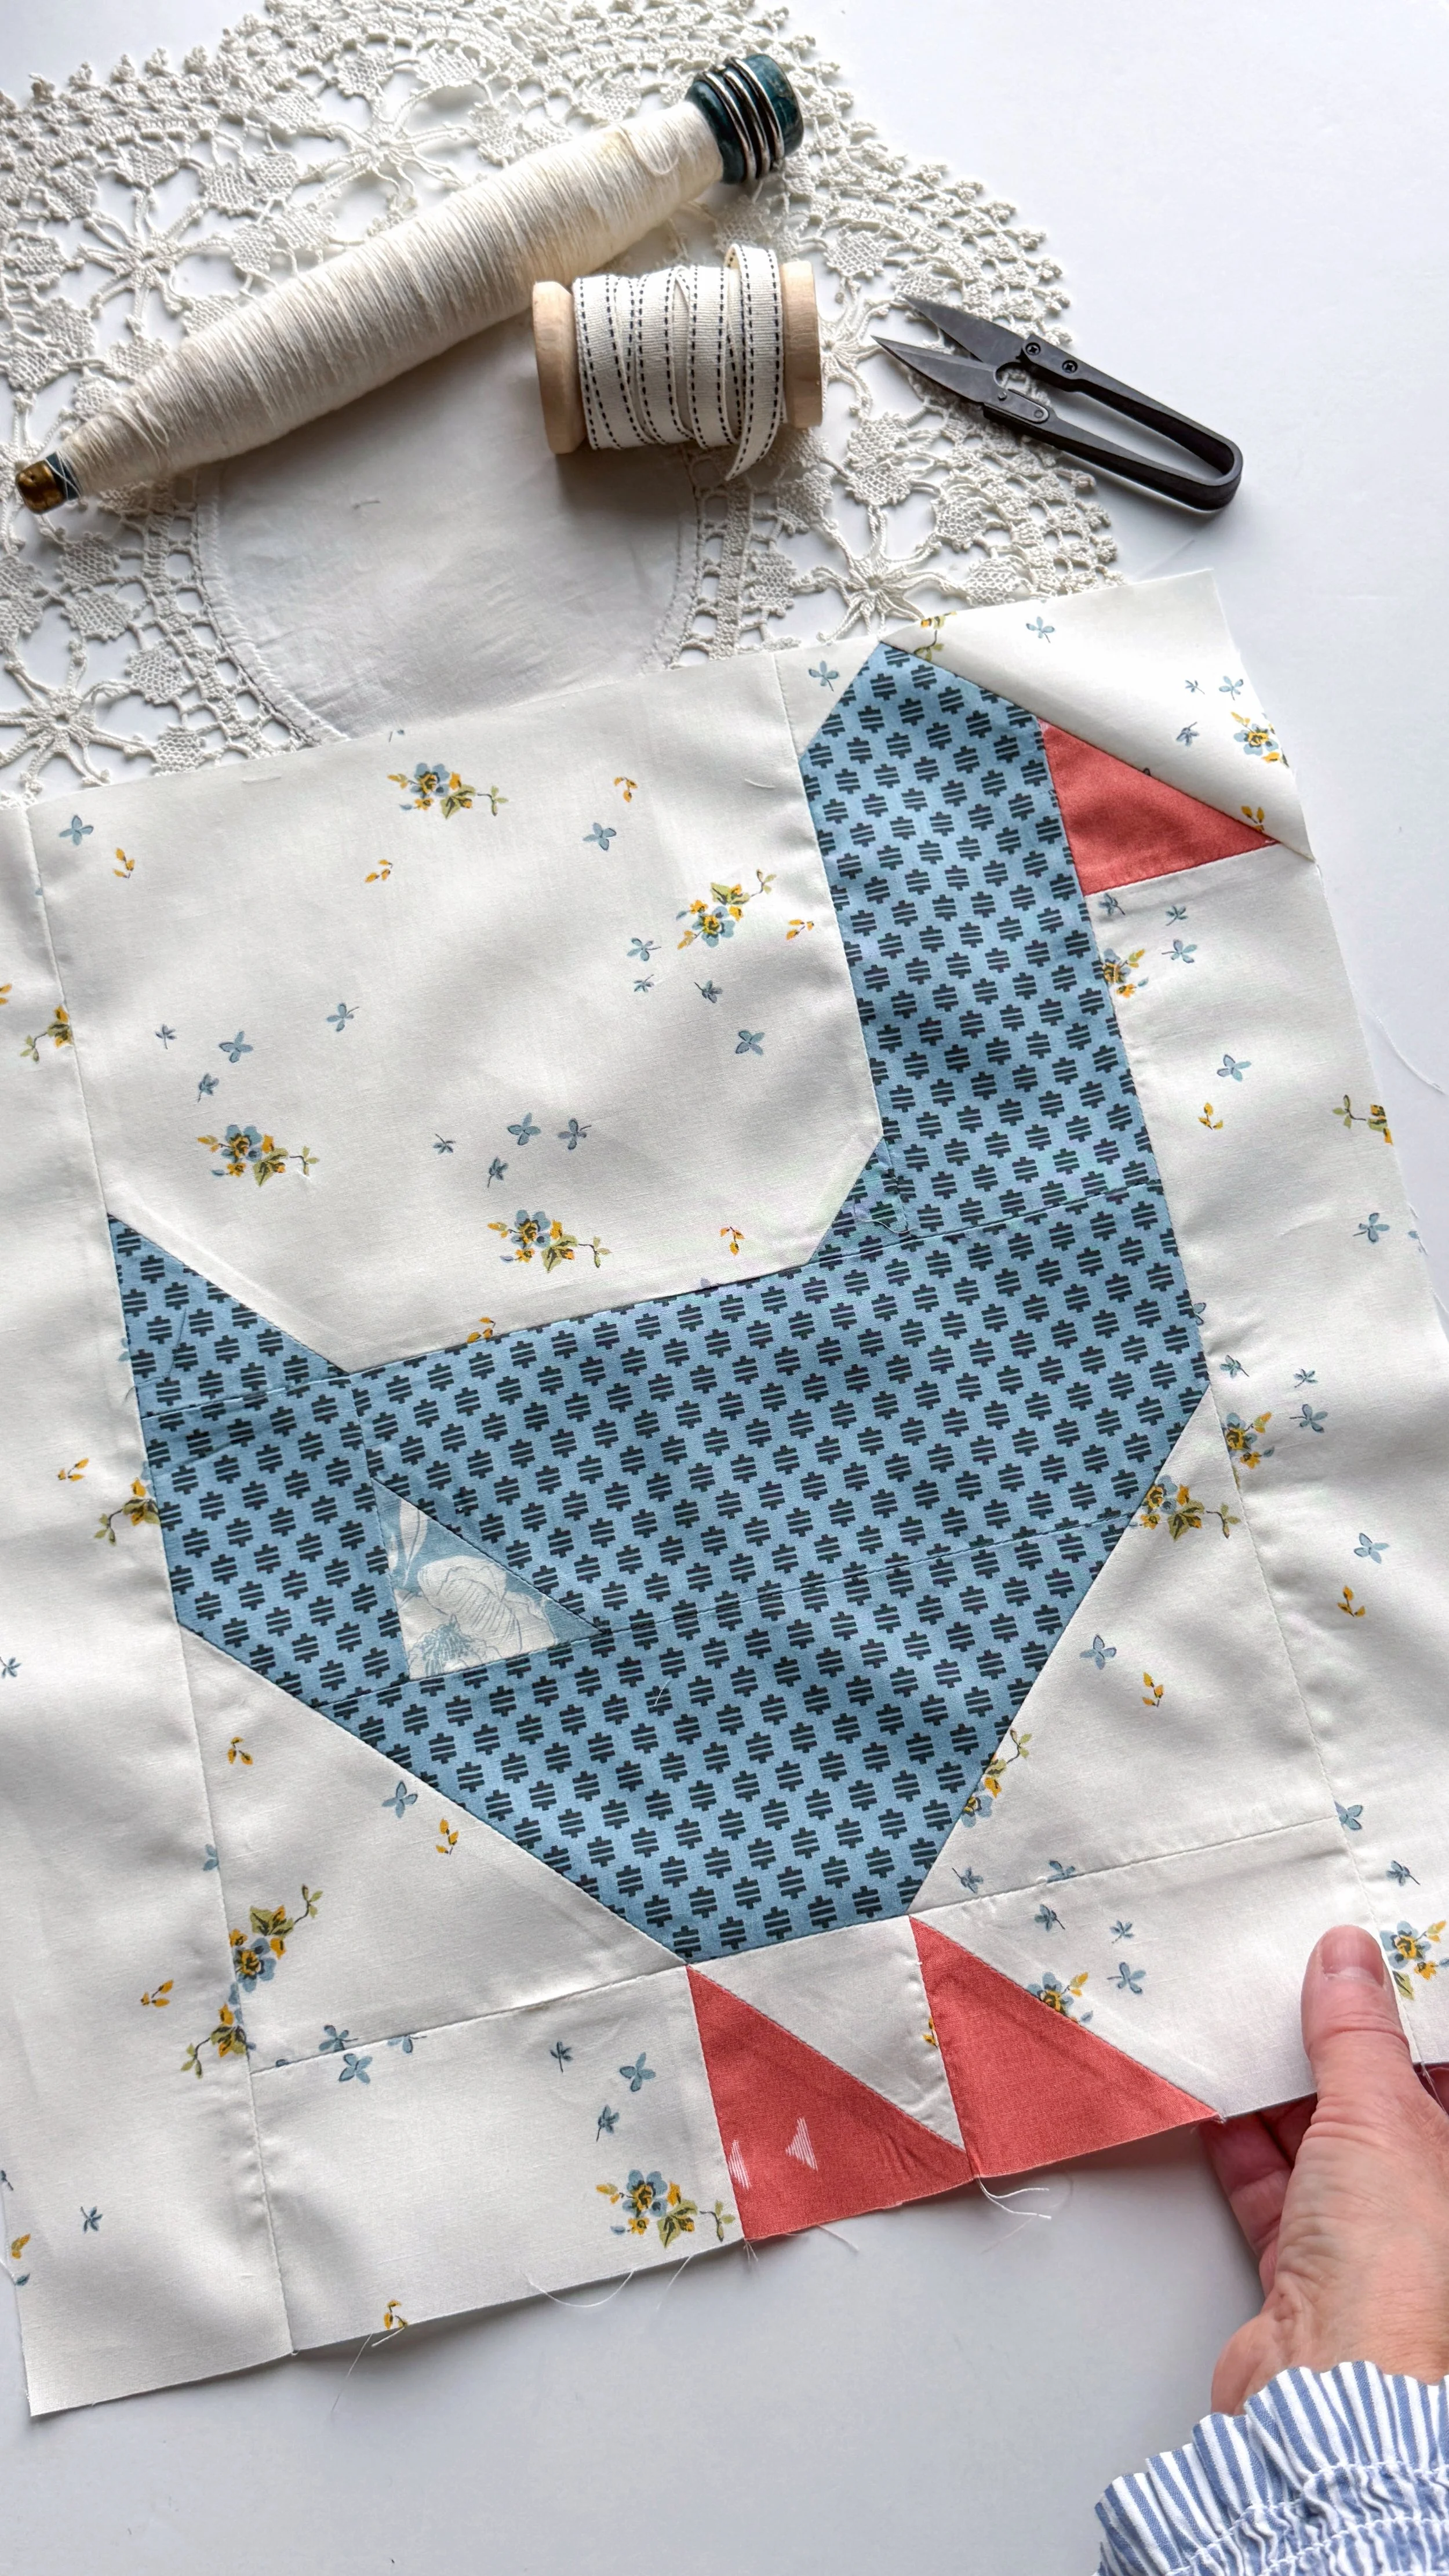
Actually I made 2 twin quilts and a set of pillows from the pattern. This first look is the cover quilt and is made with prints from my Art Gallery Fabrics Kindred, Potager, and Midsummer collections.
The pattern comes with 3 project sizes: a pair of pillows, a crib quilt, and an oversized throw/twin quilt. The “Blue Goose” cover quilt version is available as kits from two shops; at Ash and Elm Quiltery for US makers and I’m excited to announce we now have a Canadian shop, Bundled Fabric for kits for CA makers. Click the links below to shop.
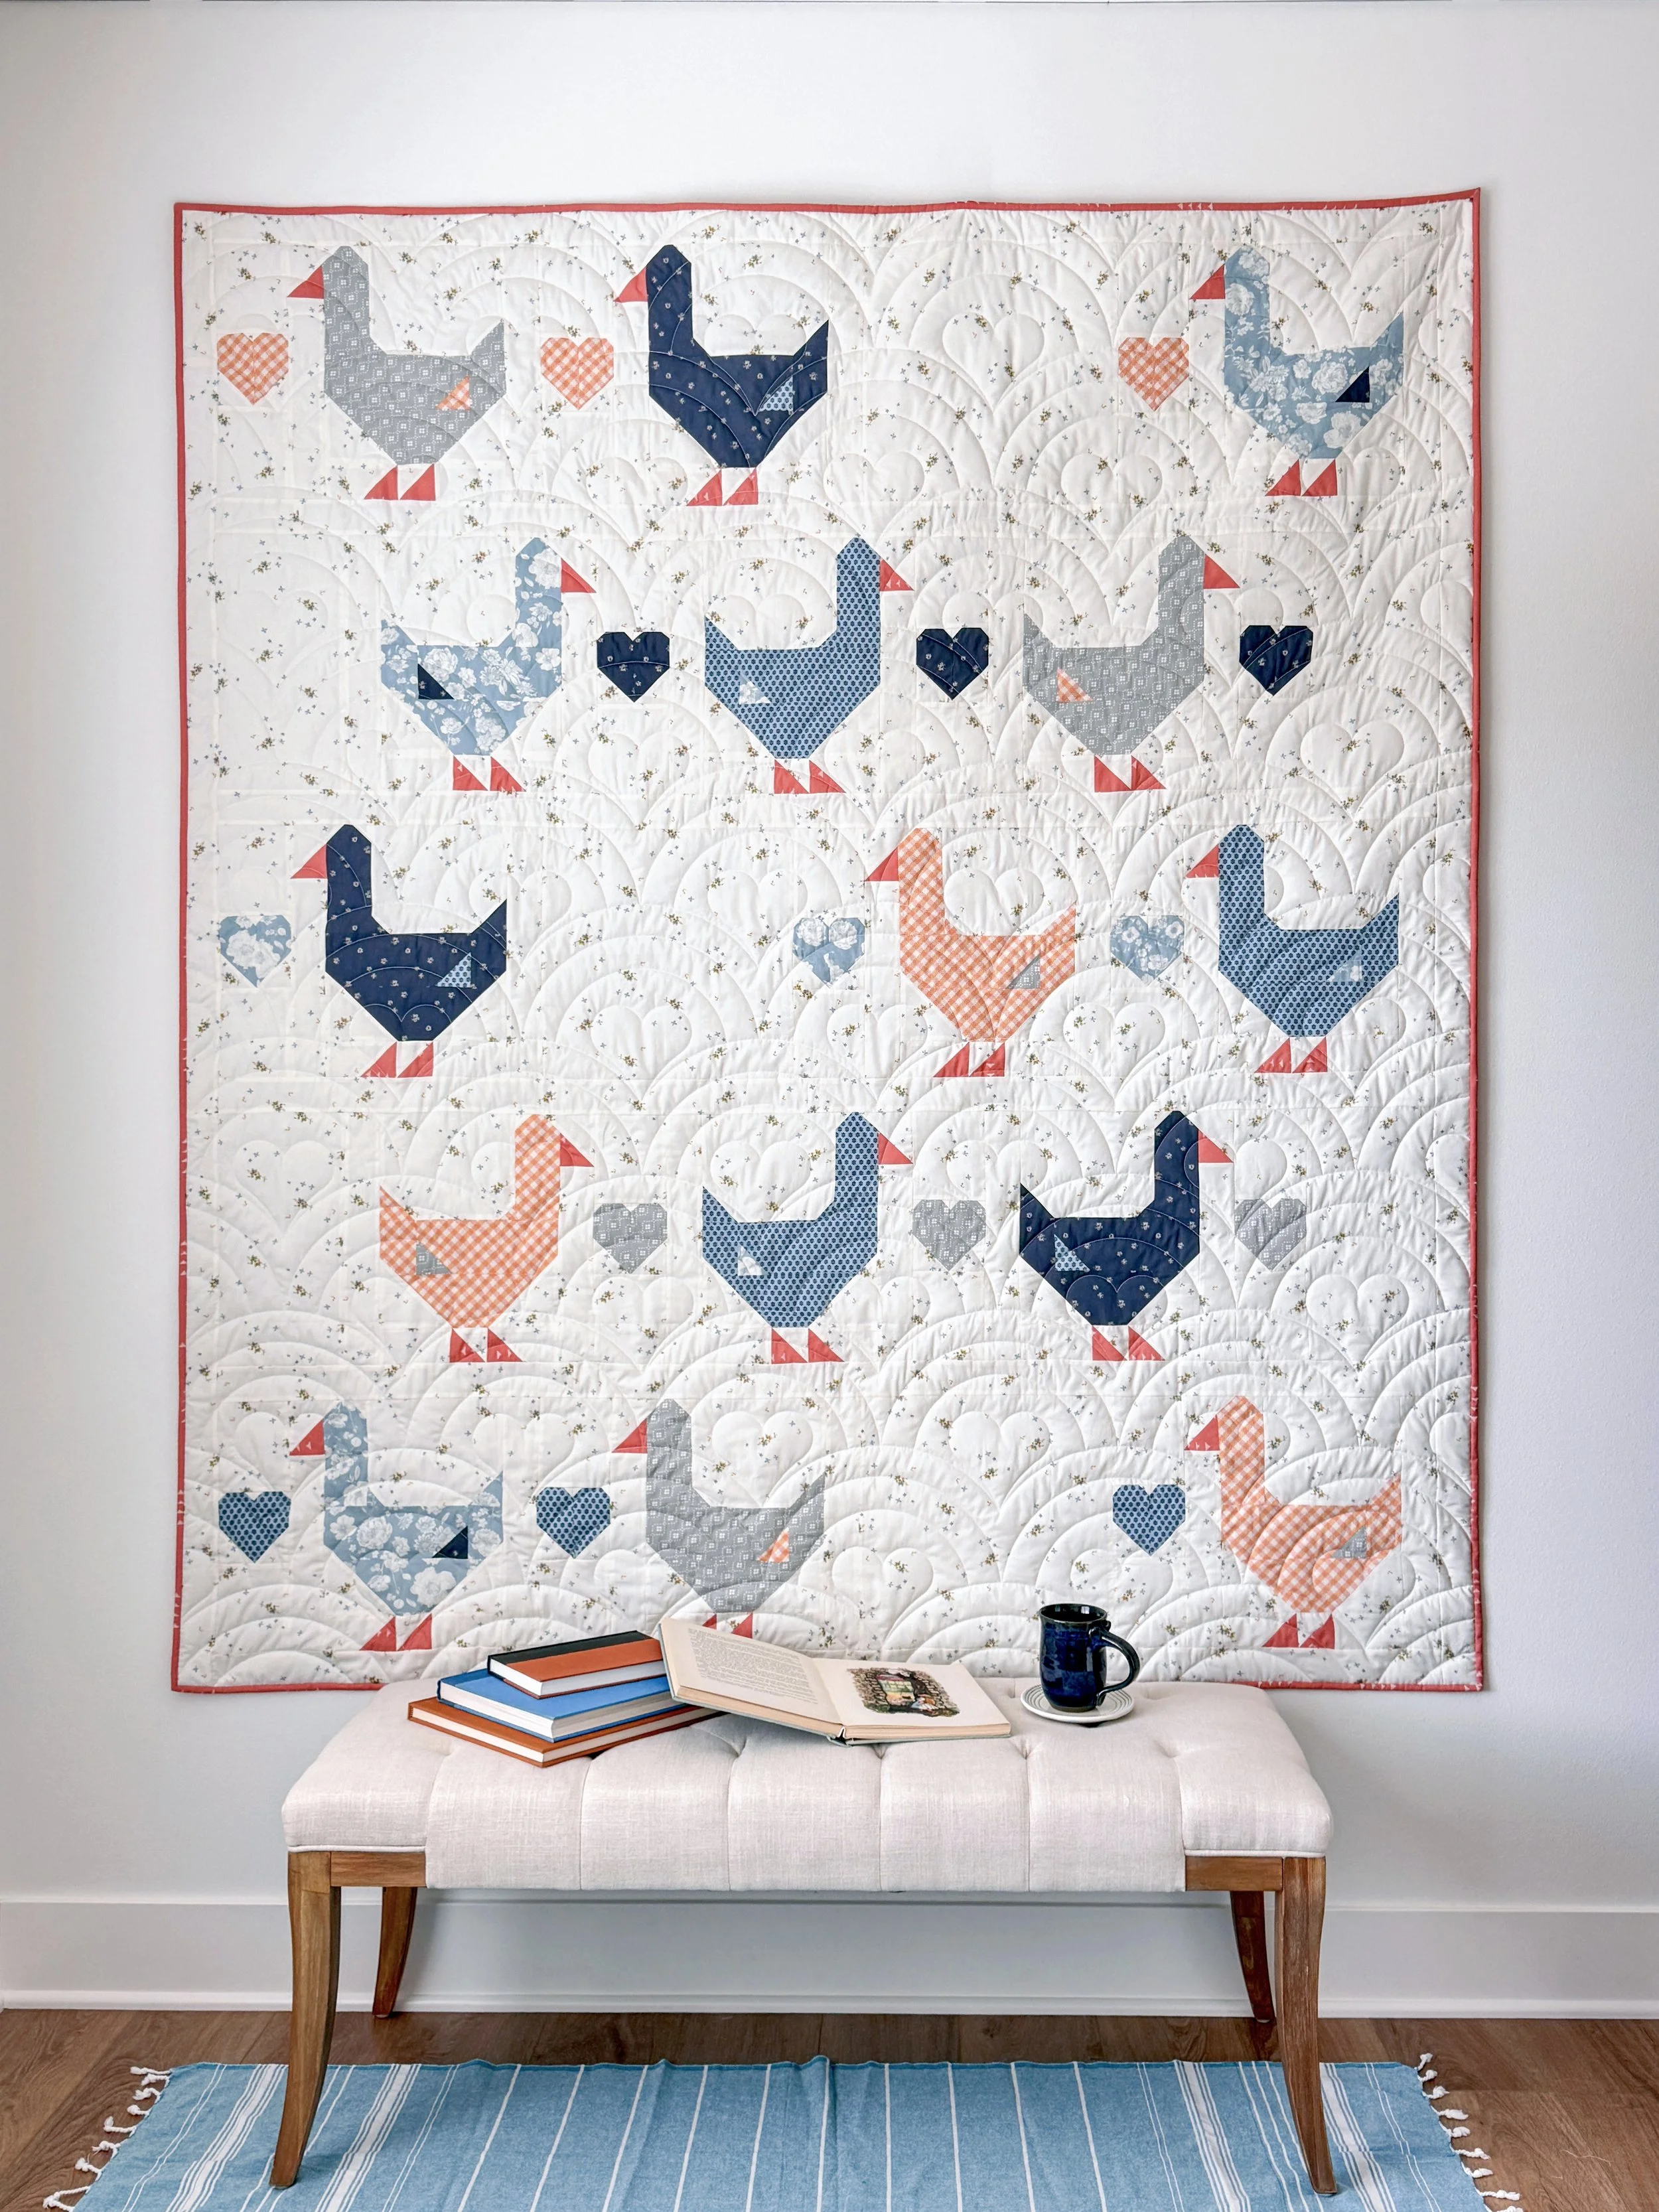
That wonderful puff in my quilt comes from using Hobbs Batting Polydown batting inside, which gives it a light, lofty feel and is cuddly warm. The cover quilt version was expertly long-arm quilted by Dearly Quilted in an allover Baptist Fan and Hearts motif, adding just the right amount of quilting and interest.
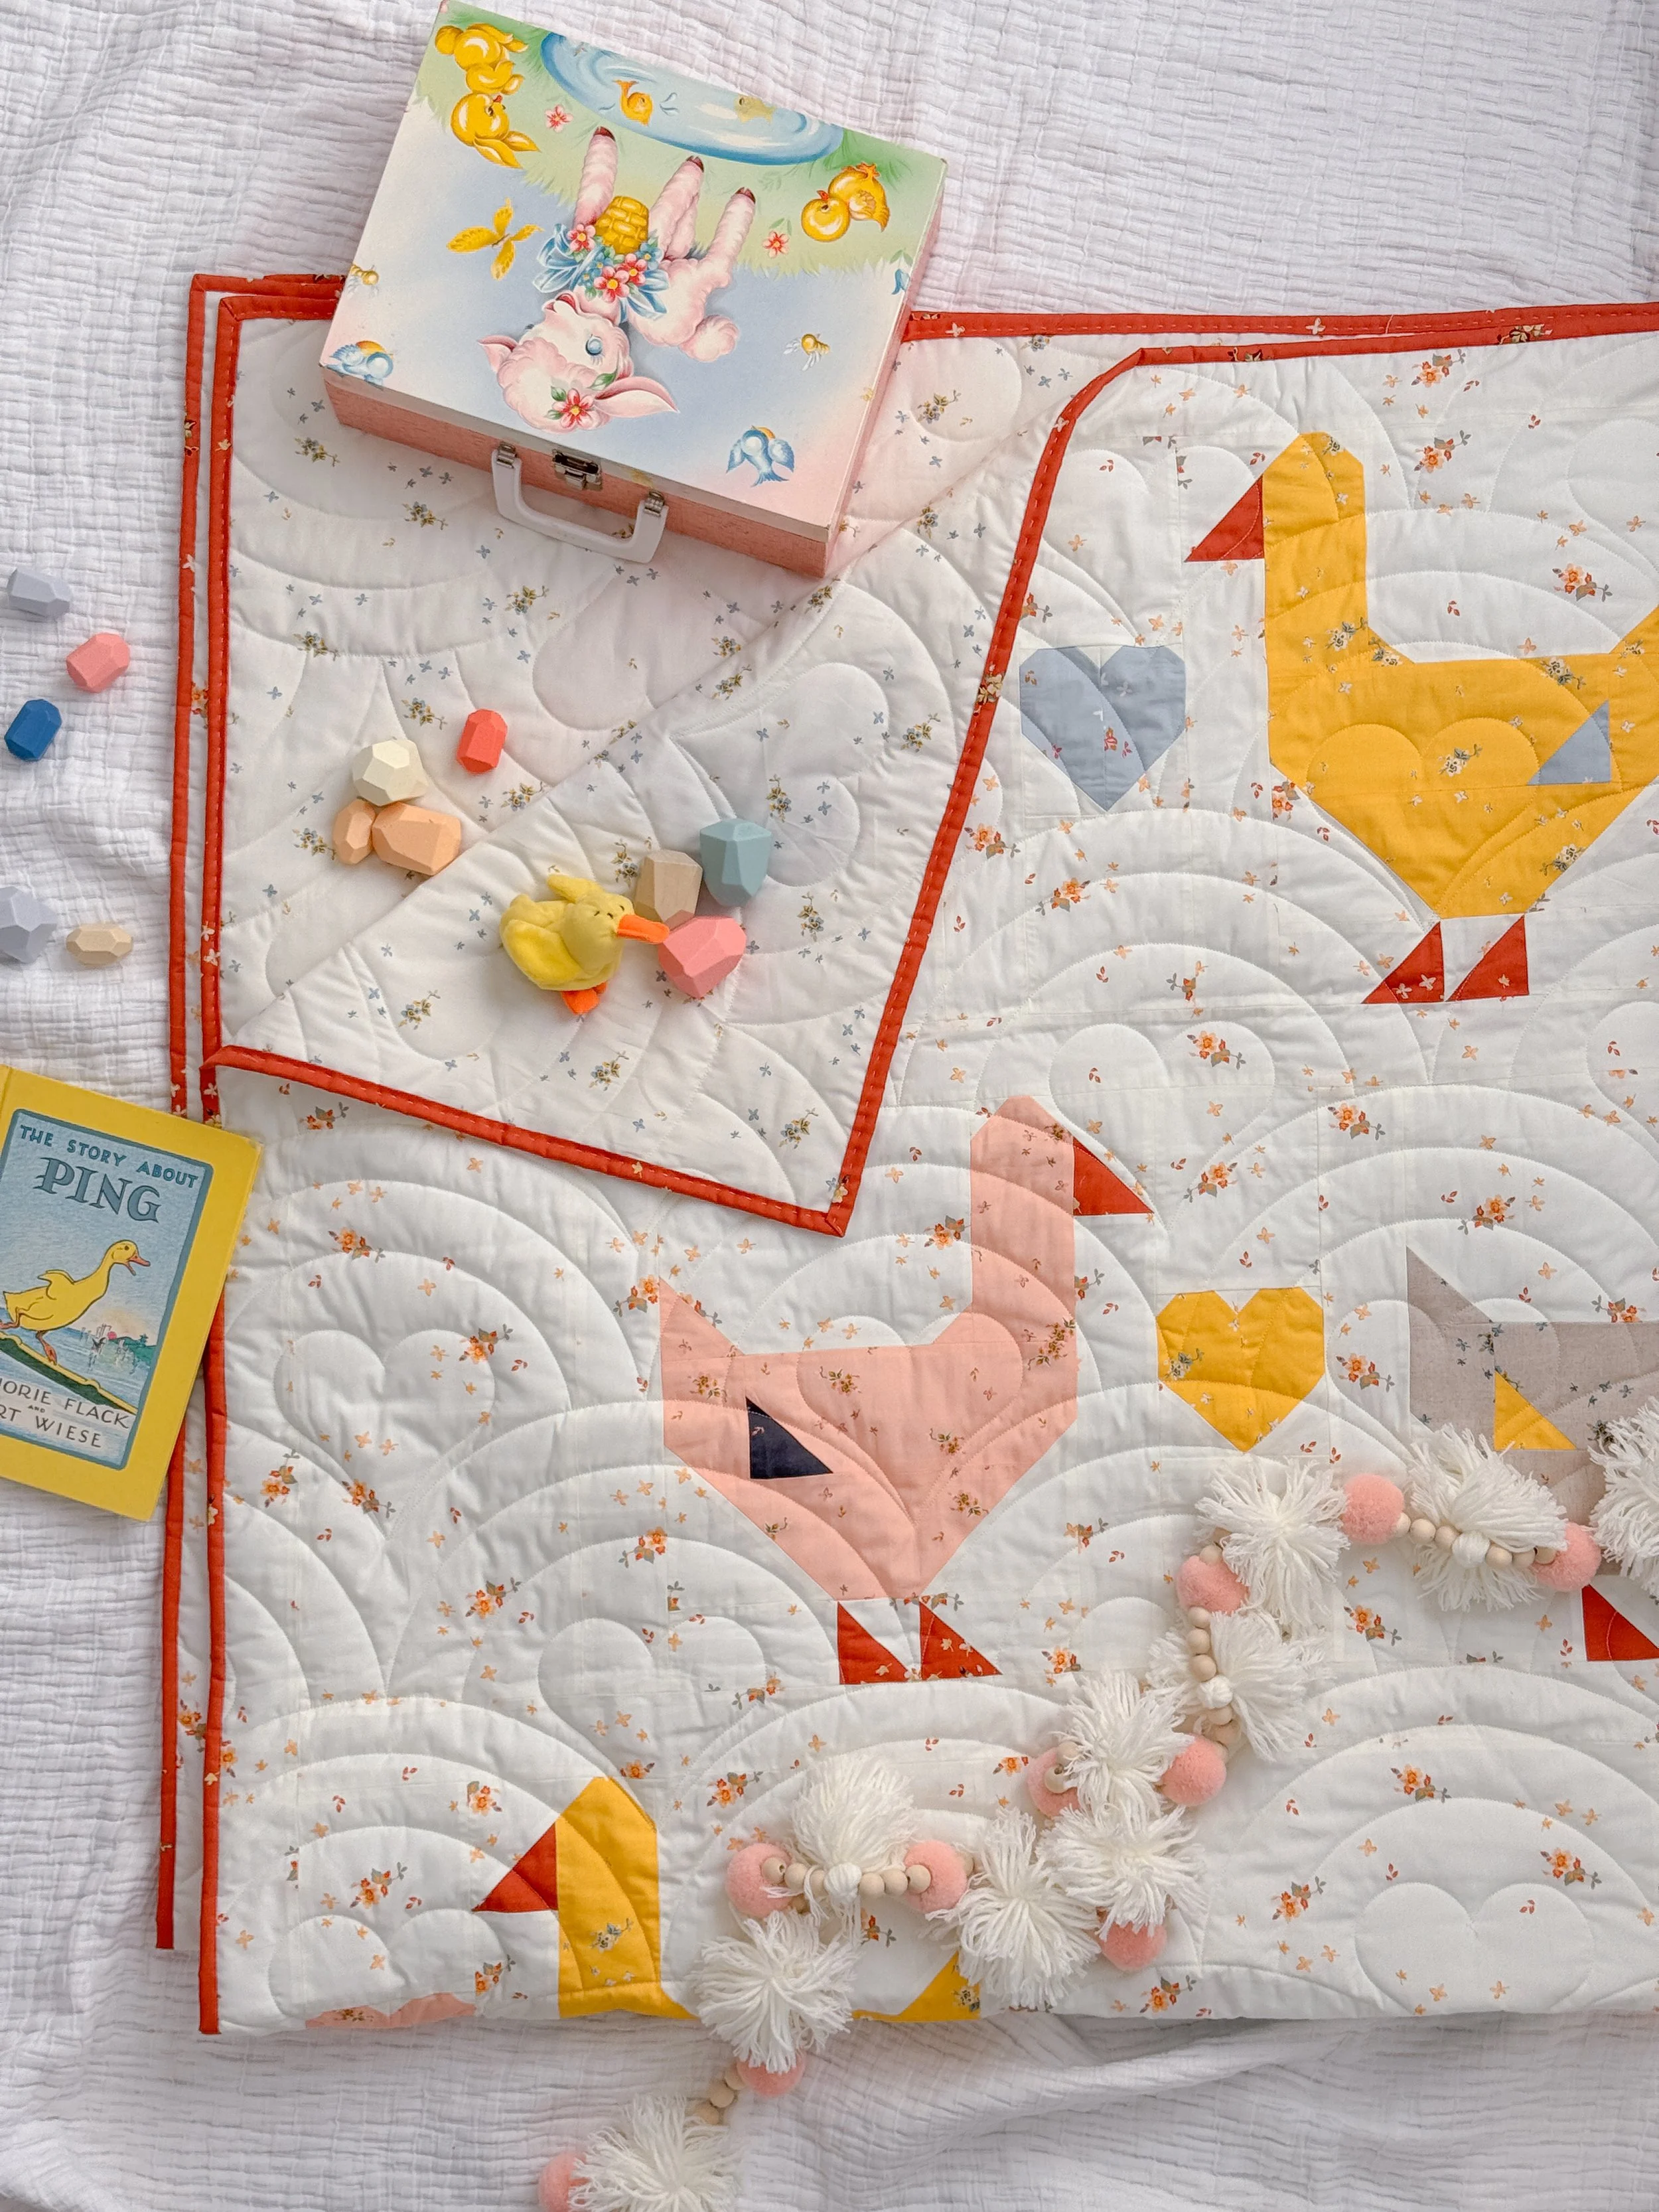
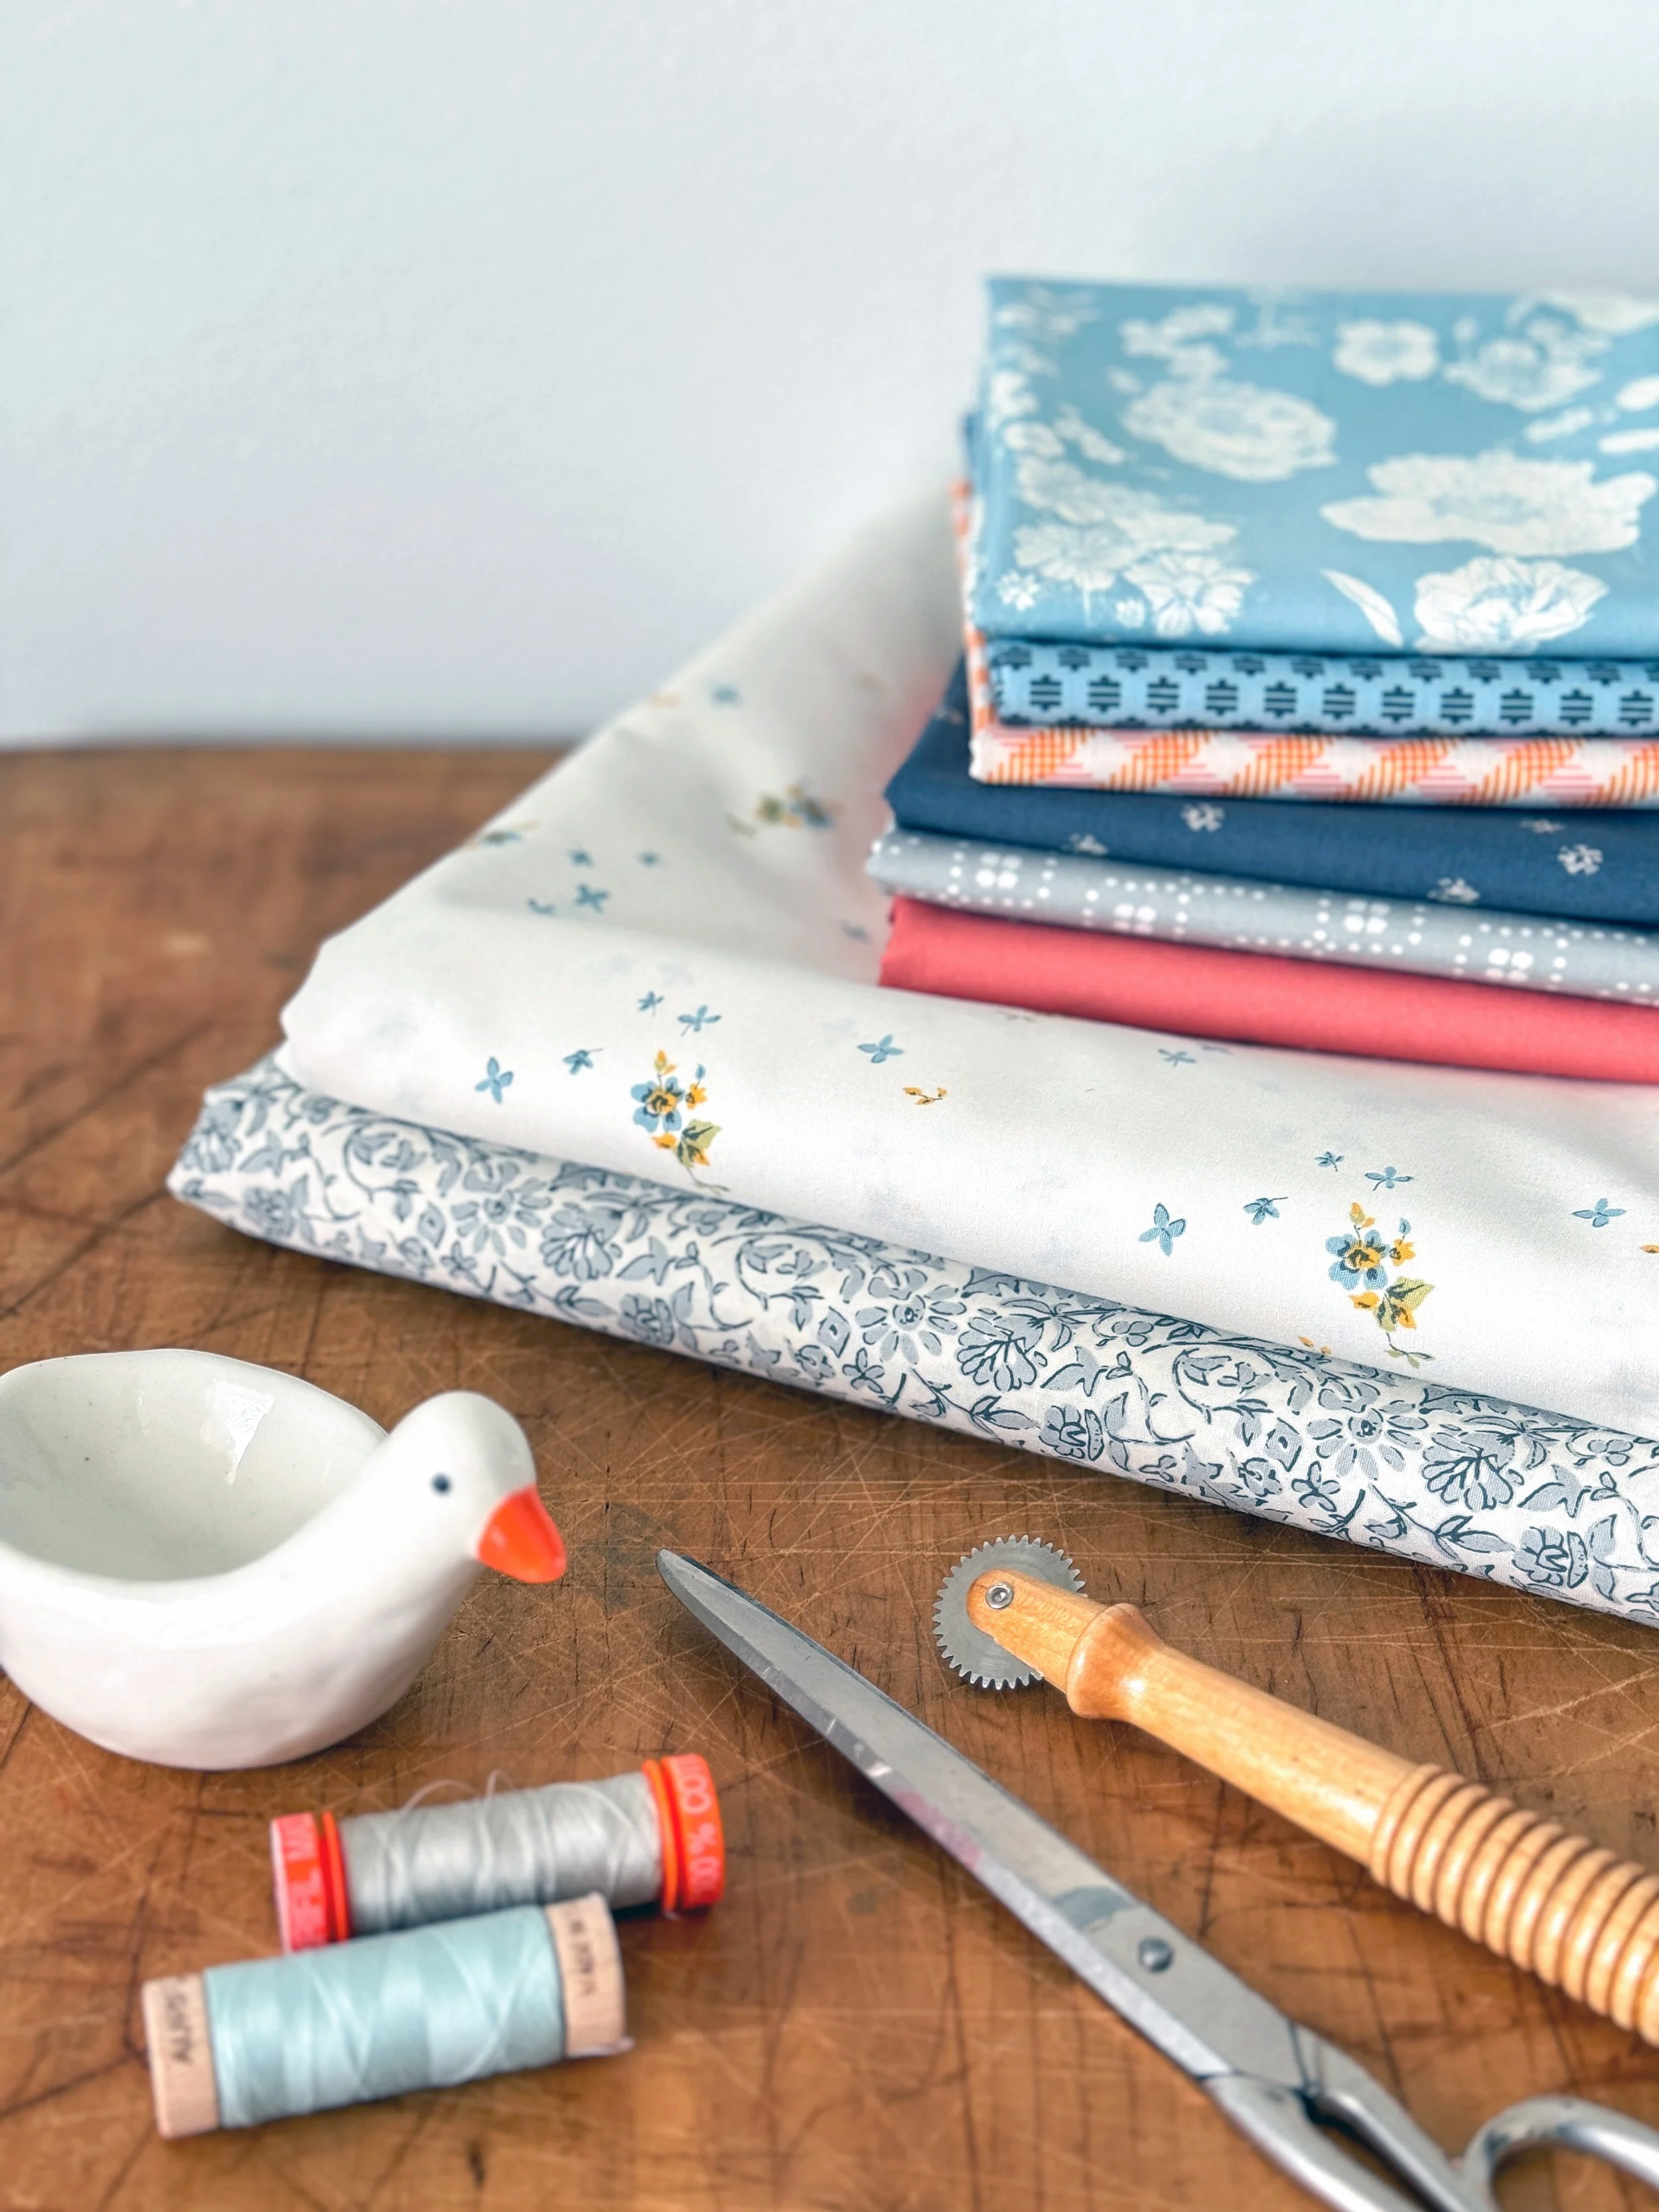
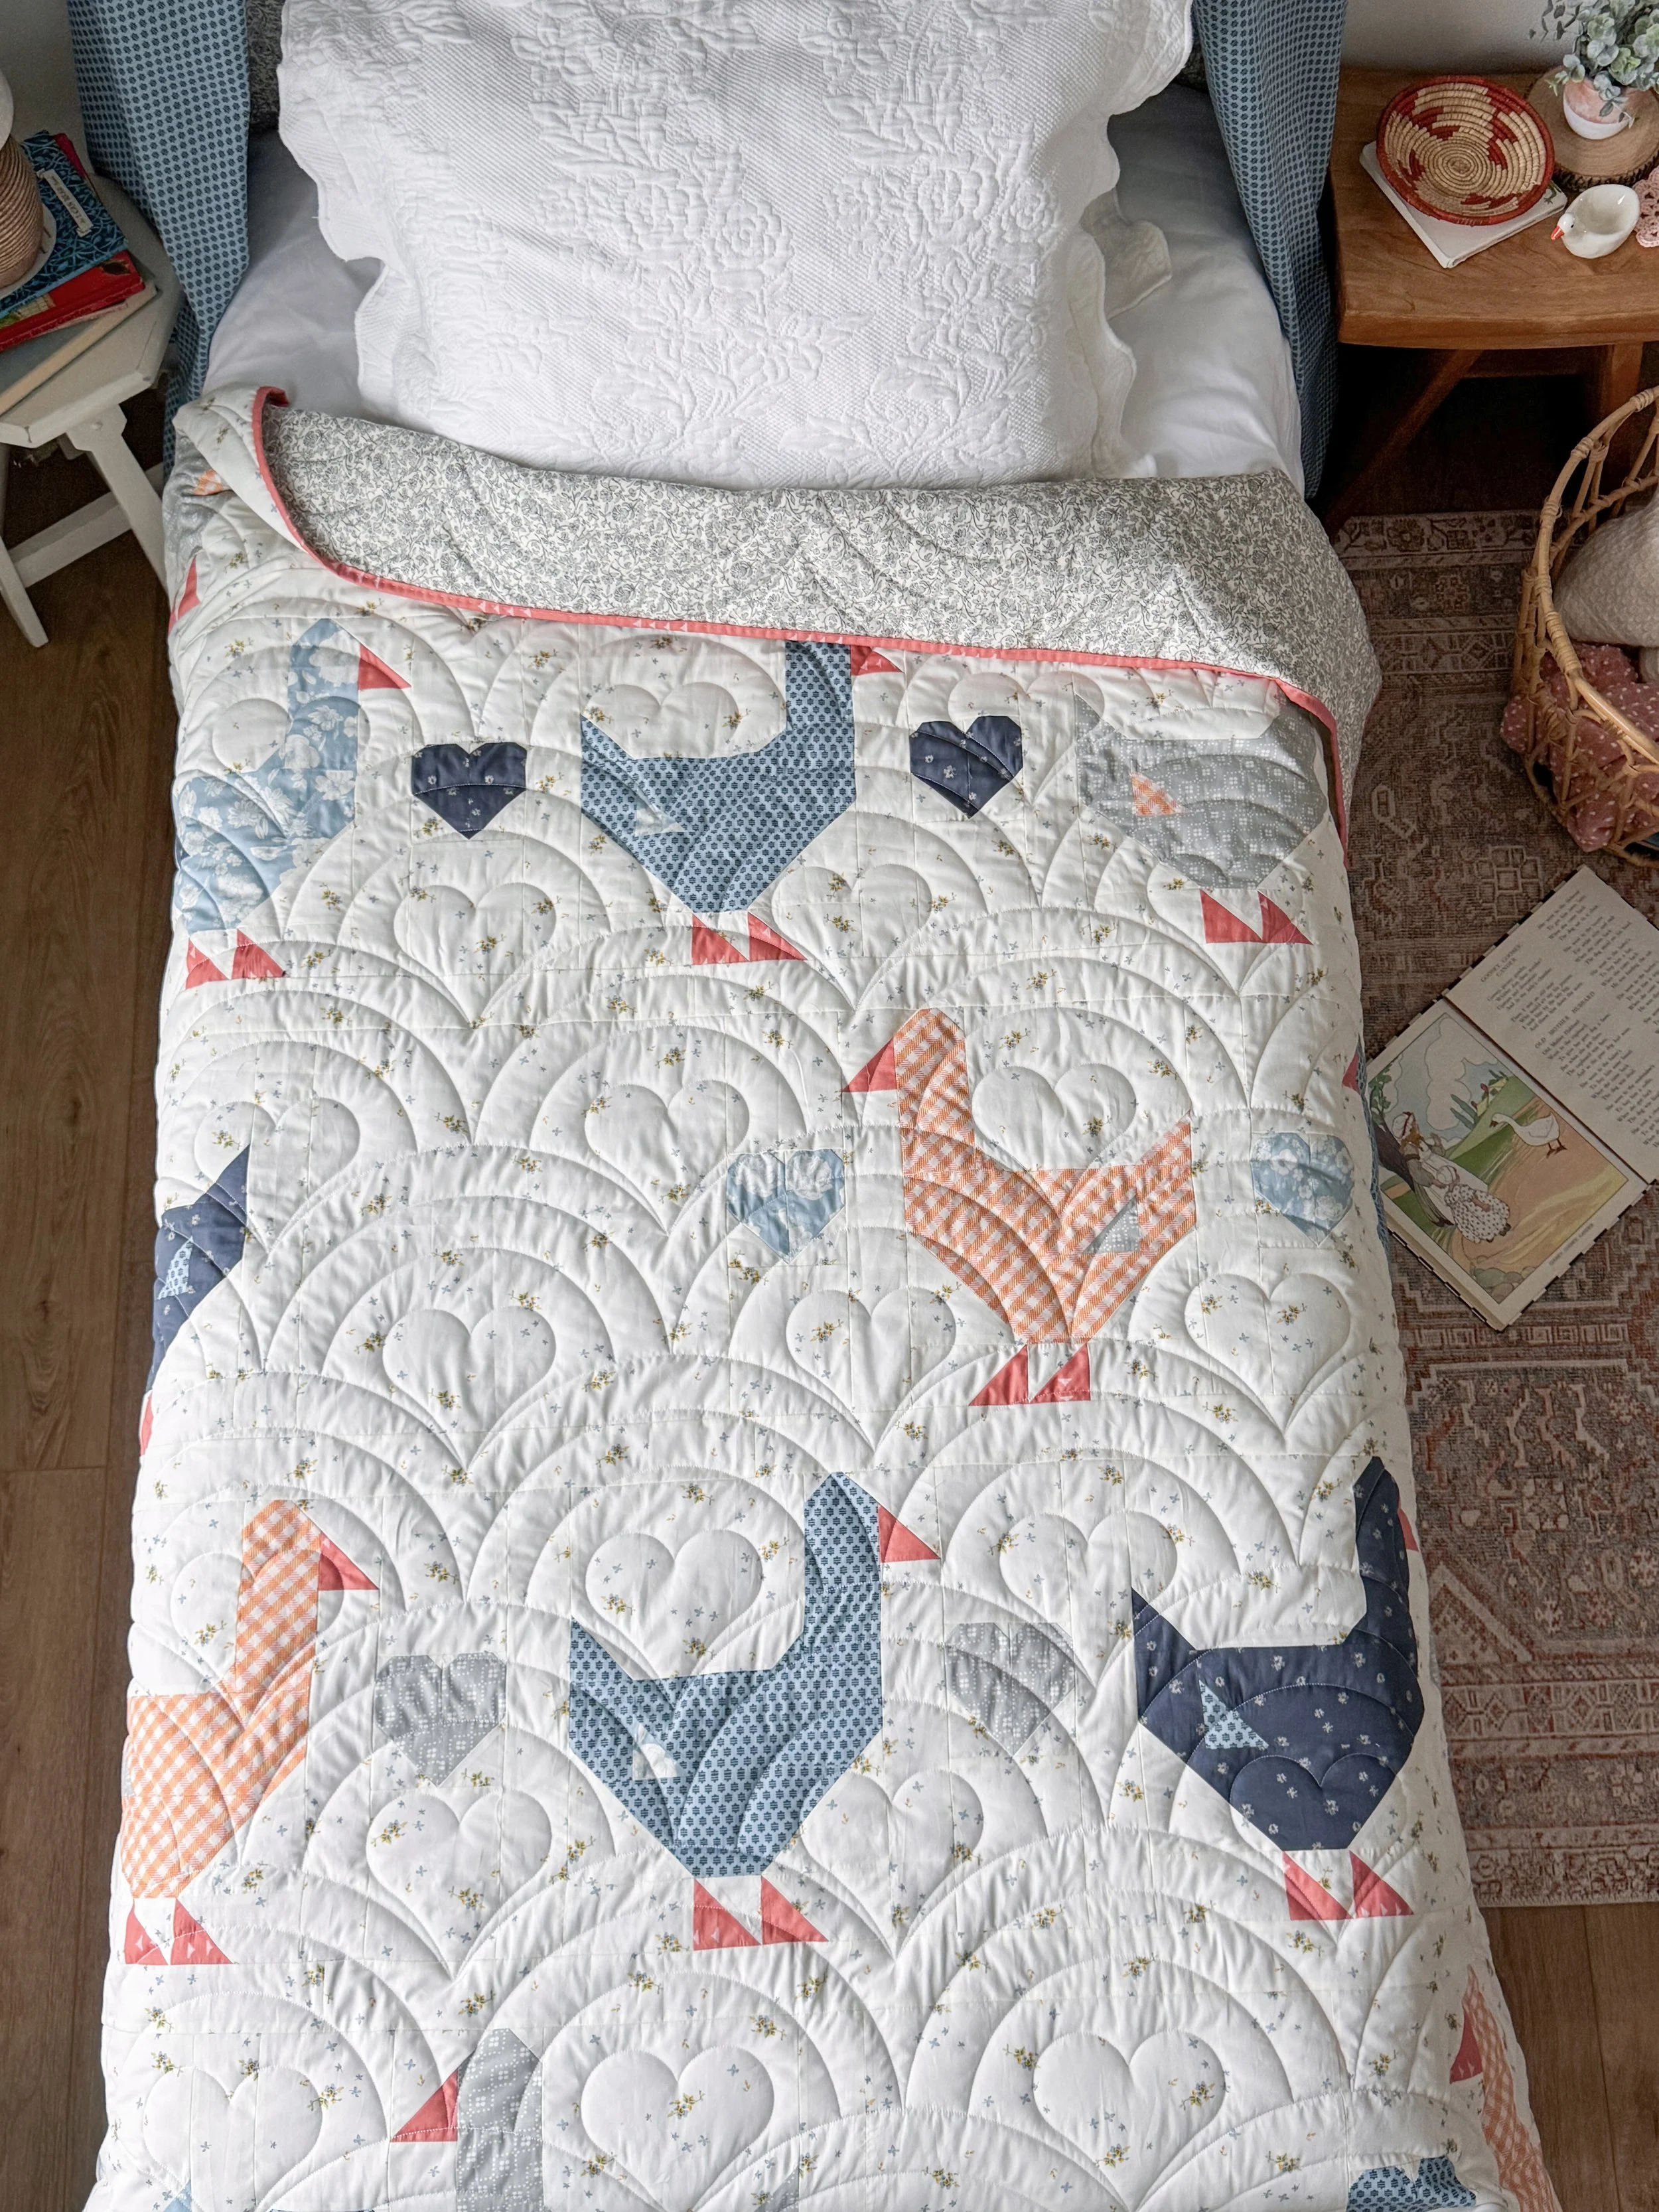
The other Goose Goose throw/twin quilt I made was actually my first quilt made. I’ve been wanting for ages to stitch an all Delicate Balance prints quilt and thought the Goose Goose quilt was the perfect, playful pattern for this airy floral print.
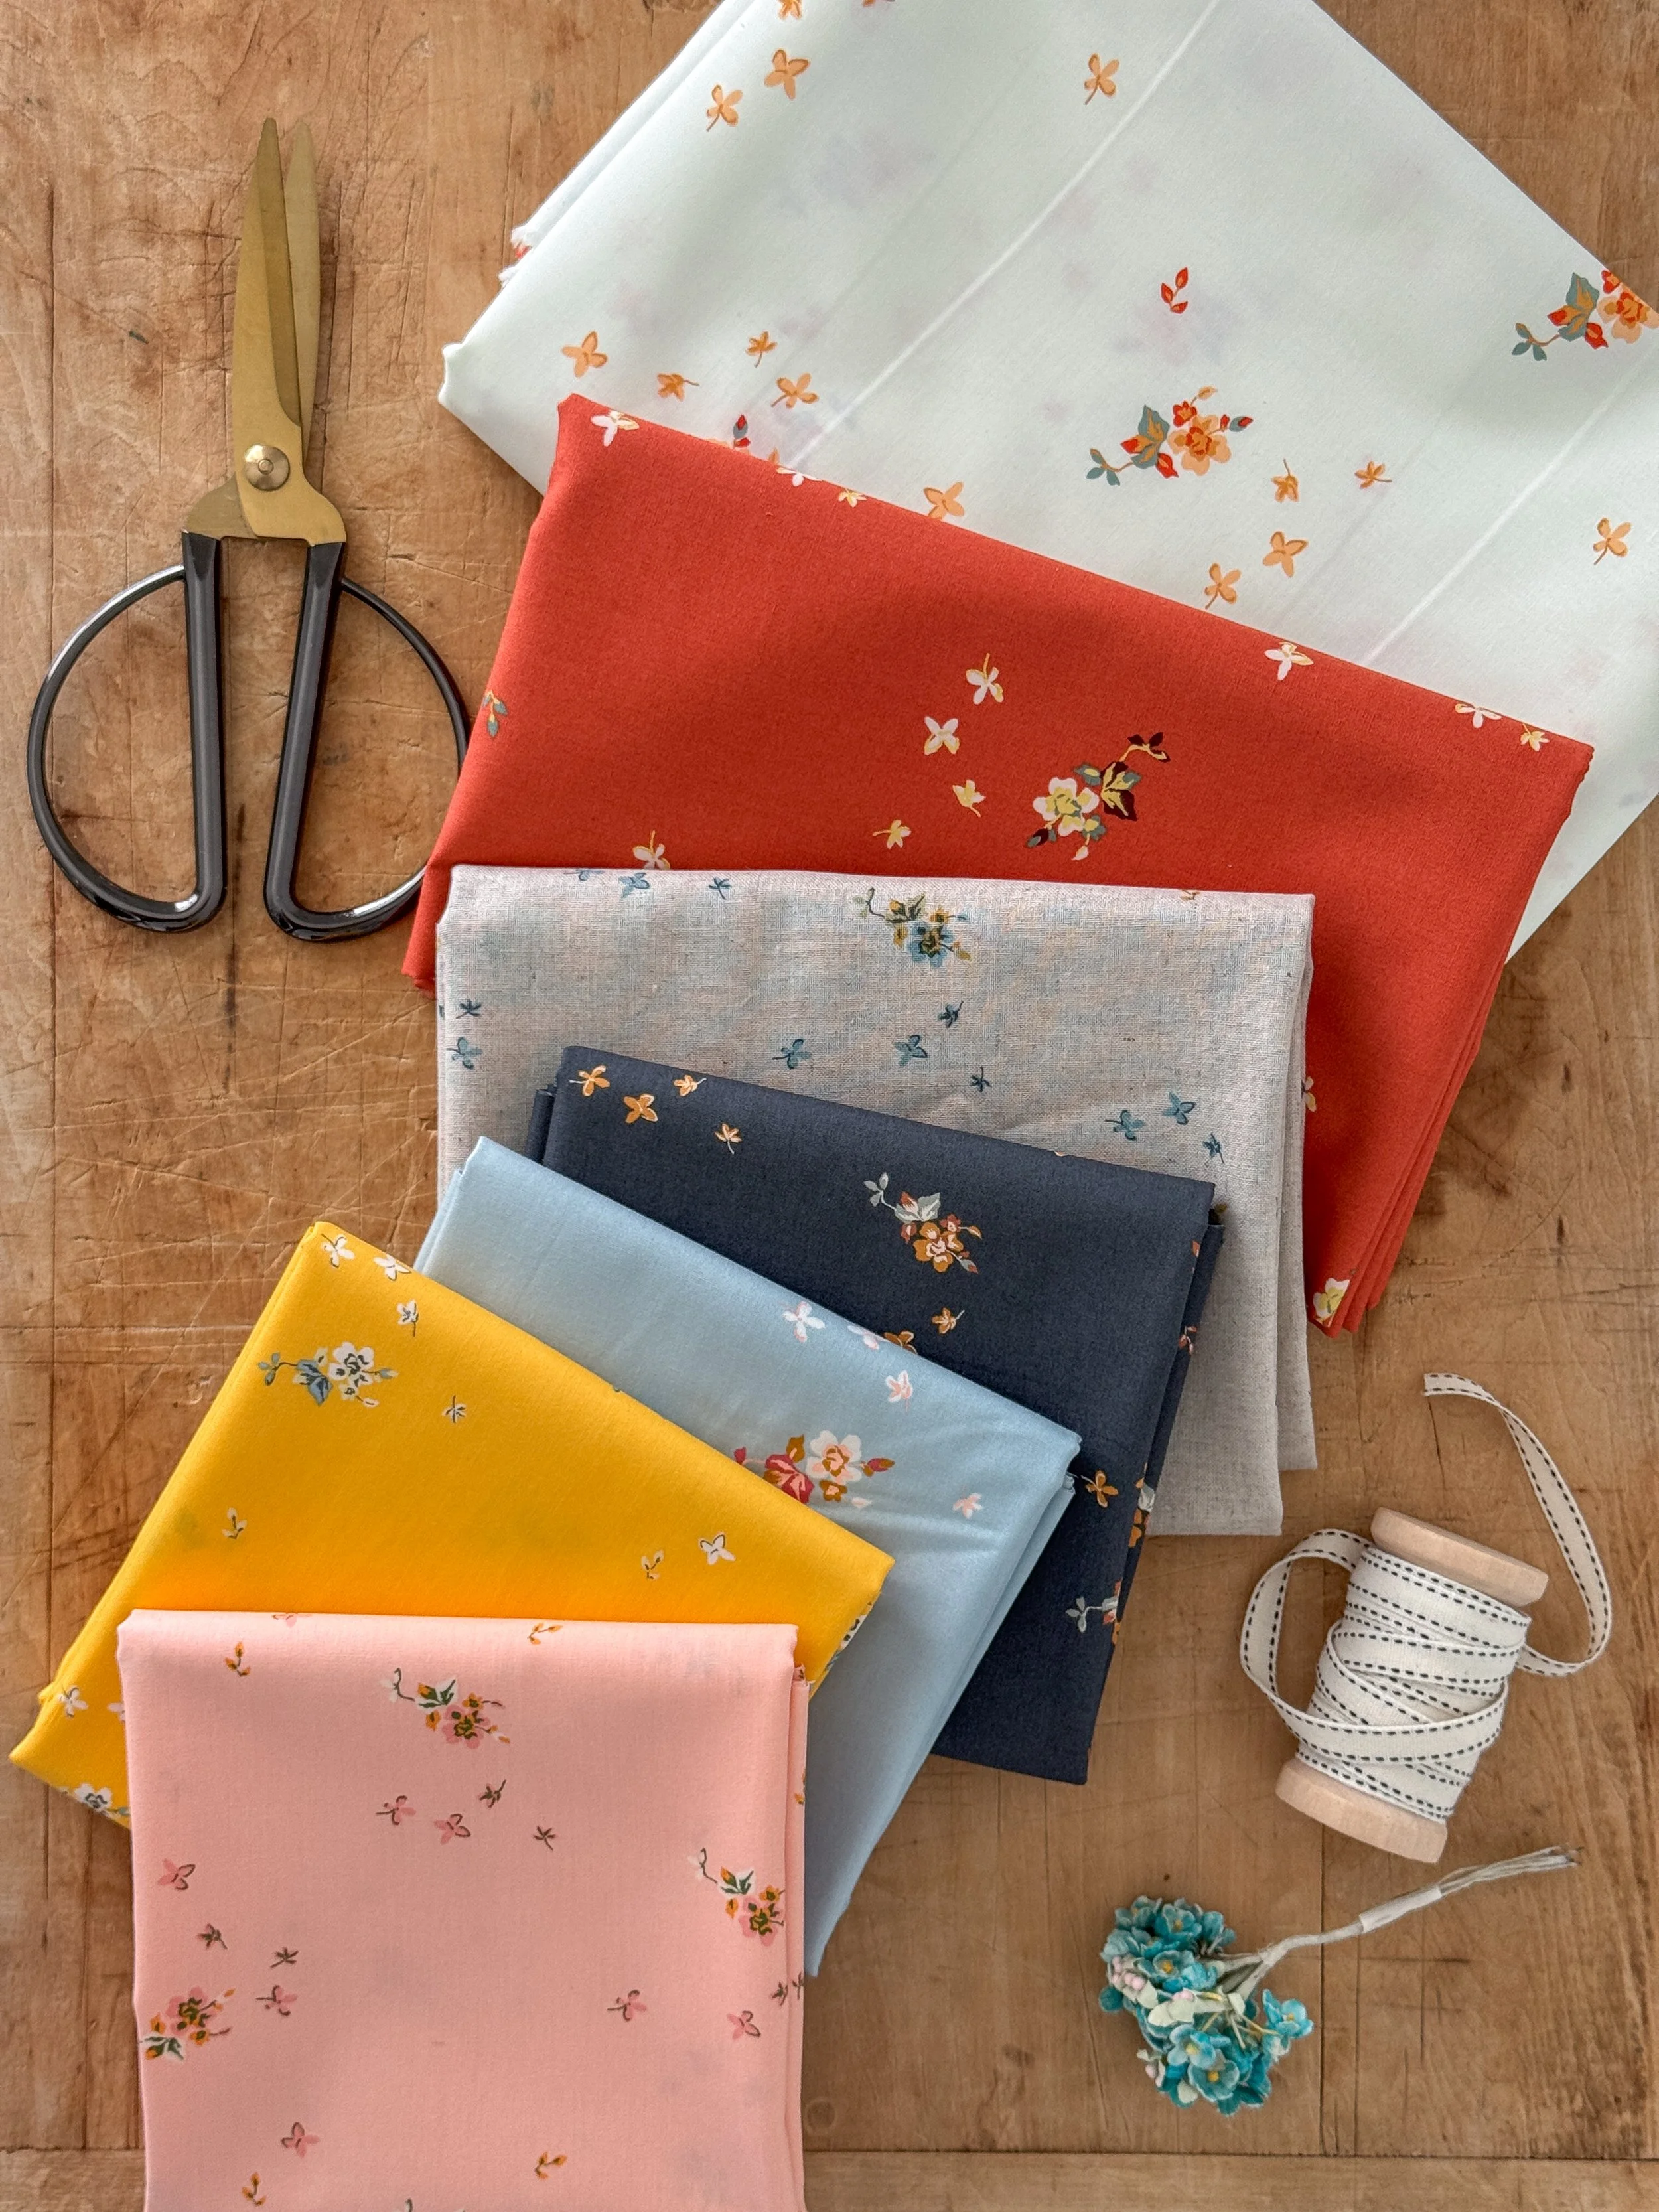
Unfortunately, the Delicate Balance Six background fabric used in this version is no longer in stock at Art Gallery Fabrics. It may eventually be reprinted but right now with the situation with tariffs, AGF is holding off reprinting out of stock fabrics and concentrating on the new collections first. So, I do not have any shops kitting this version but you still could source (on line) the individual fabric on your own to duplicate this look from shops that still have the prints in their inventory. See below for the fabrics used for making this Delicate Balance throw/twin size quilt.
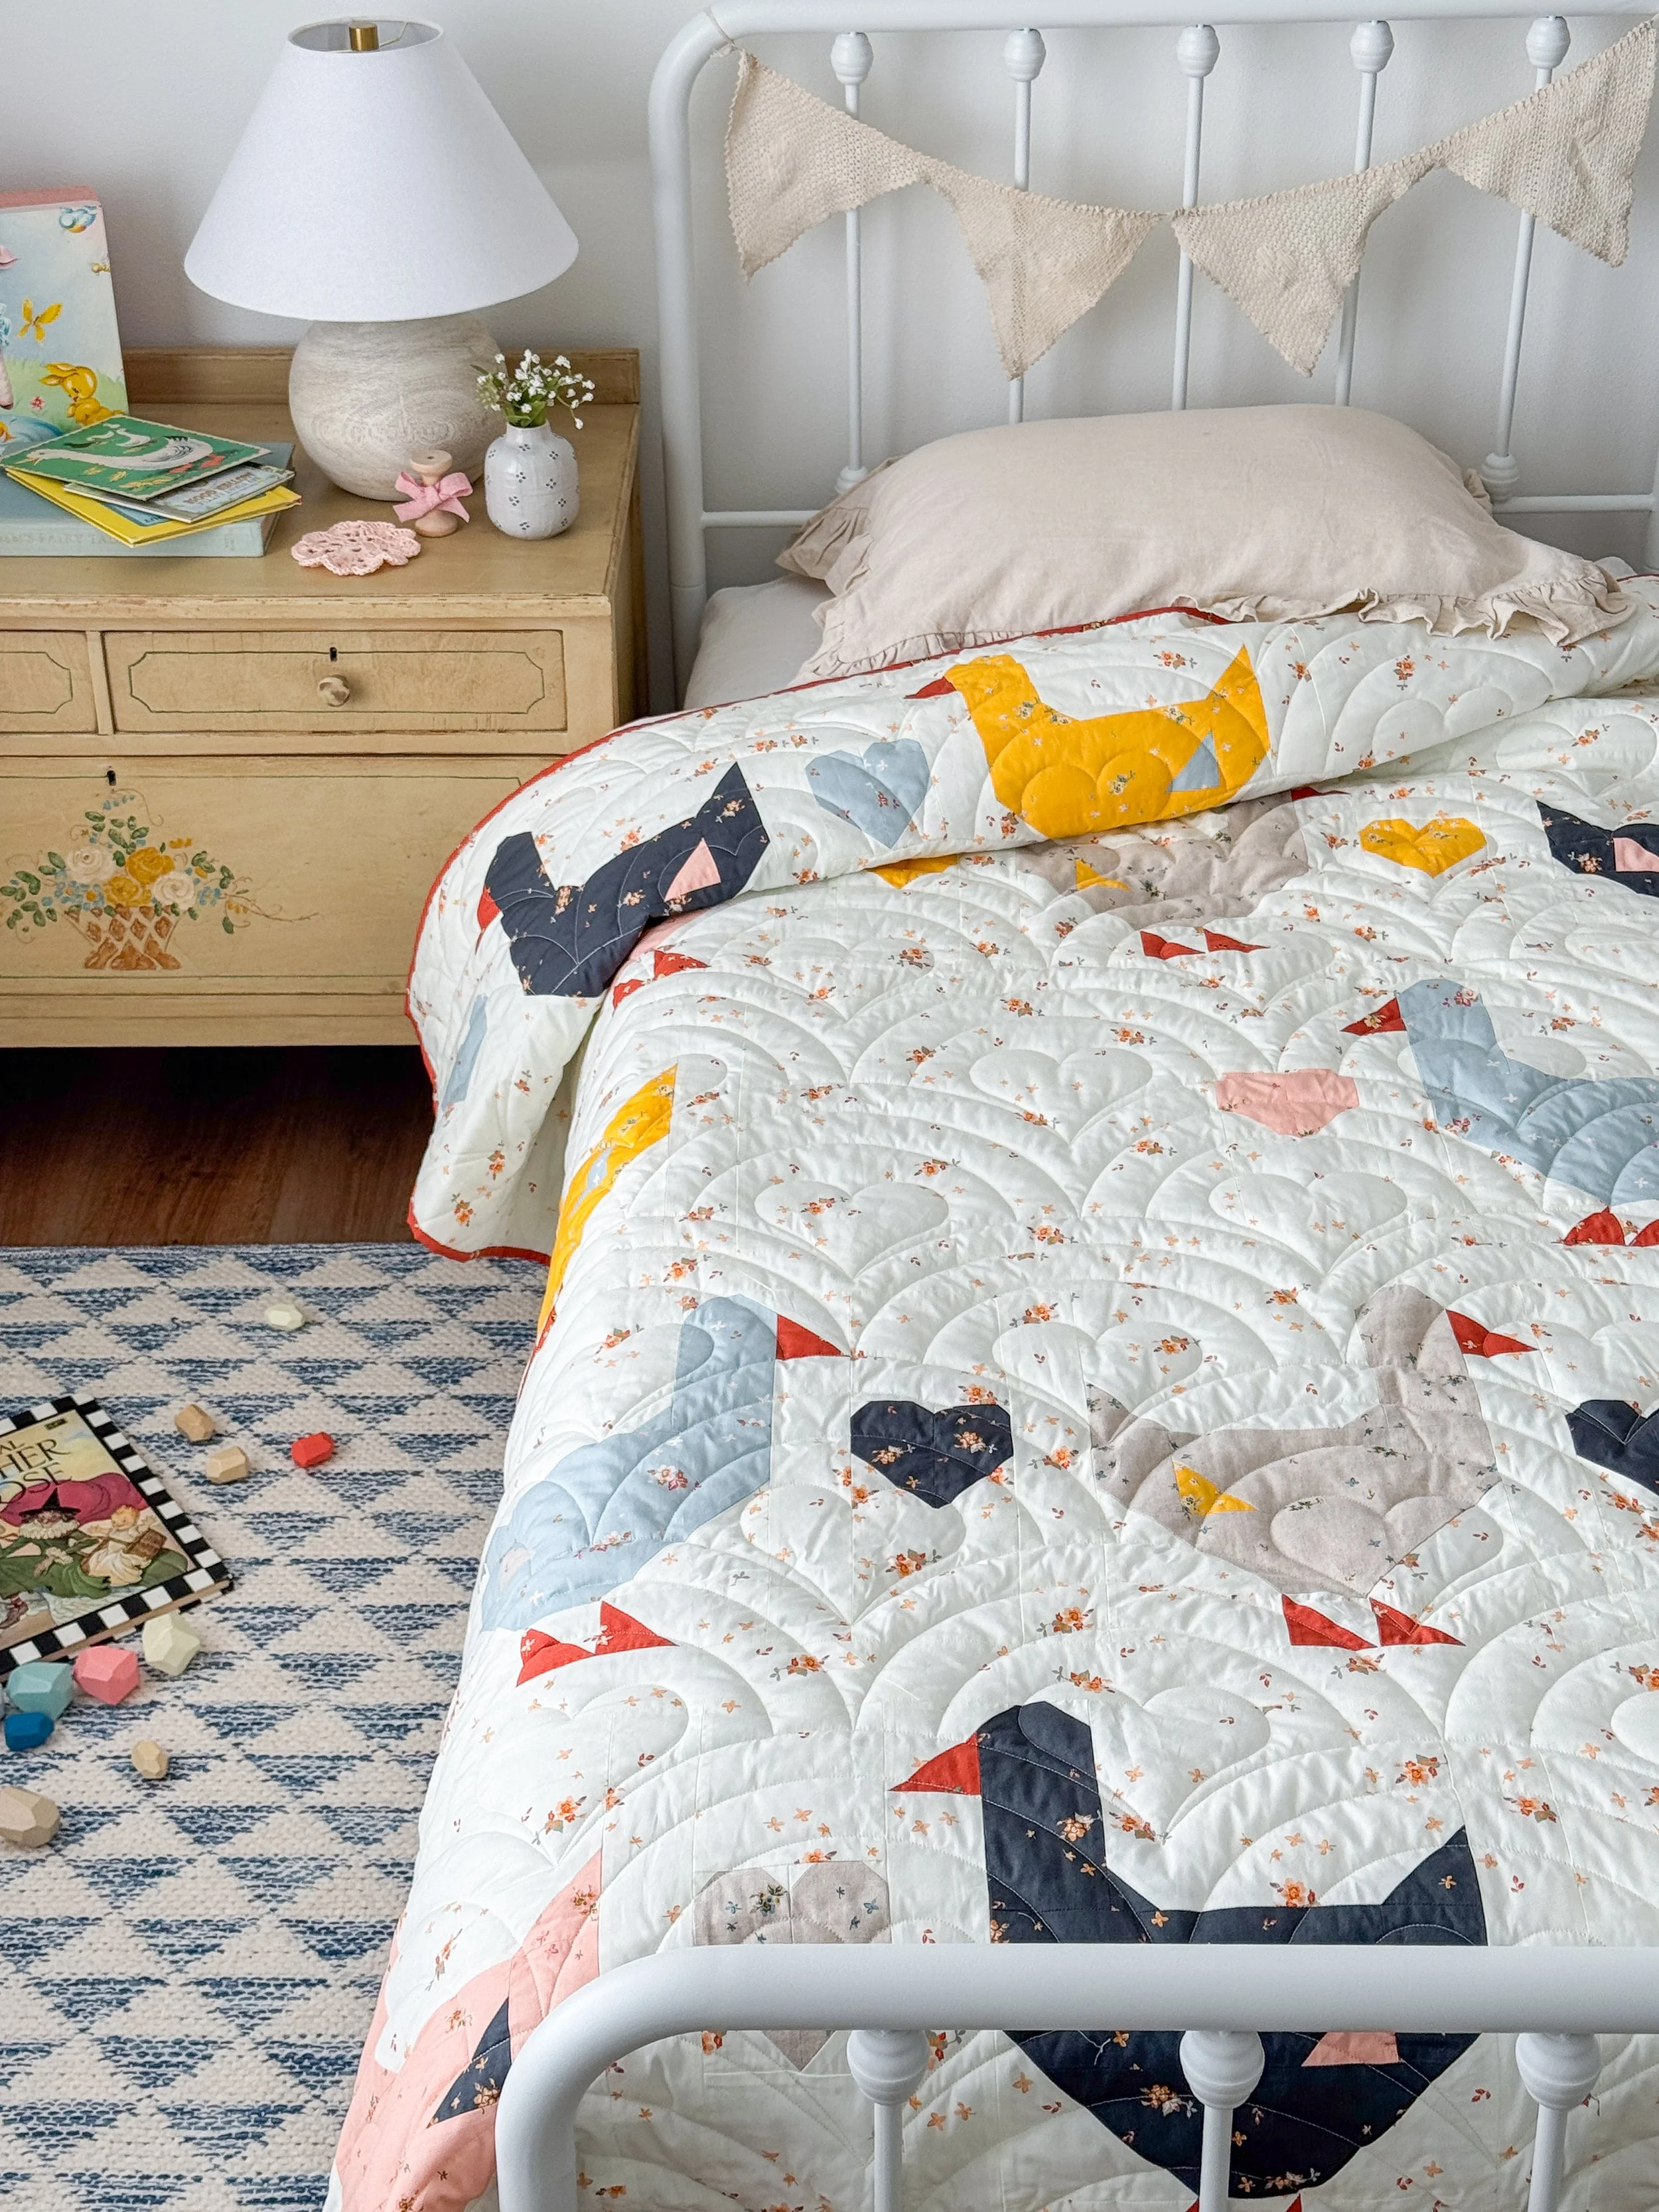
Isn’t this quilt absolutely darling for a child’s bedroom? I loved the Hobbs Batting Polydown and the quilting design so much that I used the same style for both of my quilts. This particular quilt was long-arm quilted by Brooke Becker of Lady Belle Fabric, whose careful stitching really brings out the texture and pattern. This Delicate Balance version is the one my granddaughter chose because she loved the yellow, “ello” ducks!
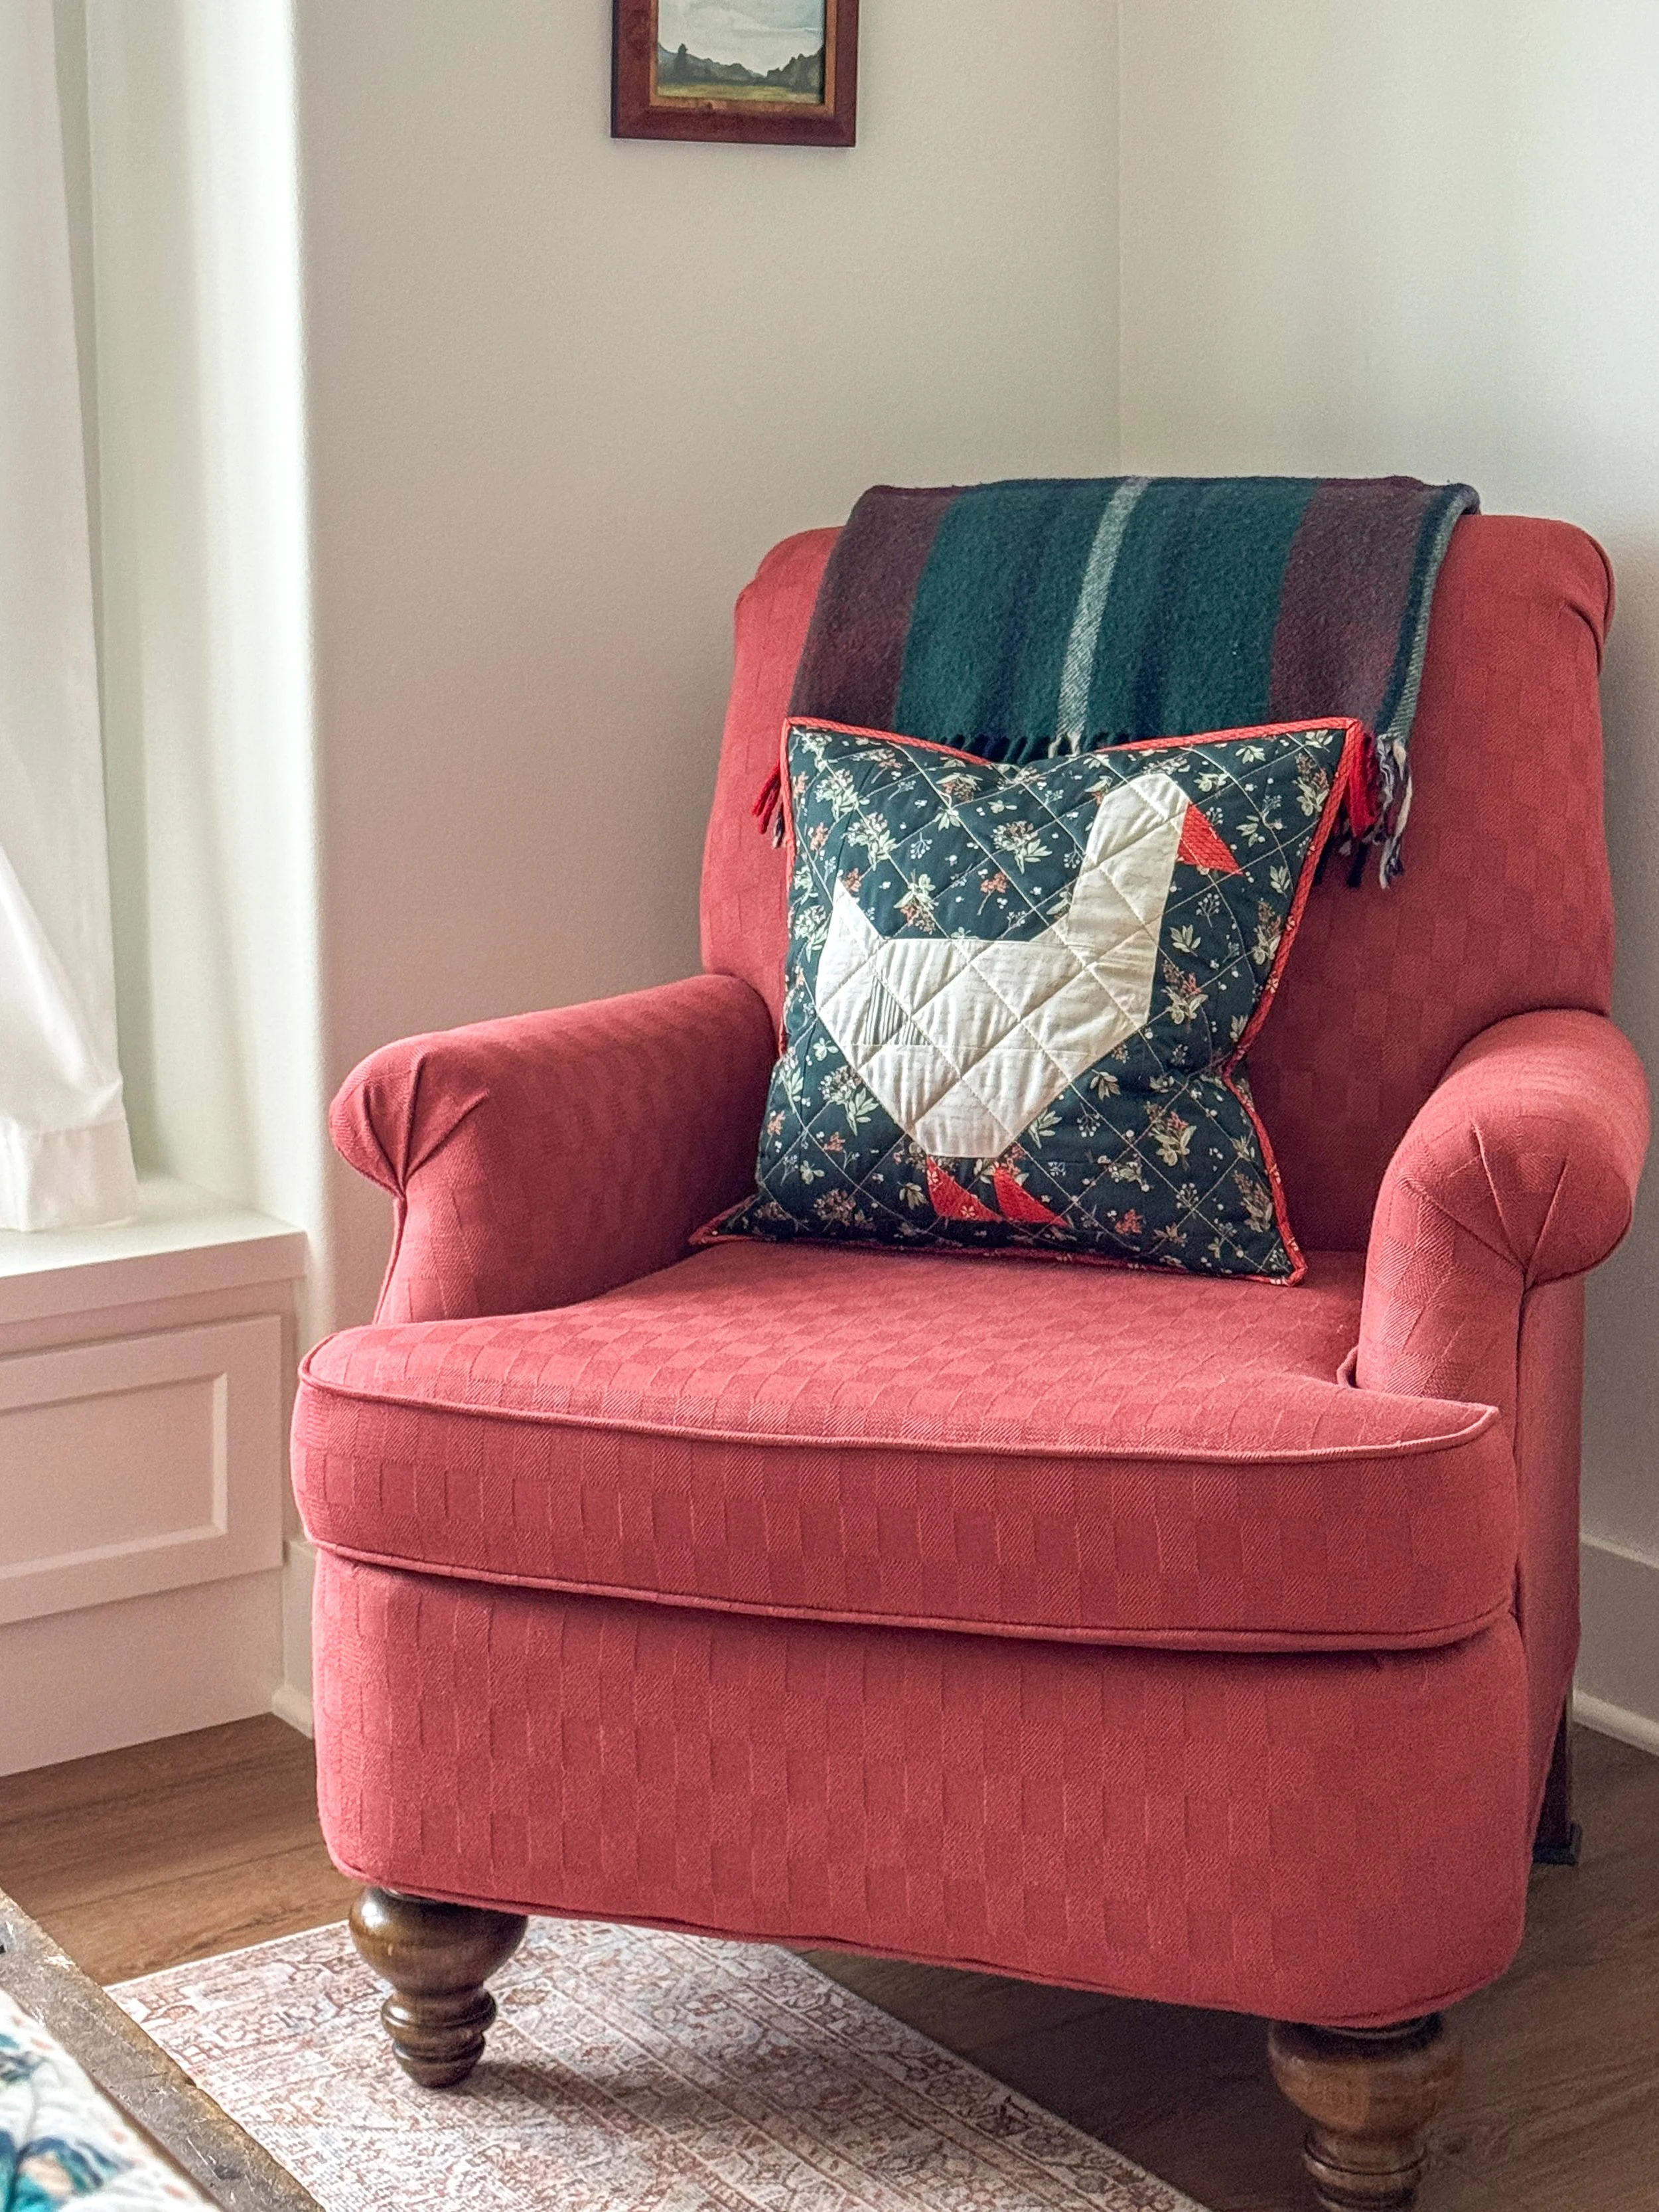
I guess I’m showing you all my Goose Goose makes in reverse order of making them, because before the Blue Goose quilt version and before the Delicate Balance quilt version, there was an initial set of pillows made to test out the block and the pattern.
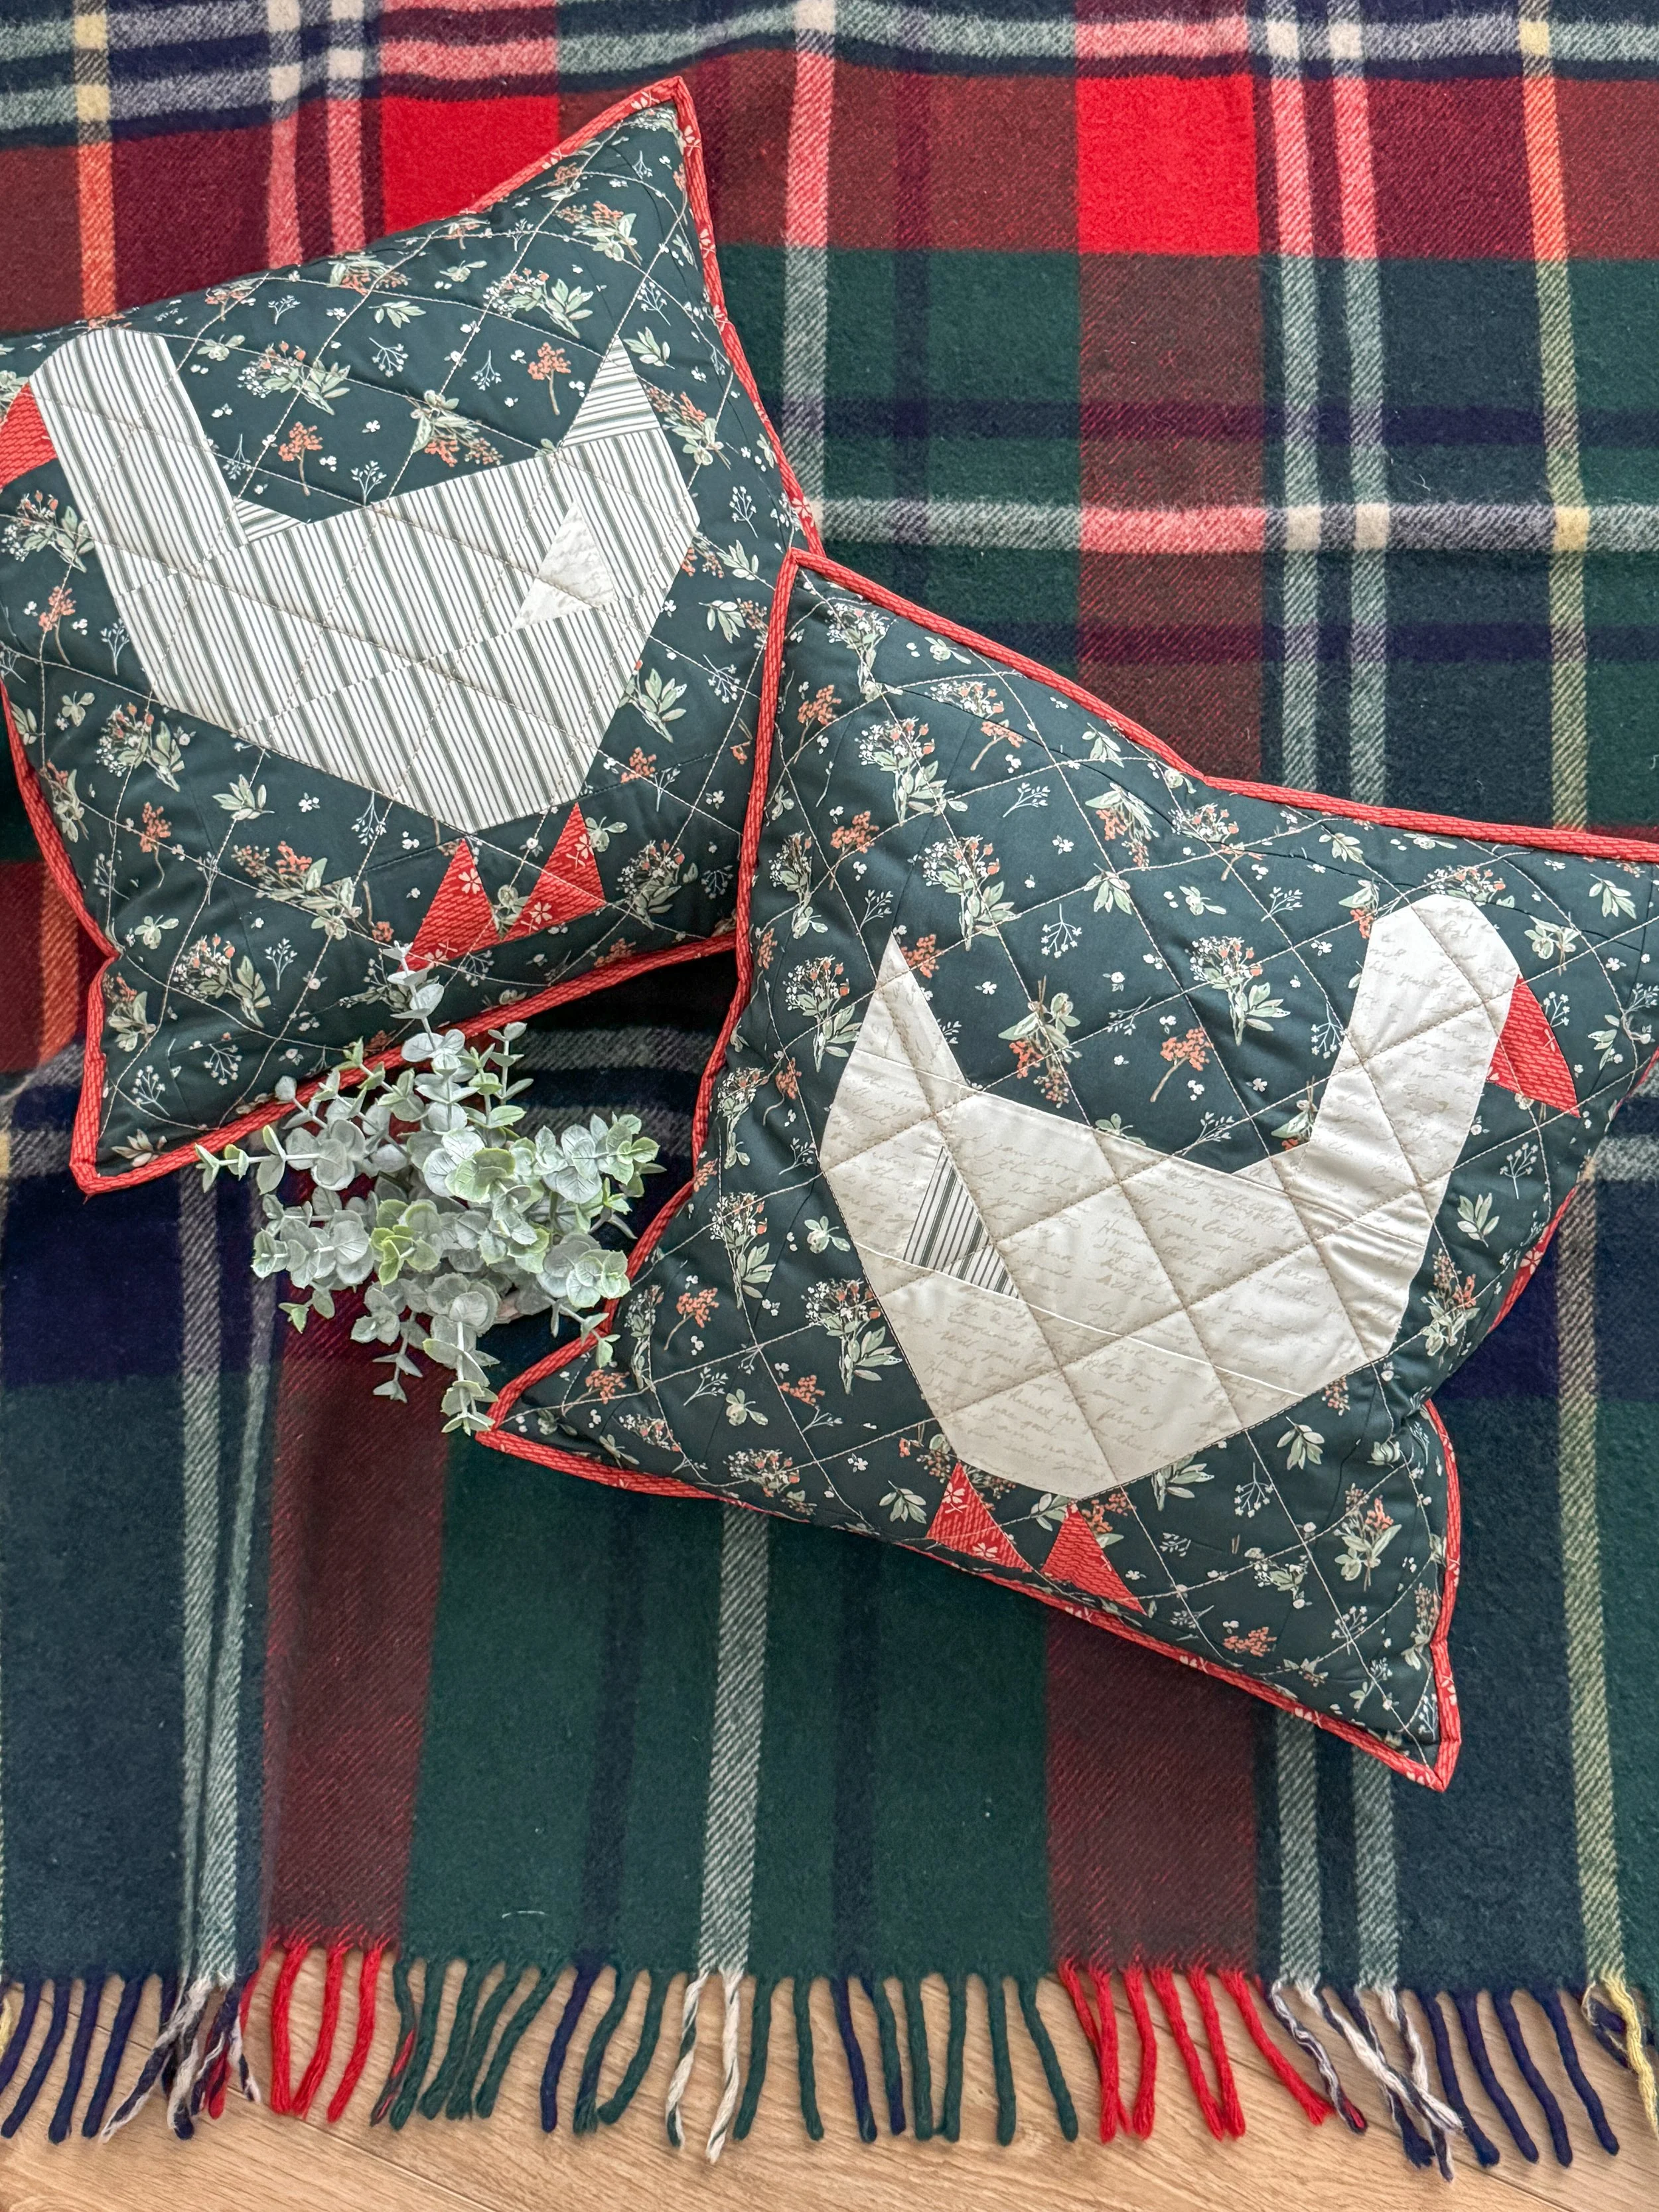
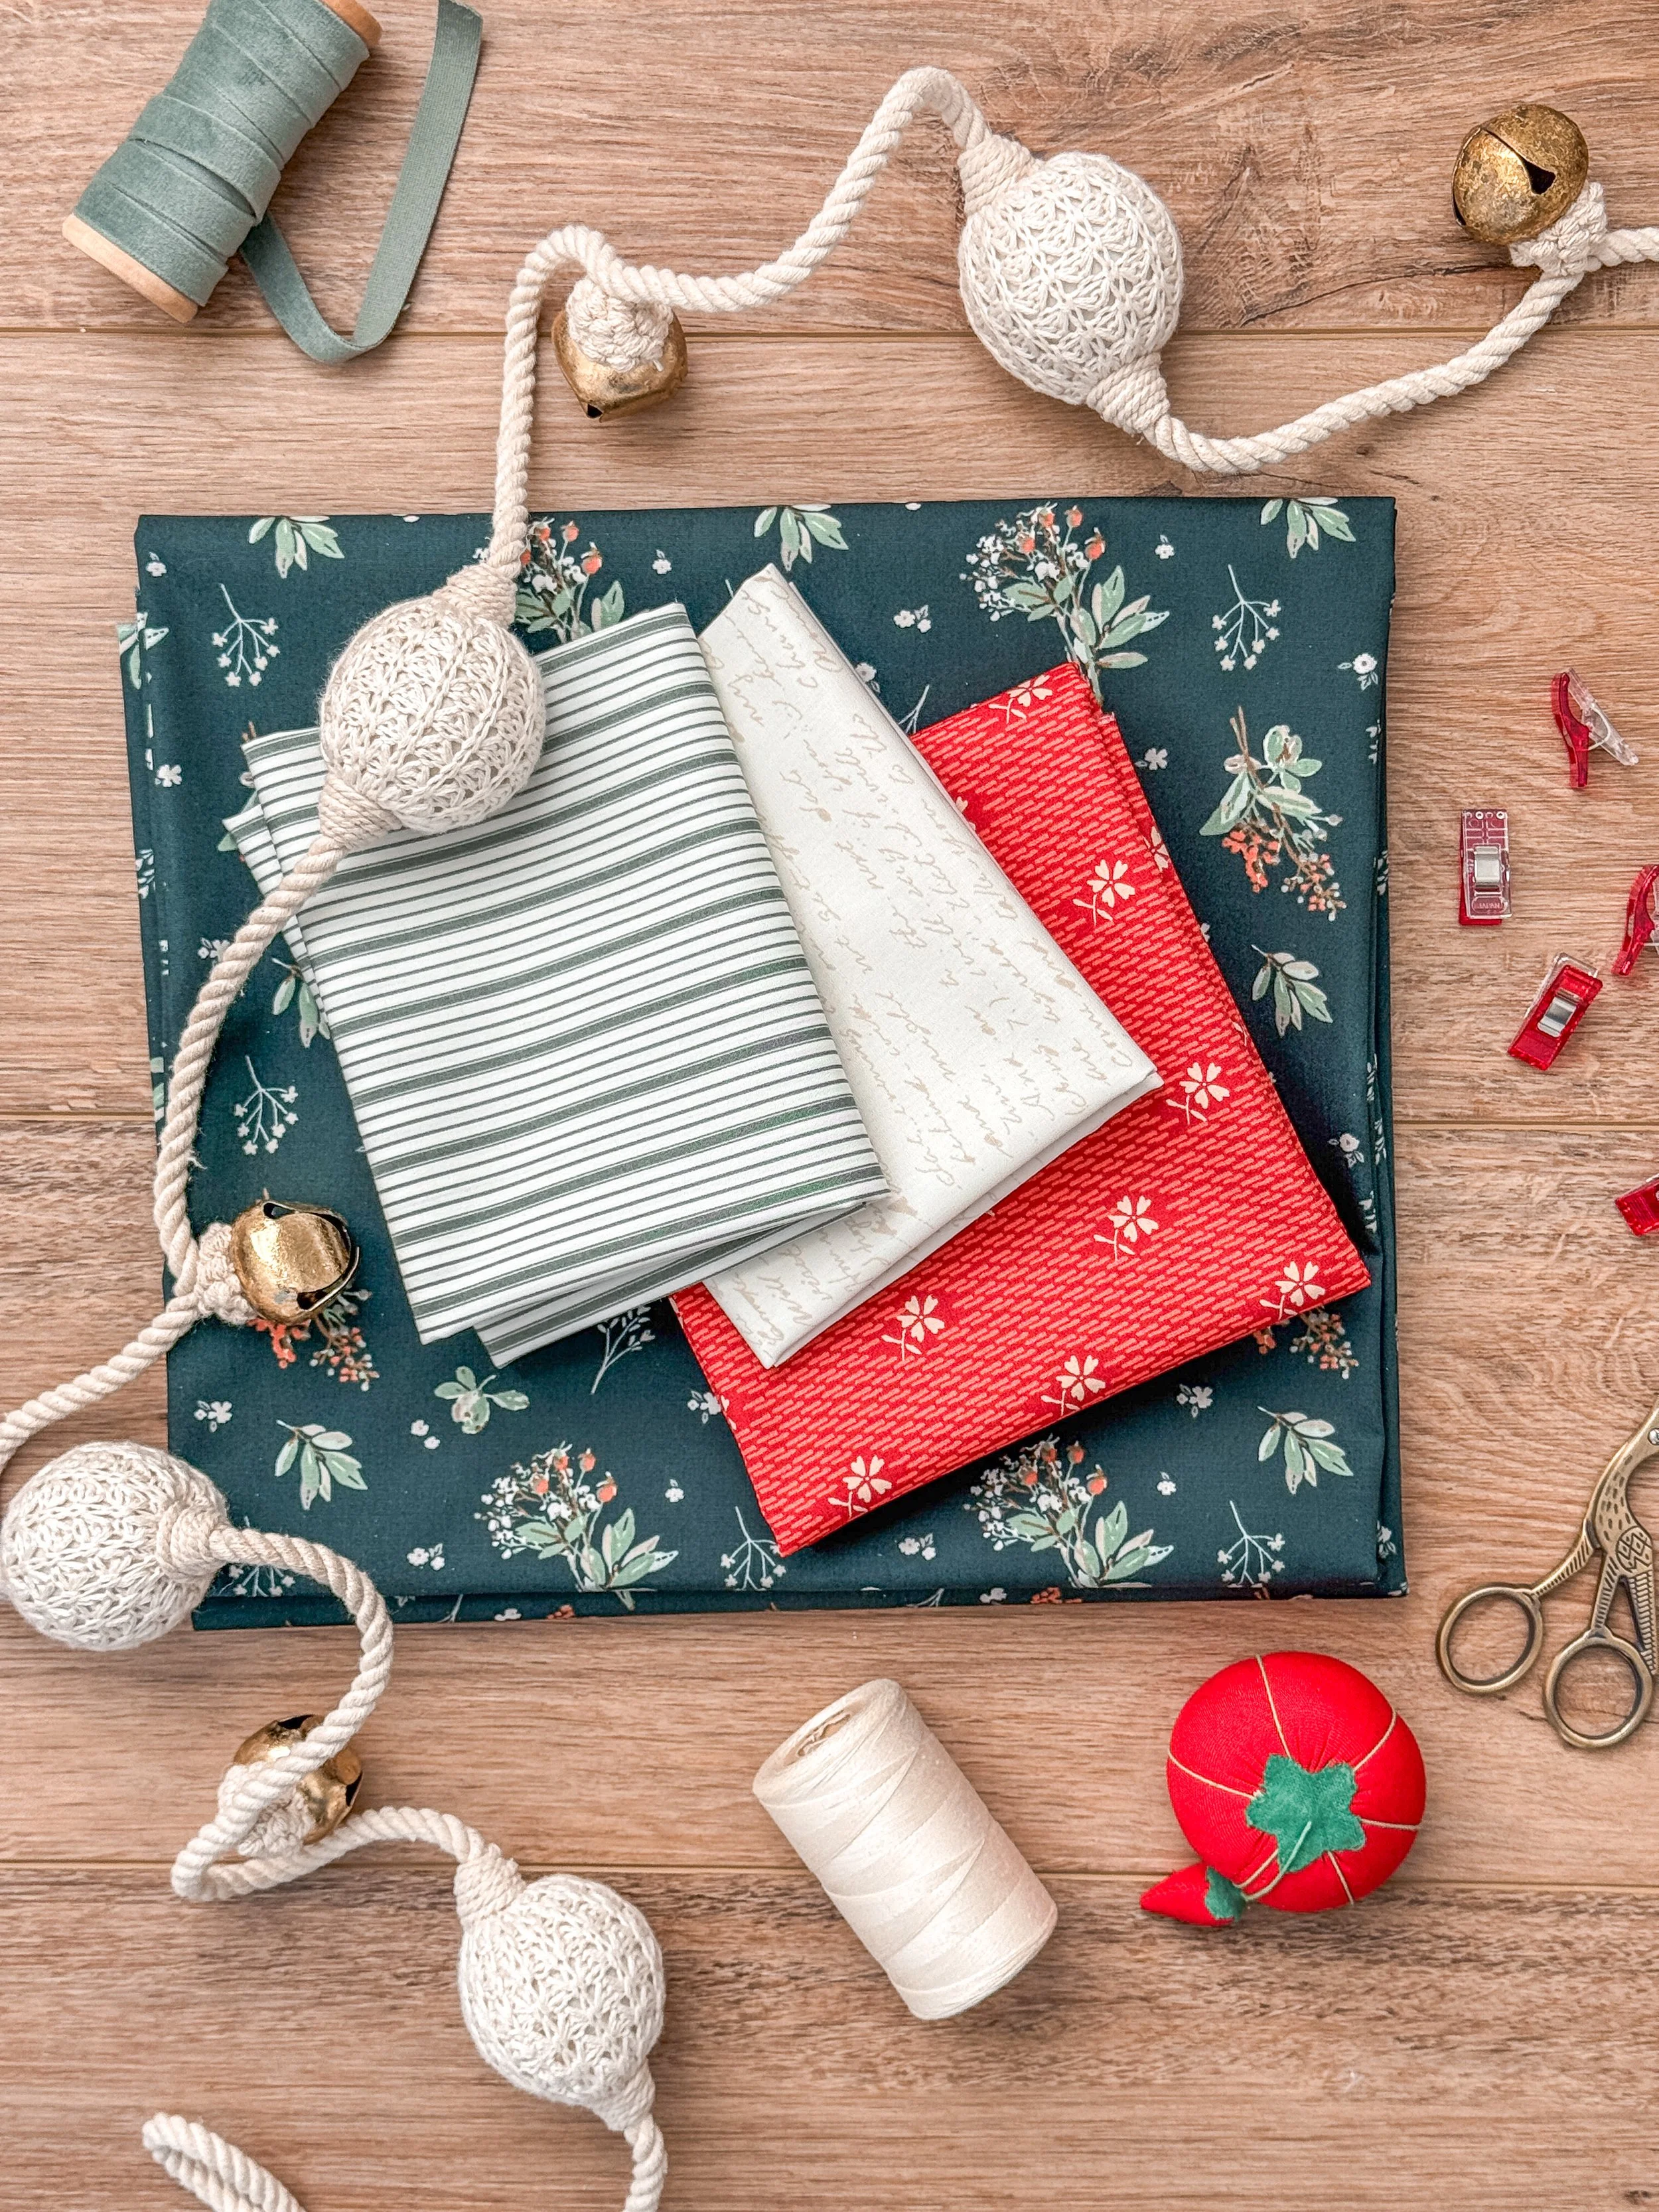
I begun working on this pattern just before Christmas and made a pair of Christmas geese using prints from my Juniper and Tumbleweed collections for Art Gallery Fabrics.
I used my Christmas goose pillows in my guest room for the holidays and they were a big hit!
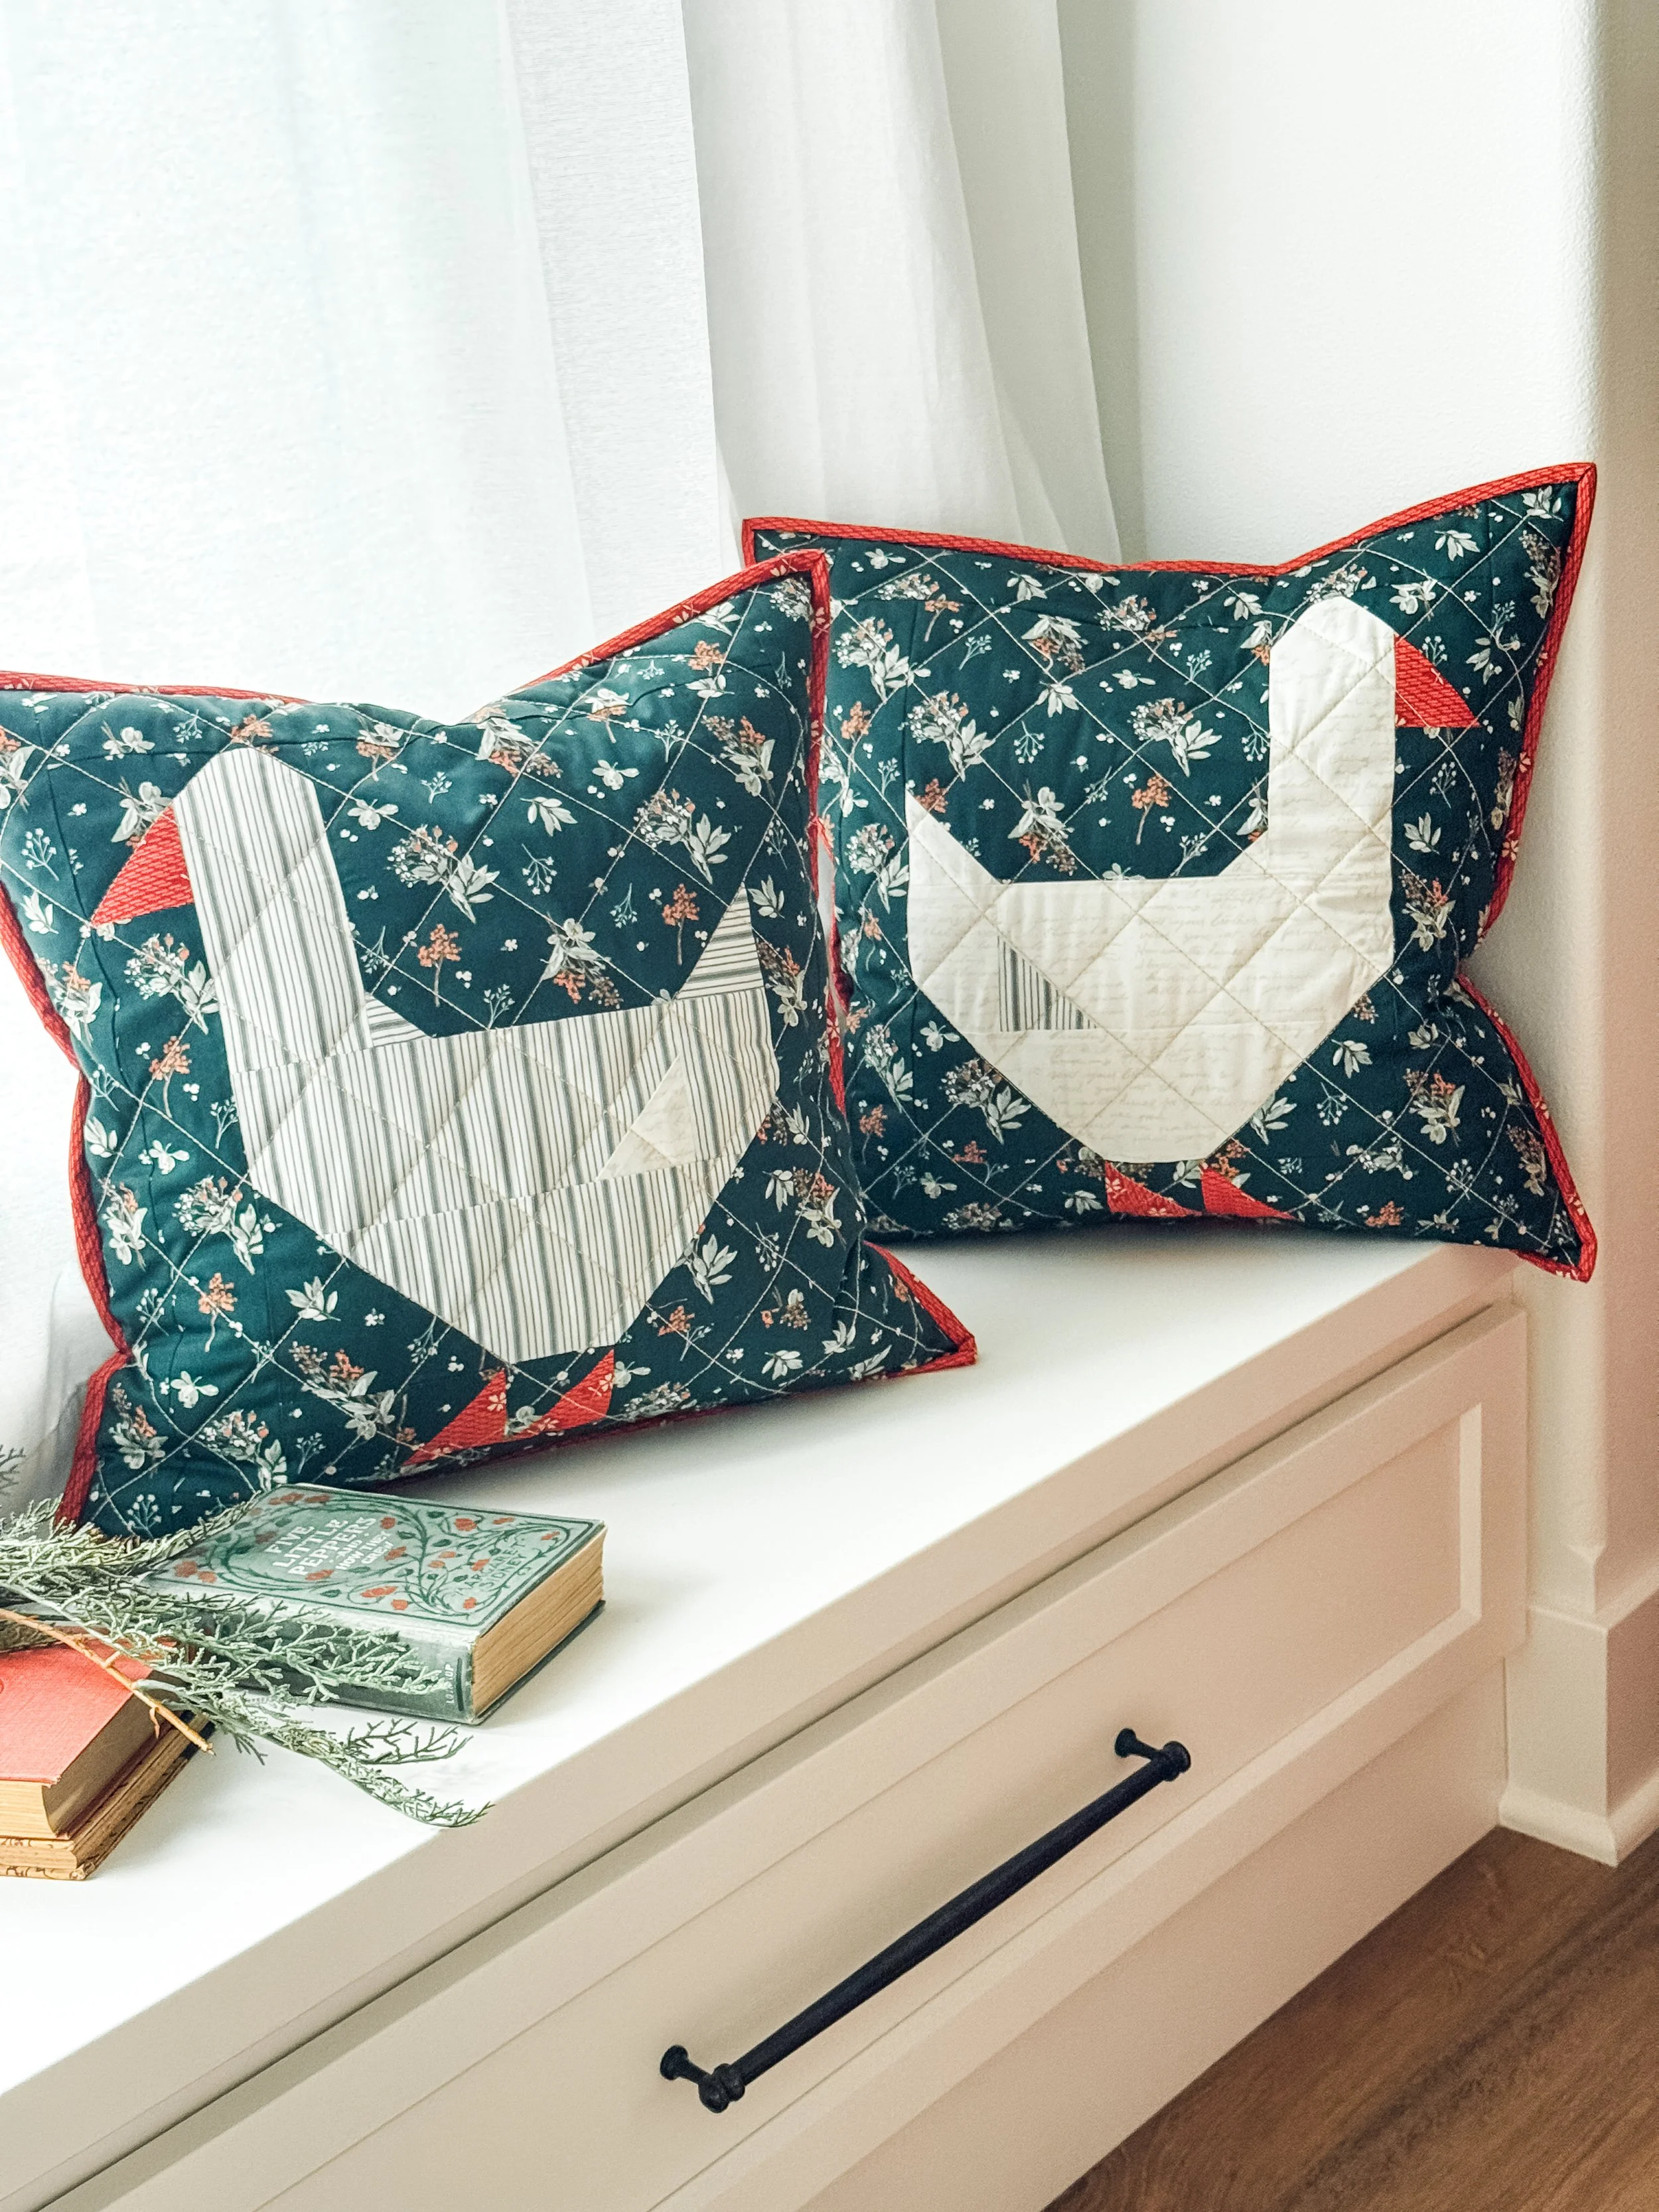
I machine quilted a very simple crosshatch pattern using Aurifil Thread 12 wt wool-blend thread for a cozy, tactile texture and excellent stitch definition.
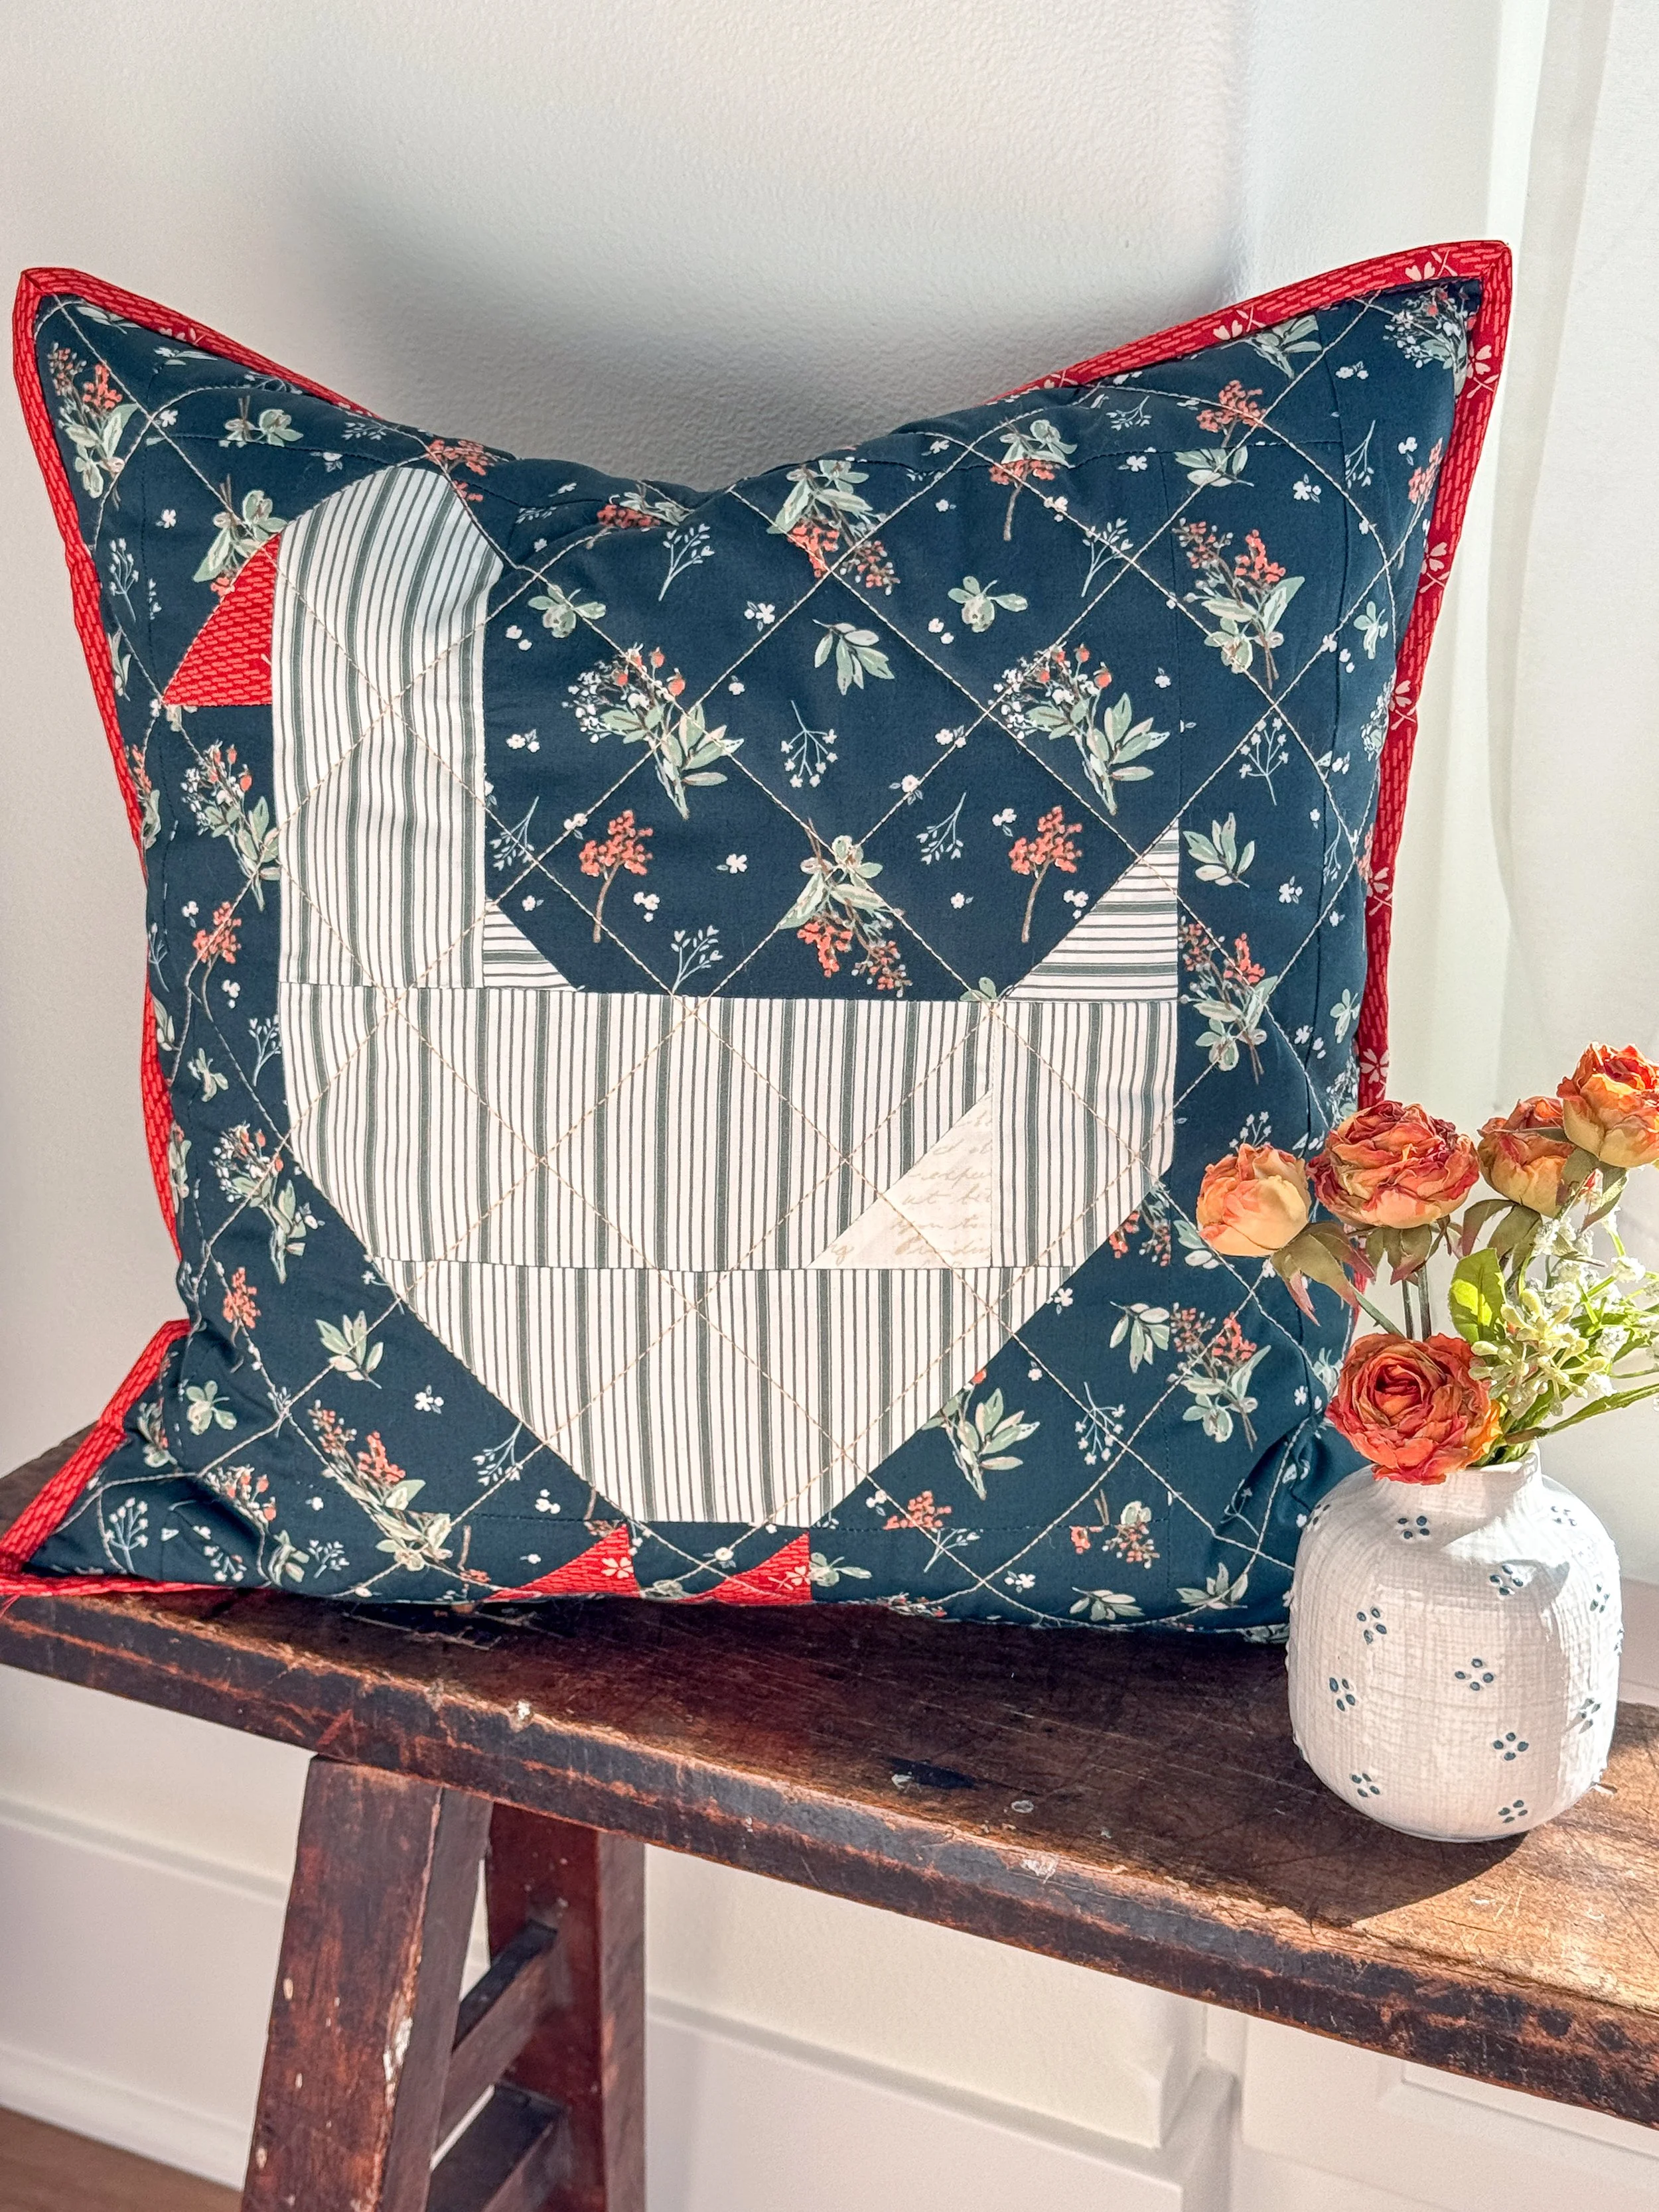
The feather pillow inserts provide an extra touch of luxury, complemented by the professional zippered pillow-back closure technique detailed in the pattern instructions.
MEET THE TESTERS
With every new pattern release, my tester team also creates their own quilt versions. I love working with this talented group of ladies — they consistently produce the prettiest quilts with fabric combinations I could never have imagined on my own. The following showcase of their work highlights how versatile this pattern is across a wide range of prints and colorways. Several testers are also shop owners and are offering kits based on their versions; look for the “SHOP THE KIT” tag on their photo collage and use the links provided to grab one (or more) before they’re gone.
IN First Name ALPHABETICAL ORDER:
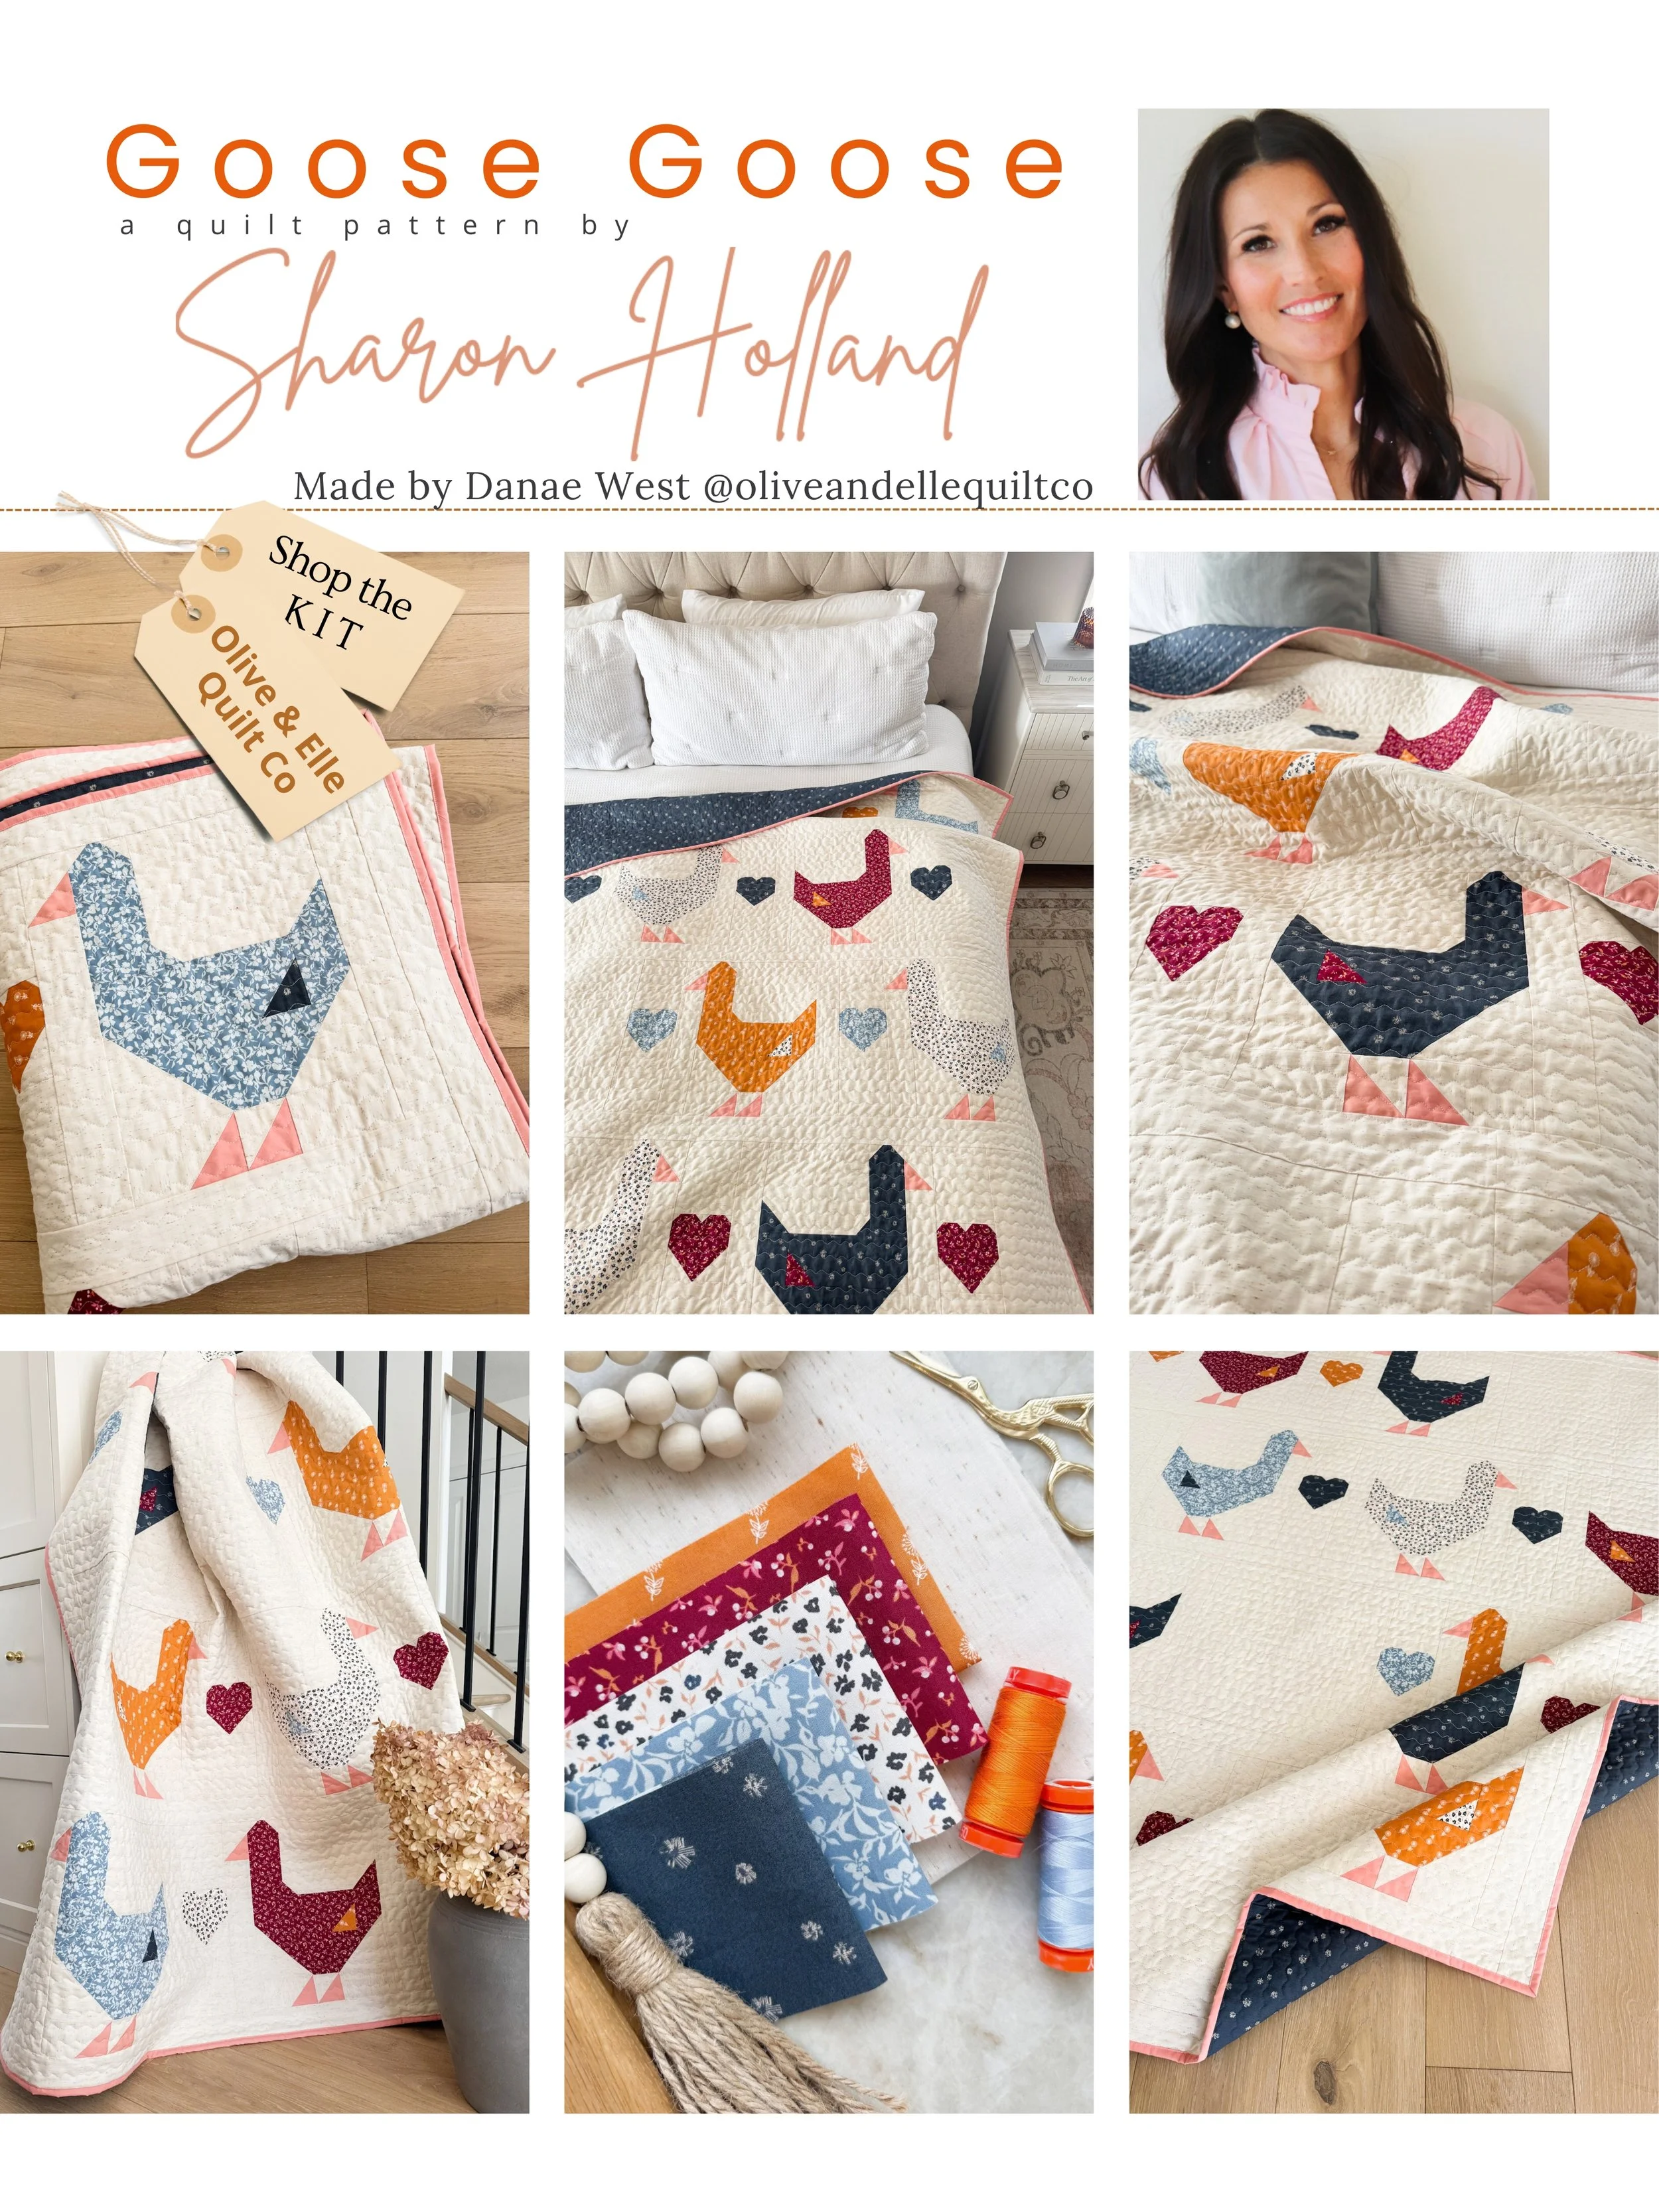
Danae West
I’m thrilled to introduce Danae West, the newest member of the Tester Team. Danae is the creative force behind Olive and Elle Quilt Co., an online shop offering high-quality, custom quilt kits and a lovely selection of quilt backing fabrics. She has been quilting for over 12 years and brings a keen eye for design, color, and style to every project. The Goose Goose quilt Danae made, using assorted Art Gallery Fabrics, beautifully showcases her talent for color harmony and pattern placement. Danae used a wavy stitch on her domestic machine to stitch horizontal quilting lines and this is so cute that I need to remember this for next time I make this quilt! This darling quilt is available as a kit in both crib and throw/twin size from Danae’s shop, linked HERE. Learn more about Danae by following her on Instagram @oliveandellequiltco and on her YouTube channel.
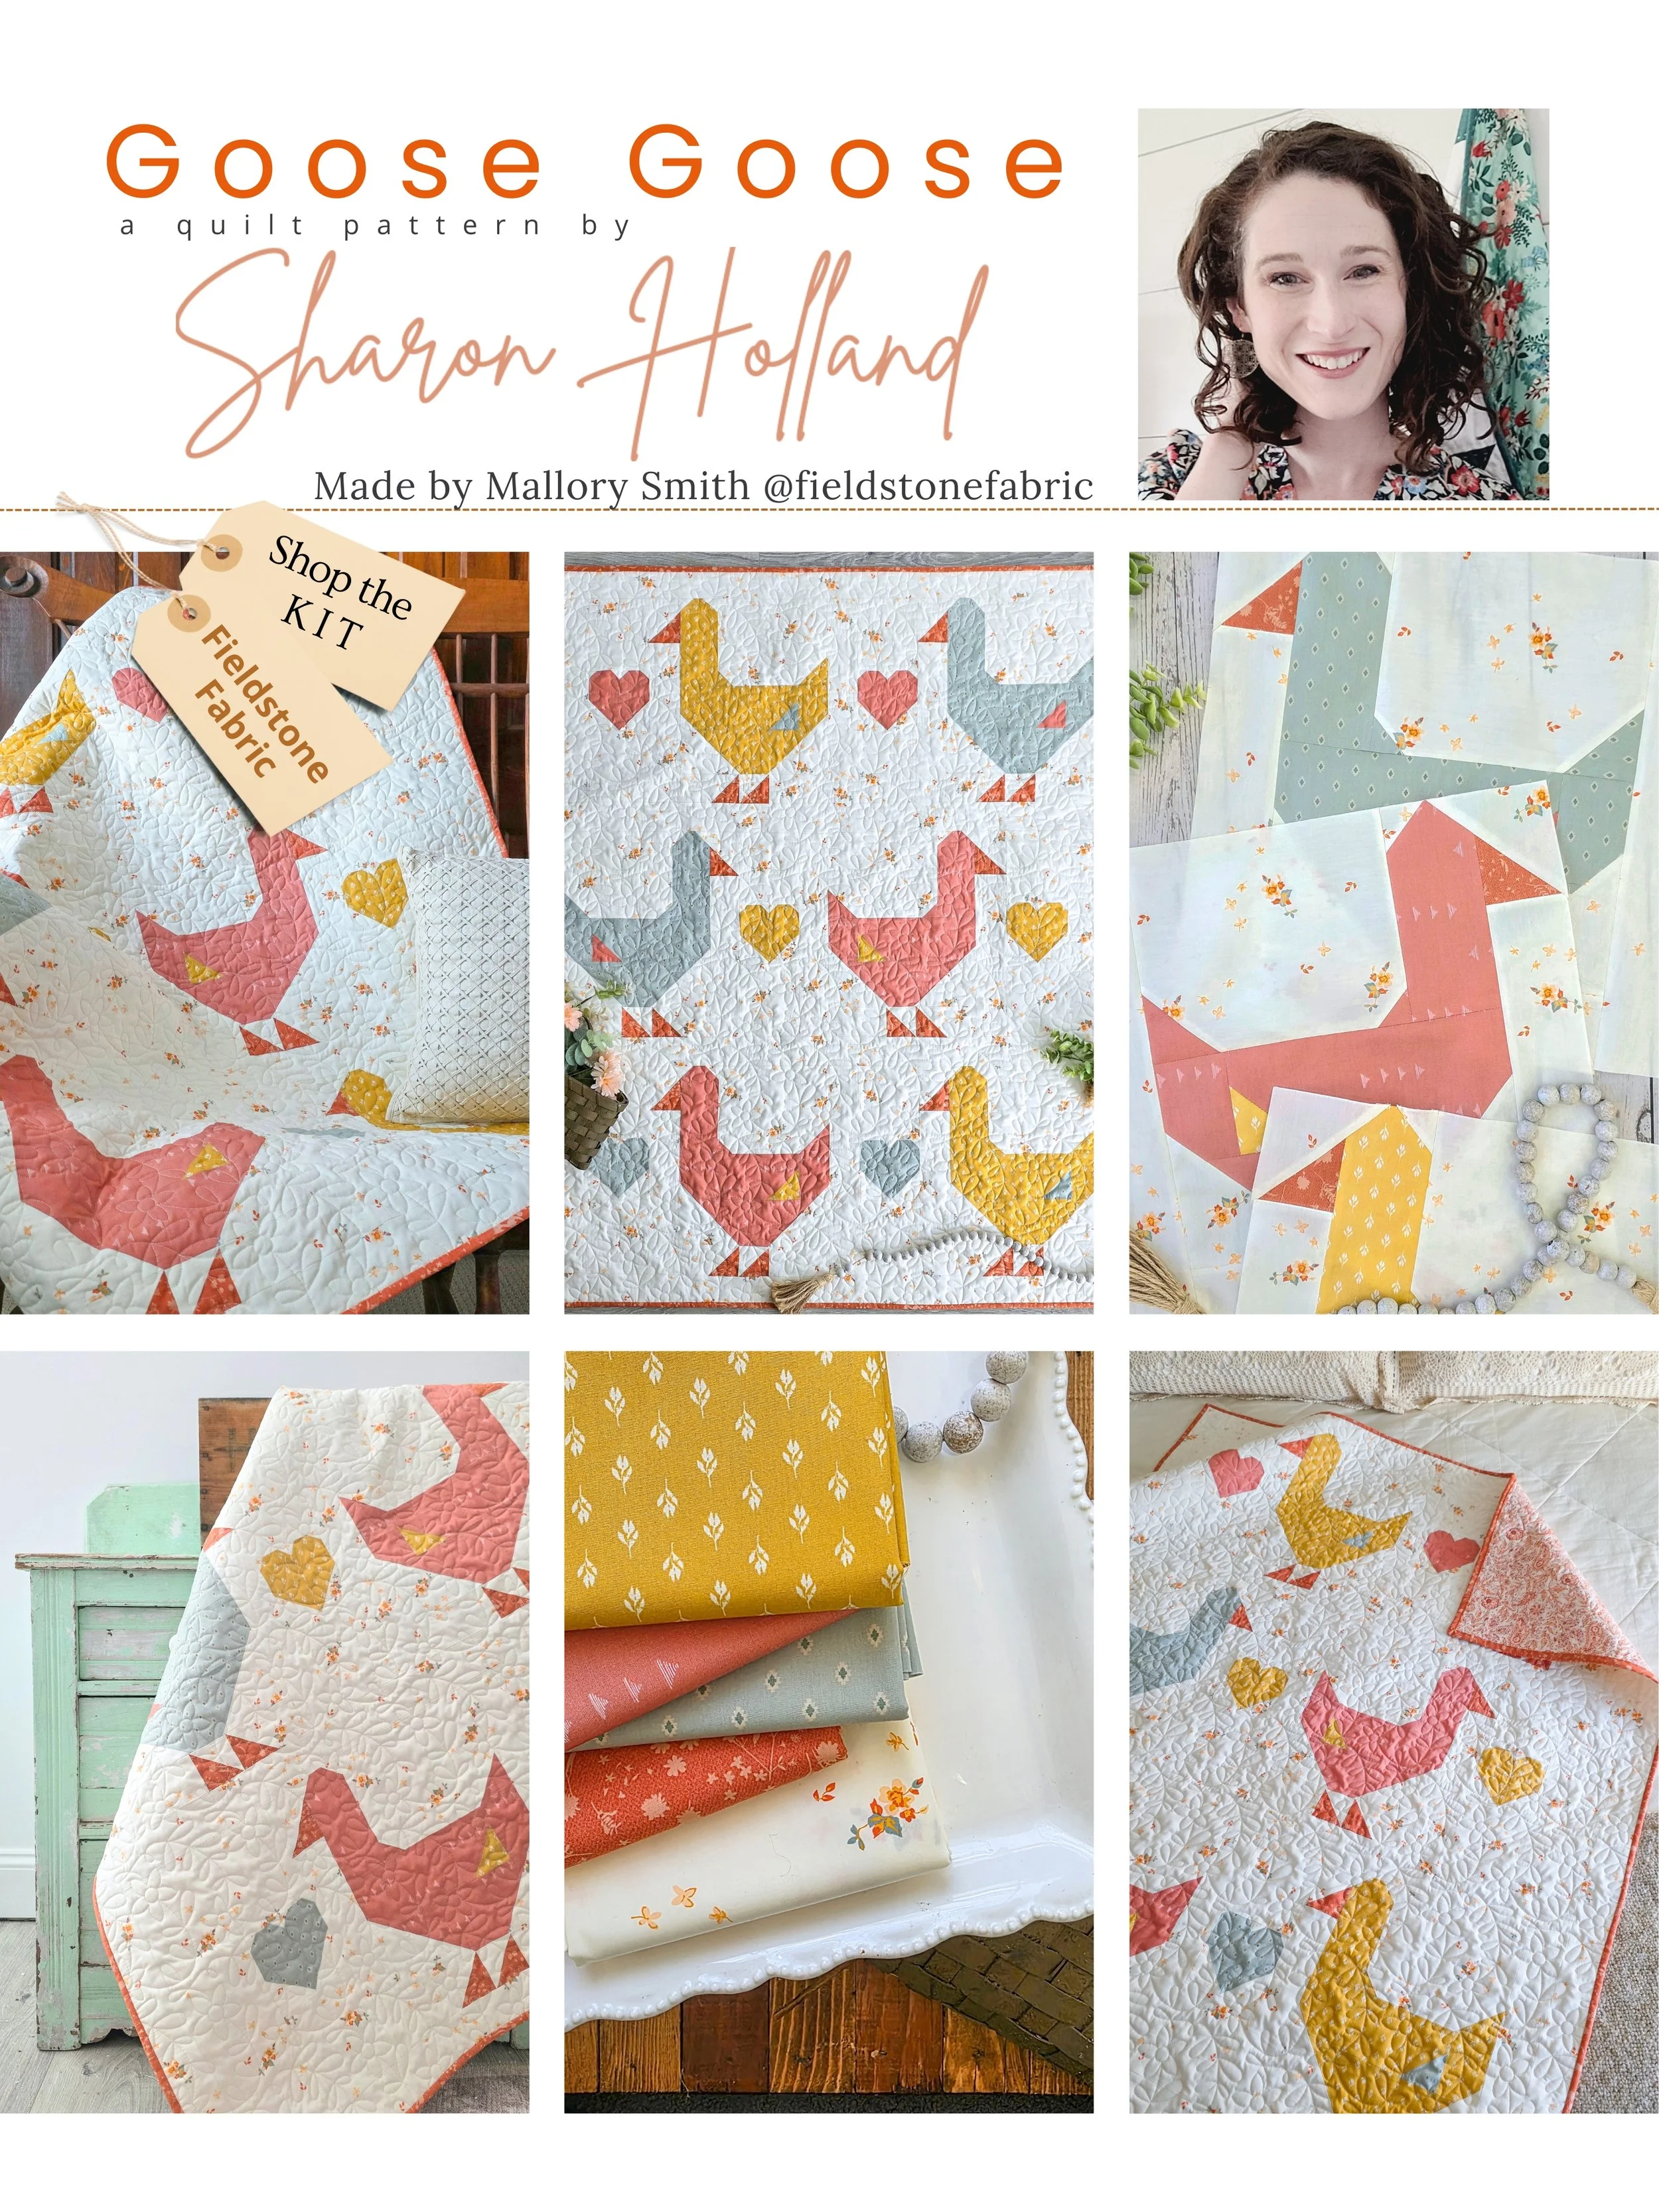
Mallory Smith
Mallory is the owner of the Fieldstone Fabric shop, an online sewing creator, and a quilt designer. For her Goose Goose test sample, she has made this adorable crib-size quilt using prints from assorted Art Gallery Fabrics lines, showcasing her careful color choices and attention to detail. Kits are available at Mallory’s shop in both the crib and the throw/twin size but in limited number so shop early to grab these geese before they fly away! You can learn more about Mallory on Instagram @fieldstone.fabric or on her blog.
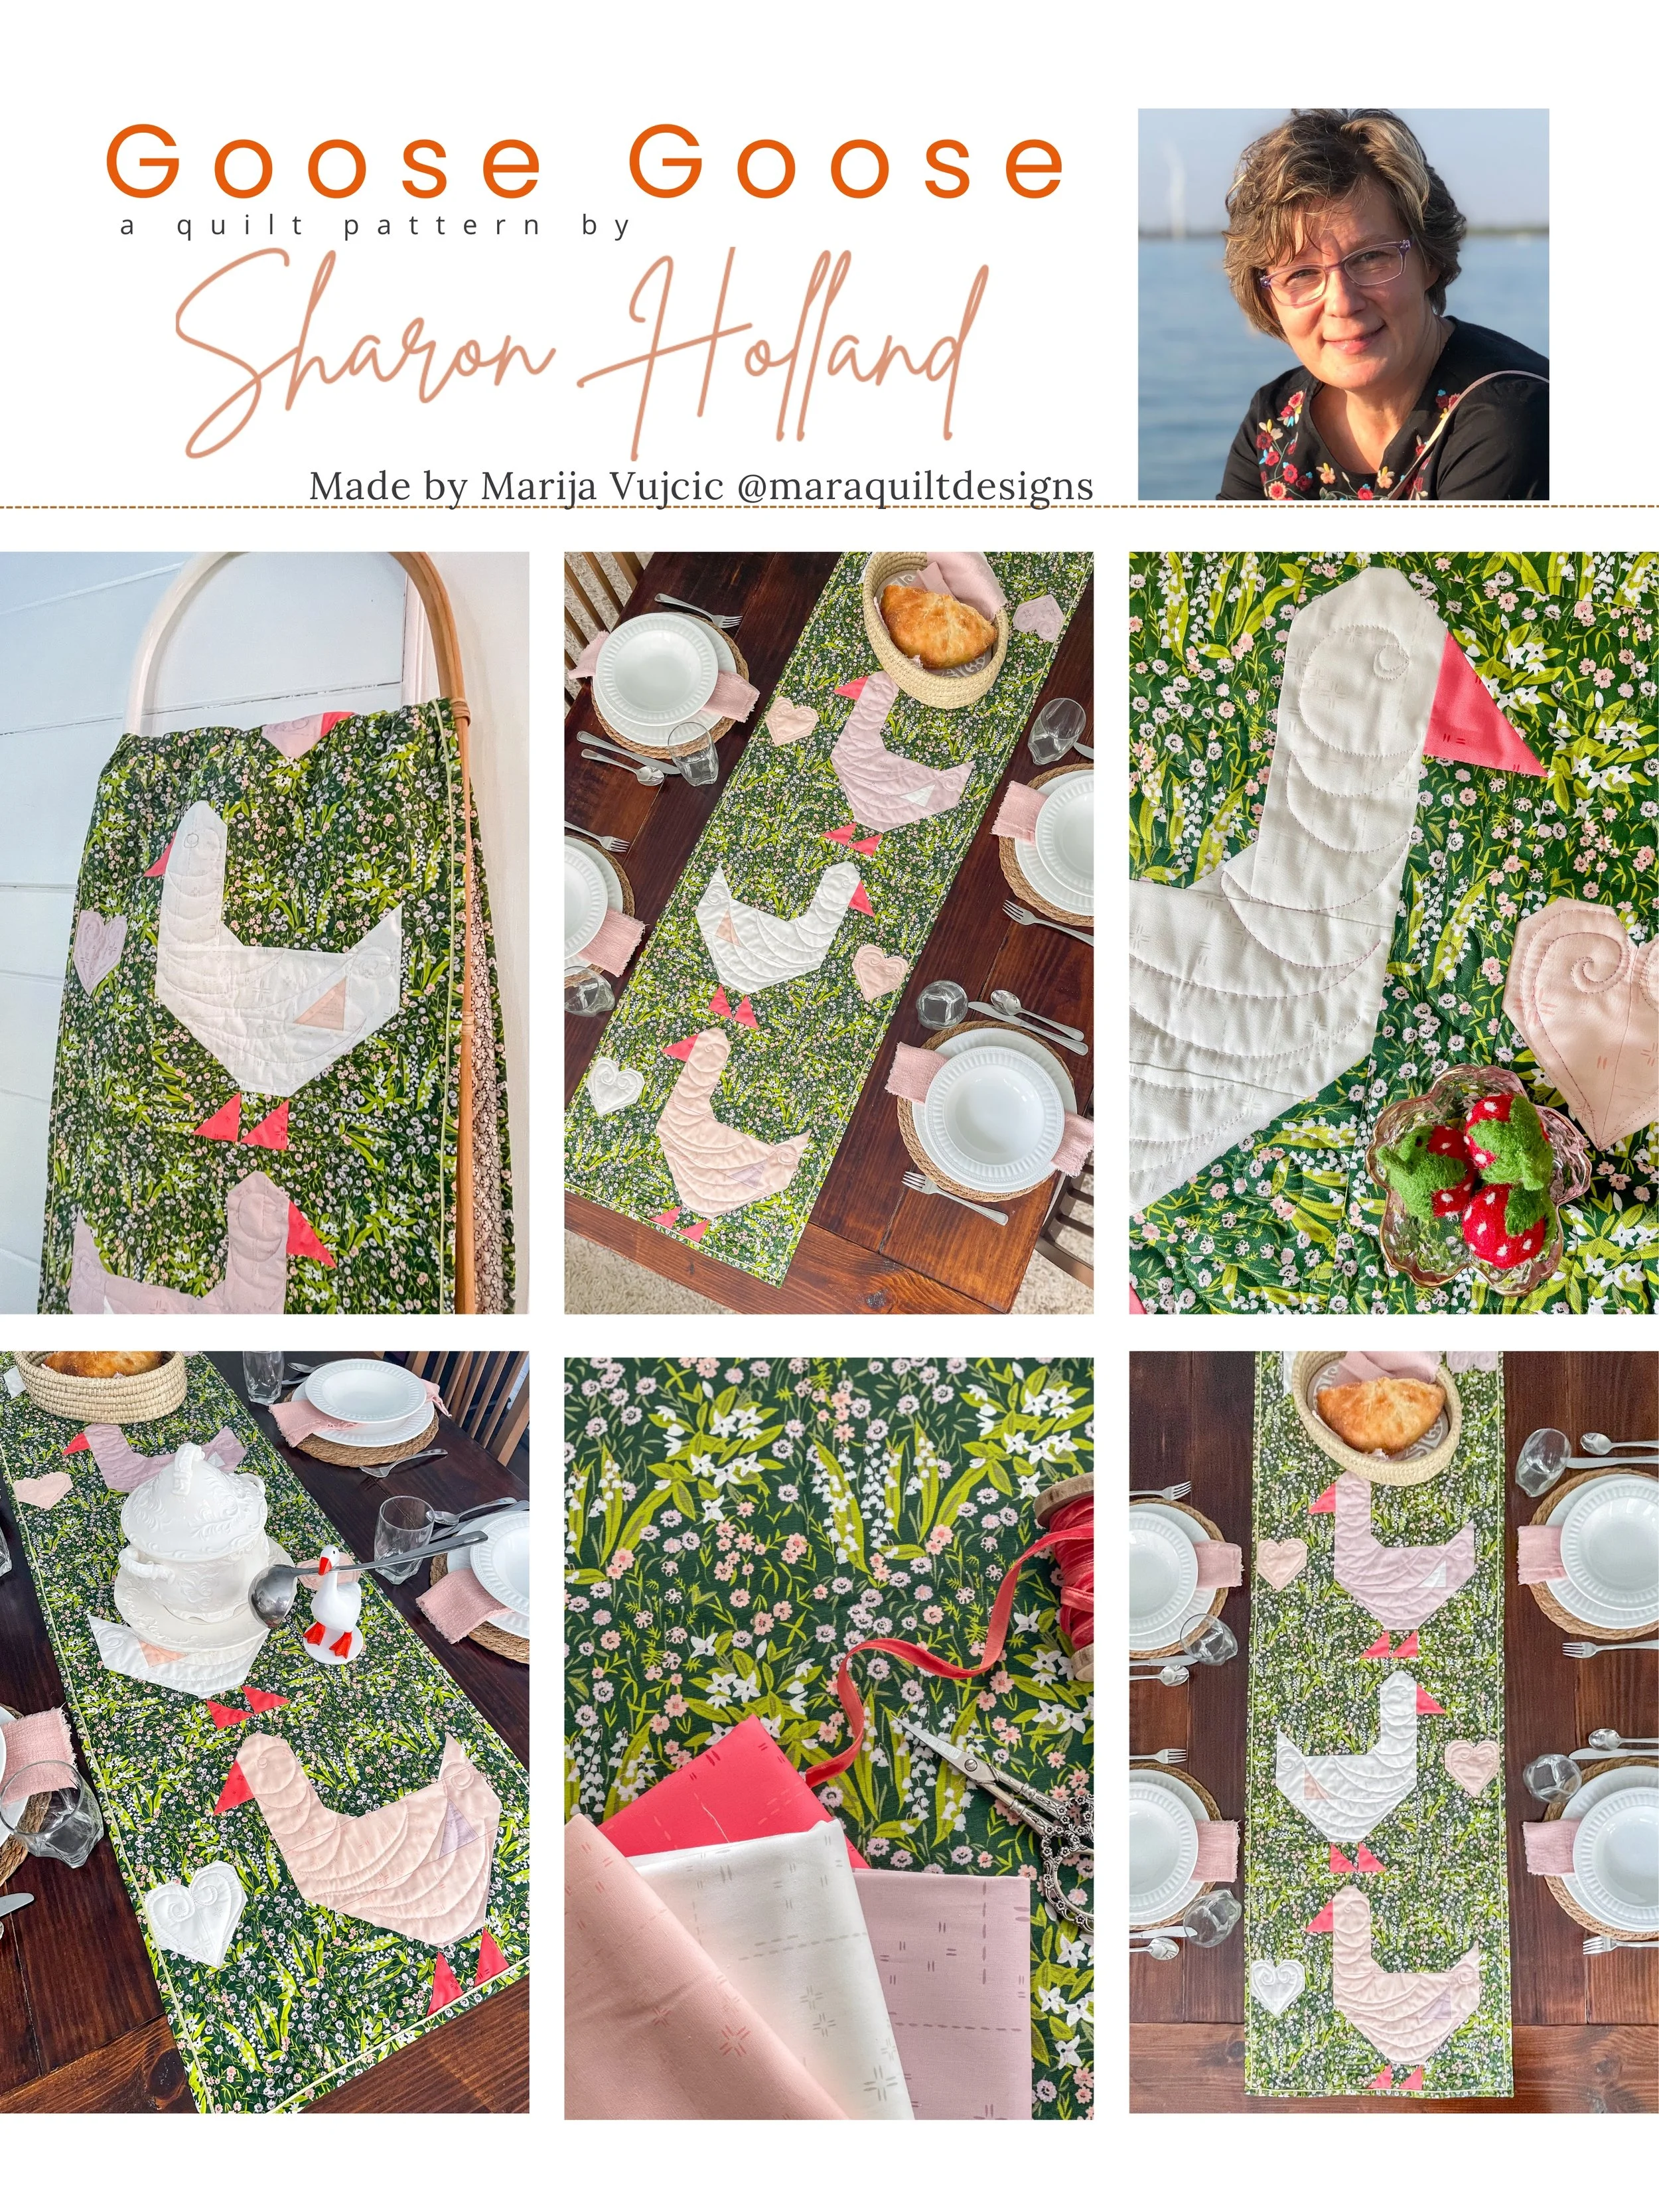
Marija Vujcic
Marija Vujcic has a well-earned reputation for thinking outside the box (or quilt, in this case). Using the exact same number of blocks required for the crib quilt but opting to omit the row sashing, Marija designed a table runner to fit her long dining table, and it turned out beautifully charming as a springtime centerpiece. Although the pattern doesn’t include a table runner layout, you can easily reconfigure the blocks to create a table topper that suits your own table dimensions. For this project Marija chose a print from my Midsummer collection to serve as the grassy background for her geese and paired it with Art Gallery Fabrics blenders for the geese themselves. She finished the piece with a faux piping binding technique, and a step‑by‑step tutorial for that method is available on Marija’s blog. Be sure to follow this talented lady on Instagram Marija Vujcic and on her blog at Mara Quilt Designs.

Michelle Corless
Remember when I mentioned the geese-and-hearts trend of the 80s–90s? Well, Michelle Corless remembered it too—she unearthed her childhood dinnerware and used those cornflower blues and dusty rose colors and playful motifs as the color-palette inspiration for her Goose Goose crib quilt. Michelle’s quilt brings back all the cozy vibes and happy memories of that era, lovingly stitched together in assorted Art Gallery Fabrics. Michelle does her own free-motion quilting on her domestic machine! If you’re on Instagram, follow Michelle @compassandwildflower to see more of her beautiful quilts or learn more about her from her blog Compass and Wildflower and check out her pattern shop!

Tamara Darragh
I told my testers that if anyone wanted to use the pillow set and turn it into a tote bag, that would be a lovely way to show makers additional options beyond pillows — and Tamara Darragh jumped on that idea and created the cutest tote ever. This just-perfect-for-spring tote uses Delicate Balance linen blend from my Potager collection for the background, paired with the Timeless Ticking stripe from Juniper and other Art Gallery Fabrics, including Dots in Clover and Slub in Golden Hour, both by Suzy Quilts. All that wonderful texture comes from Tamara hand-quilting chunky quilting stitches with Aurifil 8 wt and floss threads, with Hobbs Batting 80 cotton/20 wool batting inside for structure and loft. Tamara used her free tutorial to make the tote and you can find it on her blog: How to Make a Quilted Tote From Any Quilt Block. Learn more about Tamara on her website Remi Vail Studio and on Instagram @remivailstudio.
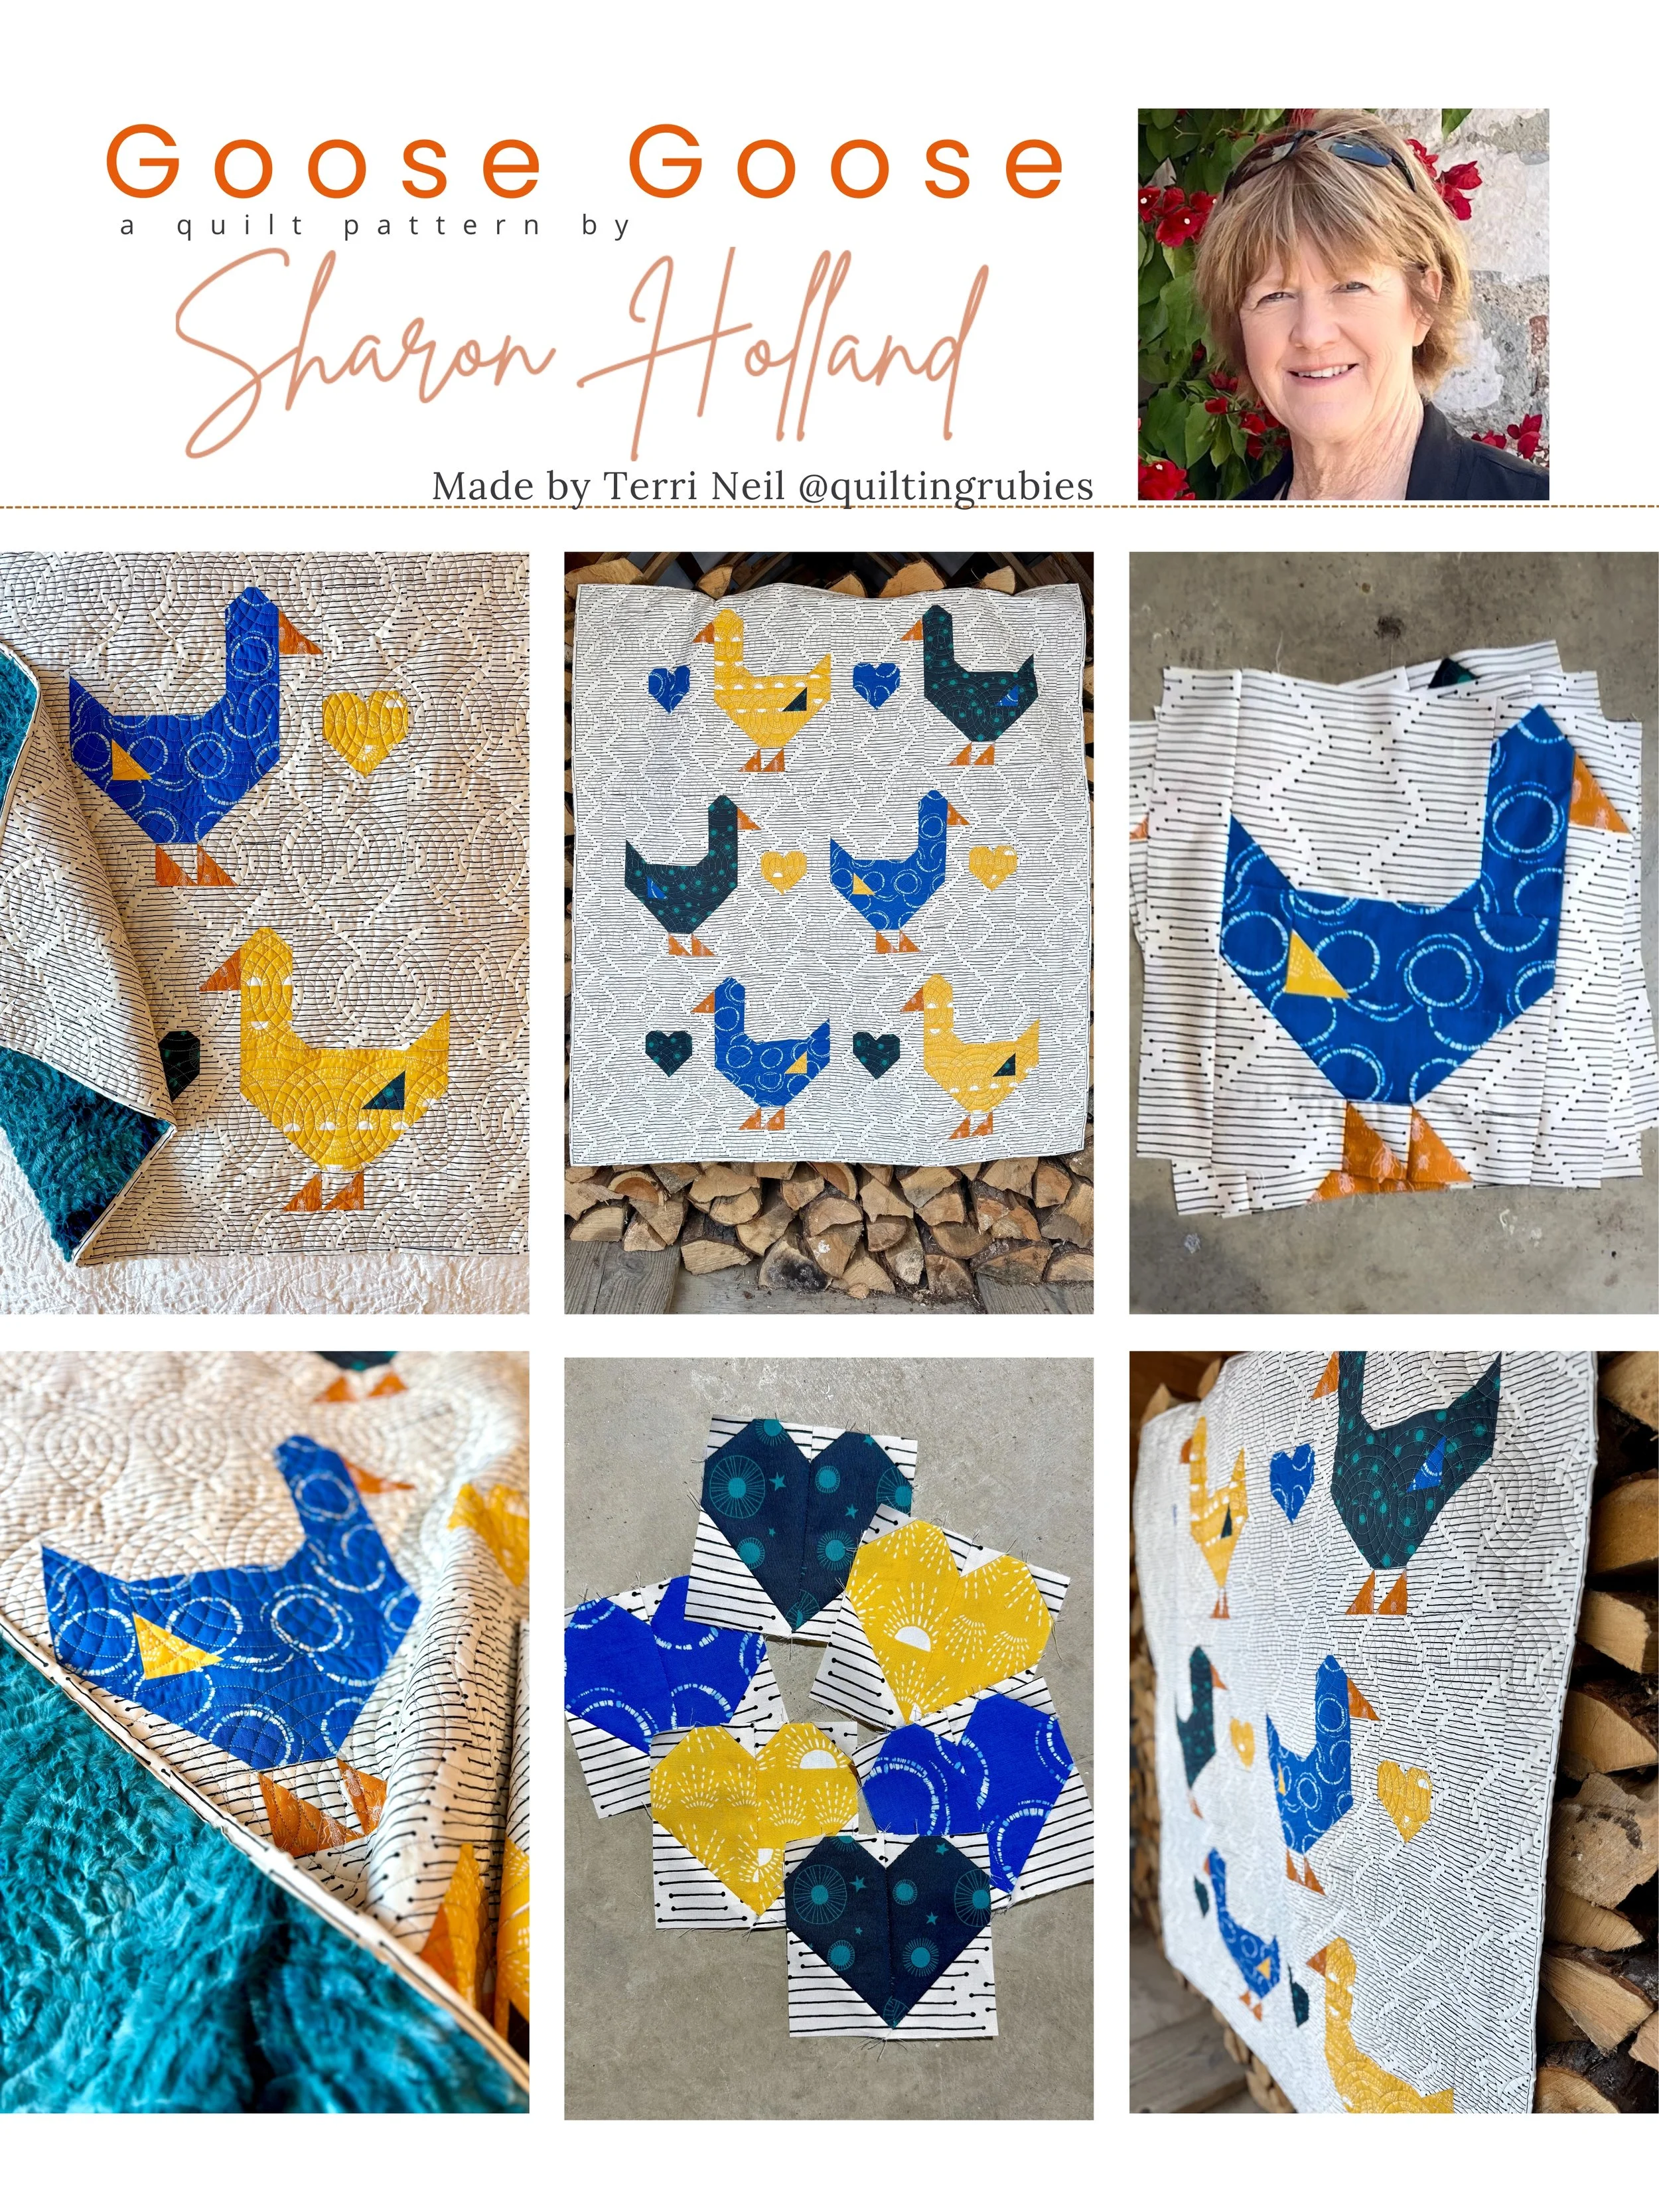
Terri Neil
Terri Neil of Quilting Rubies consistently brings vibrant color and a modern flair to her quilts. The richly saturated blues, rubber-ducky yellow, and bright orange combine into a playful, eye-catching palette, and this crib quilt would be just as striking hung as wall art as it would be tucked into a baby’s crib. The Mindful Paths background fabric by Pat Bravo creates an illusion of rippling water and is a brilliantly bold choice that enhances the overall movement of the design. Other prints featured in this quilt were created by AFG Studio, Jessica Swift, and Katie O’Shea, all for Art Gallery Fabrics. The beautiful “Spiral” quilting design by ProStitcher was long armed by Terri. Learn more about Terri and her longarming business by visiting her Instagram page and her website. You can see her beautiful work on Instagram, HERE and on her Quilting Rubies website, HERE.
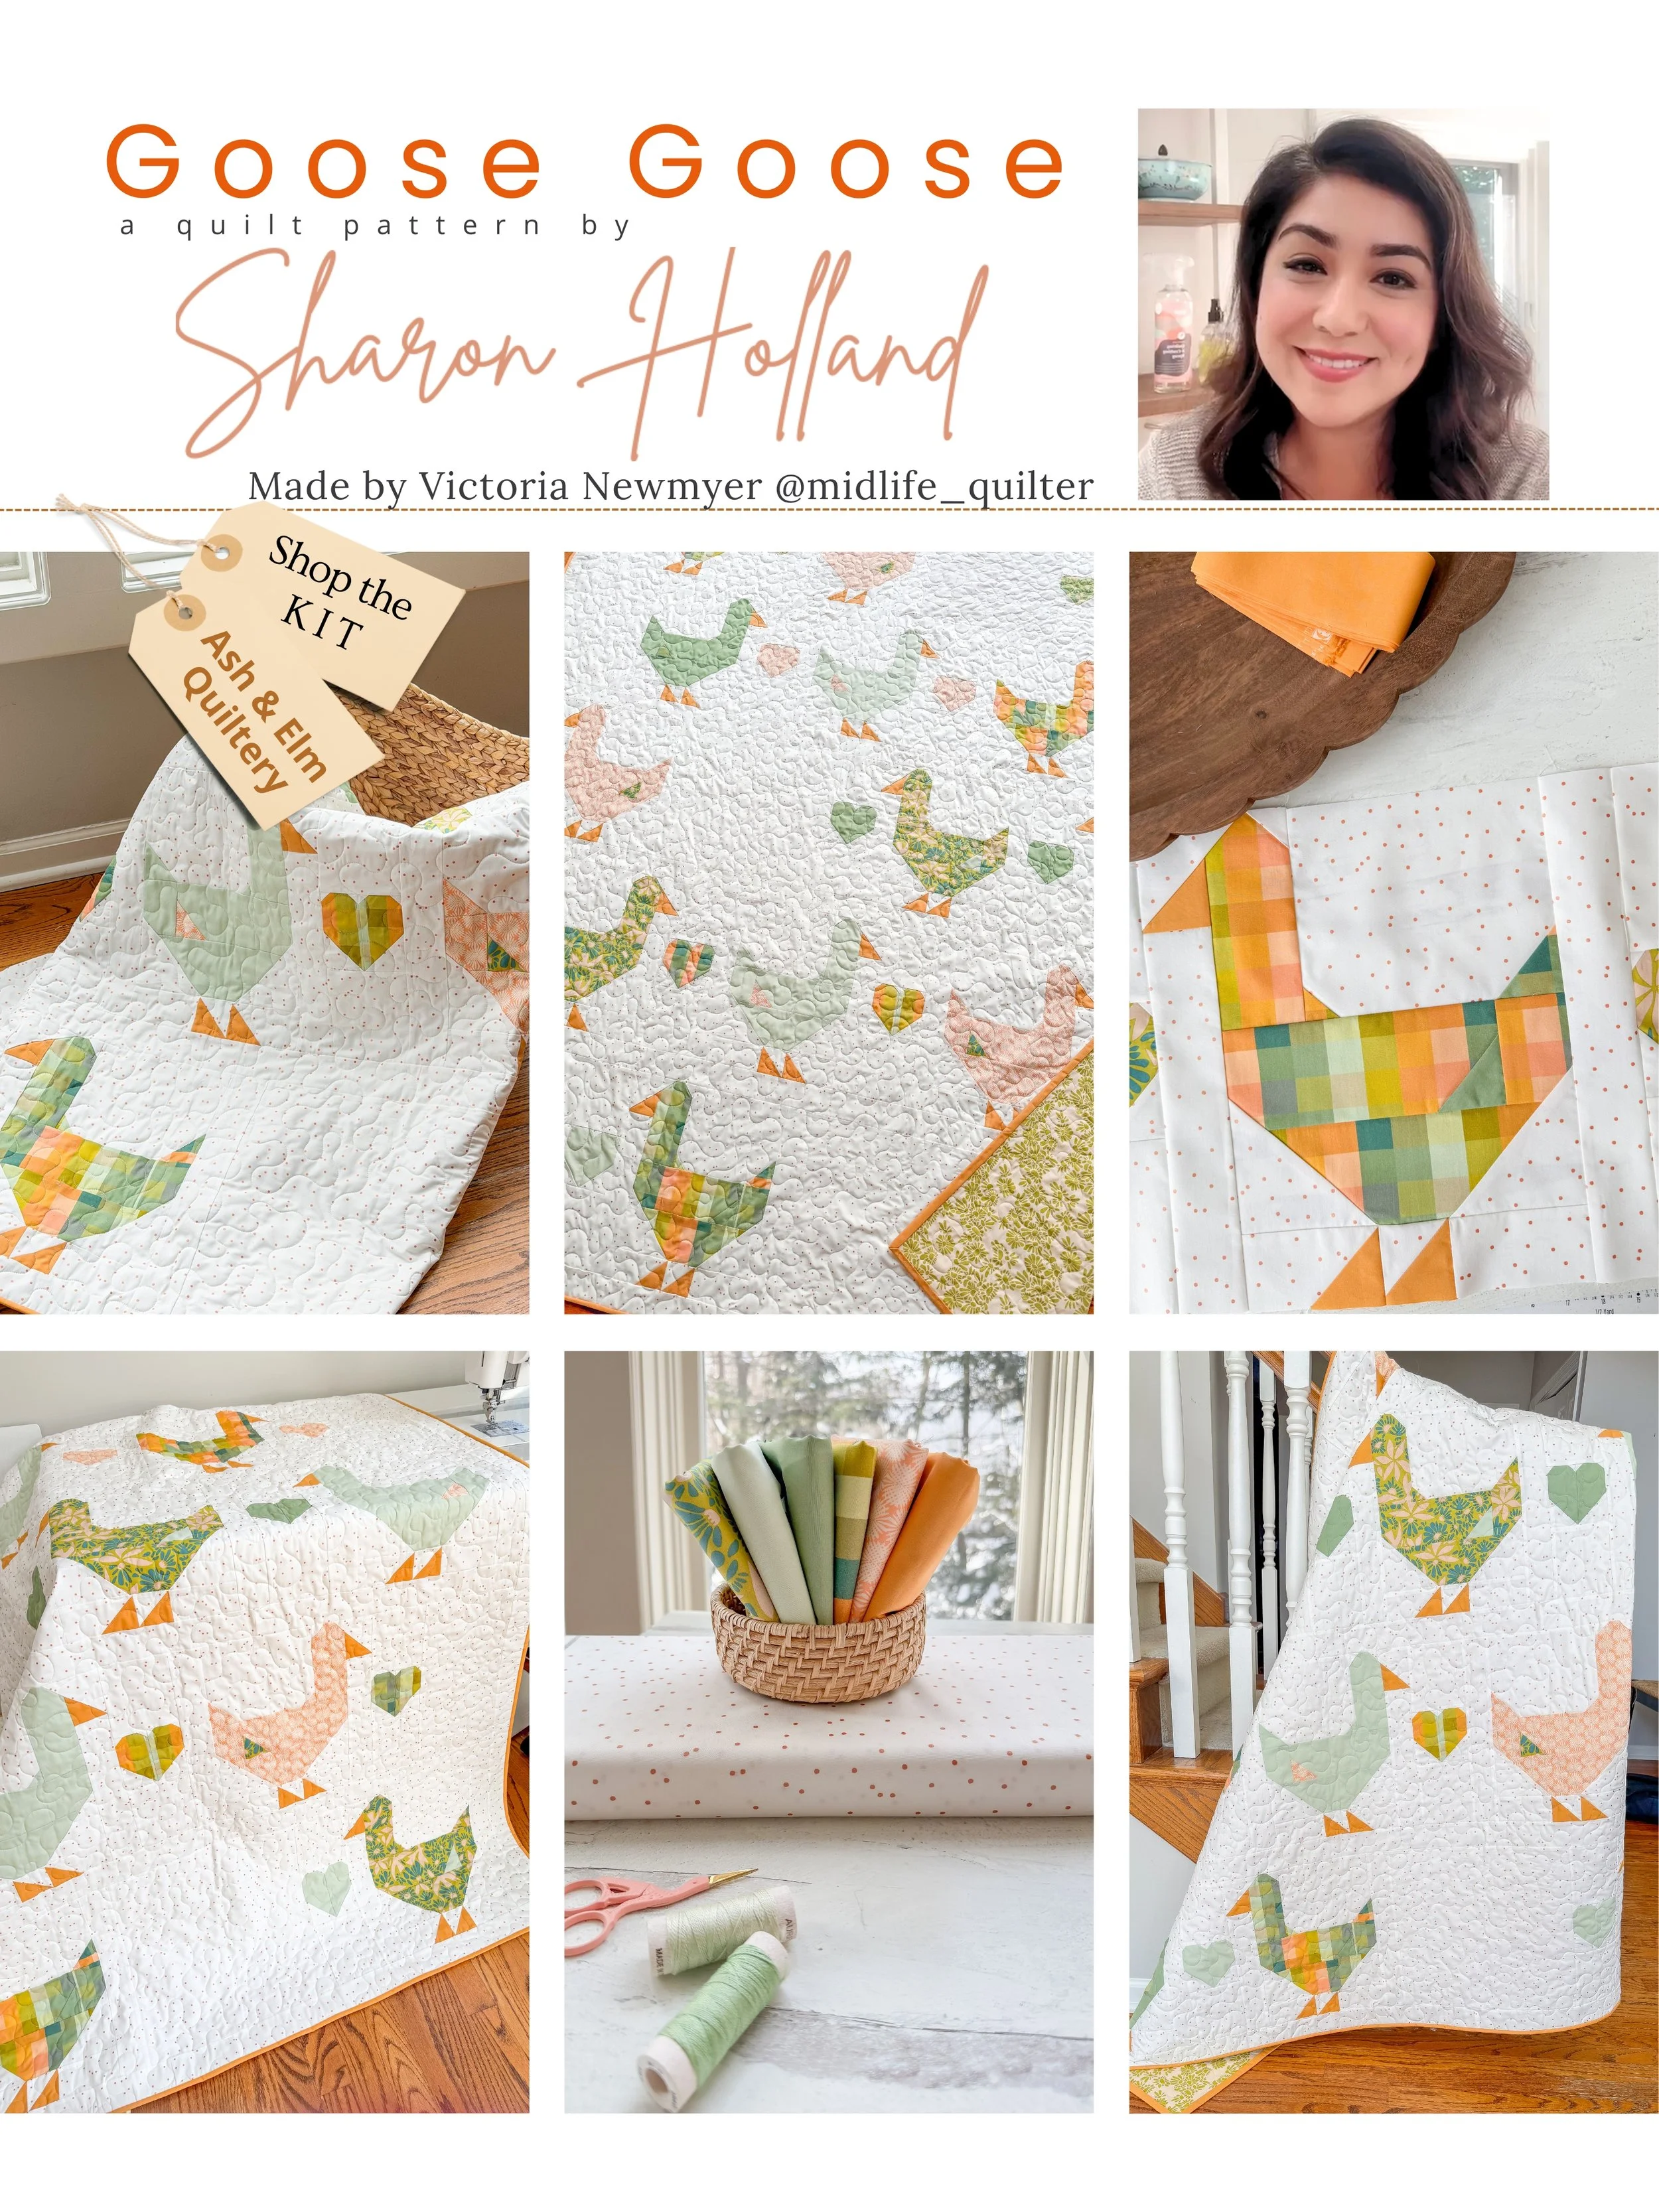
Victoria Newmyer
Last but certainly not least is the sunny spring green and citrus throw/twin Goose Goose quilt color palette, thoughtfully curated by Victoria Newmyer of Midlife Quilter. Victoria truly has the Midas touch when it comes to selecting harmonious colors and fabrics, and she’s assembled this fresh, spring-perfect combination using Art Gallery Fabrics and Pure Solids from Suzy Quilts’ collections. To add yet another kit option for you, this gorgeous quilt is also being kitted by Ashley Mitchell of Ash and Elm Quiltery, making it easy to recreate her bright, cheerful design at home. Be sure to visit Victoria’s beautiful Instagram account @midlife_quilter and her shop, HERE for fabrics and notions.
I hope you’ve enjoyed the Goose Goose parade of quilts and projects—we certainly had fun stitching them and delighting in this revival of an old favorite decor trend that now carries a fresh, 2026-ready vibe!
Thanks for stopping by the blog to learn more about this new pattern. If you’re on Instagram, follow me there as well and you’ll never miss a thing! When you follow me on Instagram there’s a daily dose of Sharon Holland Designs on my Instagram account @sharonhollanddesigns and it’ll keep you up to date on upcoming new pattern releases, new fabric collections, and more!
