My Signature Sampler Week #6

My Signature Sampler Week #6

MSS Sawtooth.jpg

Hello sampler makers and welcome to my latest sew along! This week's block is another of my favorites and I'll give you instructions on how to turn the original Sawtooth half block from the Community Sampler sew along into a full block for this quilt. 

My Signature Sampler Banner copy.jpg

The My Signature Sampler is based off block instructions from the Sewcial Bee Sampler (SBS), Community Sampler (CS), AGF Quilt Block Collection (AGF), and the blocks from the Quilter's Planner 2018 magazine (QP). If you have different favorite blocks and would rather include them in your quilt, please feel free to make this sampler with your own signature-style. 

If you're just joining in on the fun, take a look at my first post for this sew along and pick up the quilt layout and color book page to start planning your sampler!

If you need extra help with your patchwork or would like to learn how to control the direction of your prints in half-square triangle units and other piecing techniques, visit my Tutorials page for lots of great tutorials all in one place. Also, when making any Sewcial Bee or Community Sampler blocks you can access the original blog posts for each block and find additional tips and tutorials for piecing. If needed, just use the search bar at the top of the this page on the right and simply type in the block name.

Don't forget our blocks will be set on-point so if you have a fussy cut center, cut it on-point for best results. Note: I don't recommend cutting any other pieces of the blocks (other than a center square on-point for fussy cutting) because it will create bias edges along the outside of the block and increase chances of distortion. Keep any bias edges in the center of the block.

MSS Sawtooth.jpg

For week #6, I've chosen to make the Sawtooth block from the Community Sampler sew along. For that quilt we only needed a half block so we'll need to change some of the cutting instructions to get it up to a full block. Here's what you'll need...

Sawtooth Cutting.jpg

Using the original Sawtooth instructions as a guide for placement and orientation I'm using the same A, B, C, D fabric placements as reference. You can make any changes you'd like for number of and placement of fabrics.

CUT

  • Fabric A
    • (4) 4'' squares
    • (2) 3-1/2" squares
  • Fabric B
    • (4) 4" squares
  • Fabric C
    • (2) 3-1/2" squares
  • Fabric D
    • (1) 6-1/2" square

ASSEMBLY

From the 4" squares, make a total of 8 half-square triangle (HST) units. See Two-at-a-Time Half-Square Triangle tutorial.

Once the the HST units are trimmed to 3-1/2" square you can assemble the block (see above photo).

Noting placement and orientation, stitch two HST units between two 3-1/2'' squares to make one outer row. Make a total of two rows in this manner. 

Stitch two HST units together and then stitch to the side of the 6-1/2" square. Stitch the remaining HST units together and stitch to the remaining side of the 6-1/2" square to make the middle row. Join the rows to complete the block. 

MSS Week #6.jpg

I've already been adding my setting triangles to my finished blocks as I make them. I'm using a combination of my Perennial print from Printemps Fusions and Untamed Beauty Daybreak from Signature as the background setting of my quilt. Since this block is in the center of my quilt I have it set in just the Untamed Beauty Daybreak print. 

The setting triangles are made by cutting a 9-1/2'' square on the diagonal to make two setting triangles. Be mindful of print direction, if applicable. See Community Sampler Week #13 for block setting instructions. 

Bonus Borders

My Signature Sampler with optional boarders on top and bottom - 68" x 85" finished size

My Signature Sampler with optional boarders on top and bottom - 68" x 85" finished size

As promised I am sharing an additional border option with you! I apologize for not thinking of this in the original quilt plan but since I sewed ahead and could see the blocks together the idea came to me on the fly and I'm loving the addition not only to the finished size of the quilt but the added interest of this chevron border detail. 

My Signature Sampler with optional boarders - 85" square finished size

My Signature Sampler with optional boarders - 85" square finished size

Am I right?!!? Now to decide if I do just the top and bottom or the full quilt....!

So, this adds some additional material needs and of course extra piecing. Download the Added Borders suppliment PDF for an updated material list requirements for adding the borders on two or all four sides. Of course, this changes the finished sizes of your quilt and depending upon the option chosen, the backing, batting, and binding requirements for the different sizes are given in this suppliment.  

GIVEAWAY

Every Friday when I reveal a new block to My Signature Sampler, I'll also be posting the weekly giveaway. This sew along is being sponsored by the most amazing companies and have generously donated incredible prizes to share with you. 

OUR SPONSORS

THIS WEEK'S GIVEAWAY SPONSOR IS: The Fat Quarter Shop

fqslogo.png

The Fat Quarter Shop was founded in 2003 by Kimberly Jolly. An avid quilter, Kimberly began her shop as a side business while still working a corporate position, cutting, packing and shipping right out of her house during evenings and weekends. From the very beginning, she was committed to delivering top-notch service for every single order and customer. As the Fat Quarter Shop's reputation grew, Kimberly decided to make it a full-time operation. Her husband Kevin joined her not long after, and with his help, lots of hard work, and a tireless commitment, the store began to grow. Over the past few years a few more people have joined the staff! As a team, they continue to branch out with the best fabrics, exclusive kits, quilt clubs, BOMs, and more. And they will always be driven by the passion that Kimberly founded the store upon, which is always giving you the best products and service!

SHOP  *  PINTEREST  *  TWITTER  *  BLOG  *  FACEBOOK  *  YOUTUBE 

MSS Signature Atmospheric.jpg

For this week's My Signature Sampler giveaway, our friends at Fat Quarter Shop are giving one luck winner this 10-pc fat quarter bundle of my Art Gallery Fabrics Signature collection in the Atmospheric color way! 

Signature Atmospheric 2.jpg

Giveaway Now Closed. Congratulations to Rosemary B.

Note: This giveaway is open to EVERYONE! If you're a "no reply" or anonymous commenter, please remember to include your email address in your comment--you can't win if I can't get a hold of you!

1. Simply leave a comment here under this post for your first comment entry.

2. Follow Fat Quarter Shop on any of their social media platforms (see links above). Just let me know that you did by making a separate comment here to record that entry. (Separate comment-second entry). 

3. My followers get a third entry! If you follow me via subscribing to my posts, on Pinterest, and/or Instagram, just let me know by making a separate comment here to record that entry. (Separate comment-third entry).

4. Help spread the word!! I know that many of you already do, so I thought it would be nice to add that as another way to enter! Spread the word about the My Signature Sampler sew along on YOUR instagram, Facebook, Twitter, or on Pinterest by pinning any of my pretty images in this post. (Separate comment-fourth entry) 

That’s FOUR possible entries! Enter now through Monday, July 30th! The winner will be picked at random around 4pm Eastern. I will post the name of the winner on this post once they've been notified and responded to my email.

Don't forget to enter into this same giveaway on Instagram by posting images of your sampler inspiration, sampler fabric pull, or blocks. Use the official #mysignaturesampler hashtag every time you post your My Signature Sampler makes (to a public account) and you're automatically entered into the weekly IG drawings as well! See my Instagram giveaway posts @sharonhollanddesigns for full details. 

Happy sewing!

Sharon

Community Sampler Week #14

Community Sampler Week #14

Community Sampler borders 1.jpg

It's bitter-sweet that we're at the border assembly part of our sew along. This week we'll put on the optional borders and have a finished top! Looking ahead, next week Maureen and I will post about how to sandwich your top, batting, and back and I'll have some suggestions for quilting. The final week #16 is the full reveals and grand finale prize giveaway so stick with us just a few more weeks. 

If you've just found out about this sew along, don't worry, you can still join in on the fun but you may want to start from the very first post and work up to the present. There are eleven blocks in our quilt, block setting, and optional borders. Each Wednesday will be a new PDF block release or finishing step for the quilt. If you are just joining us, pick up the Introduction PDF on the Sew Along page and you'll get a material list along with coloring pages so you can get started planning your quilt. Then, work your way through the first Community Sampler post to the present.

My co-host and sister Art Gallery Fabrics designer Maureen Cracknell and I are so happy to have you sewing with us and can't wait to see your finished quilts.

CS Layered Sharon.jpg

Accurate cutting and use of a true 1/4'' seam allowance is a must for successful patchwork piecing. All your set blocks will measure 17-1/2'' square (unfinished). Review how to cut strips, sew with a true 1/4'' seam allowance, and other helpful piecing tips on my "Are You Ready to Sew" post.

Let's add some borders! Download the free PDF on the Sew Along page.

Community Sampler borders.jpg

If you're using directional prints, you may want to check out my tutorial for controlling directional prints that was posted during the Sewcial Bee Sampler sew along. I know you know how to stitch our No-Waste Flying Geese by now but if you'd like to look back on our past tutorial, revisit week #3 post, here.

Those of you that may have made your quilt bigger by adding more blocks will need to increase the length your borders and more materials will be needed for the added size. 

Adding the Borders

In a perfect world we all could sew perfectly square blocks that are true to size but let's face it, that rarely happens. The cutting and piecing sizes given in our PDF Borders instruction are written for that perfect case senecio which means you're probably going to make a few tweaks to your cutting and piecing to get this baby together.

CS Chain Piecing.jpg

Cut and stitch your Flying Geese (FG) units to the size given in the instructions, making them 2-1/2'' x 4-1/2'' (unfinished). Please read the rest of this blog post and through all the instructions on the PDF before cutting the A and B rectangles for the pieced borders.

My original plan for my quilt was to make all the Flying Geese units and rectangles white on a peach/pink background to match the block setting background solid. But, the peach/pink is a very light shade and to do all that Flying Geese and rectangle piecing in white against light seemed like a waste of all that piecing! I decided to select a few mid-tone solids that were predominate in the blocks and do a mixed solids border treatment. To do this I needed to divide the number of different fabrics by the number of "pop beads" as I like to call the border shapes. Remember, that with every No-Waste Flying Geese method you'll get four units in the end and will need one 5-1/2" square and four 3-1/8" squares to get four matching FG units. The PDF instructions give the total number needed (if using the size of quilt given) to cut so use those numbers as a guide when dividing in your number of fabrics.

I'd run out of enough fabric to include a terra cotta colored pop bead so I substituted with the more muted PE-472 Cinnamon of Art Gallery Fabrics Pure Elements color seen on the far right of the above photo. 

BG0A6827.jpg

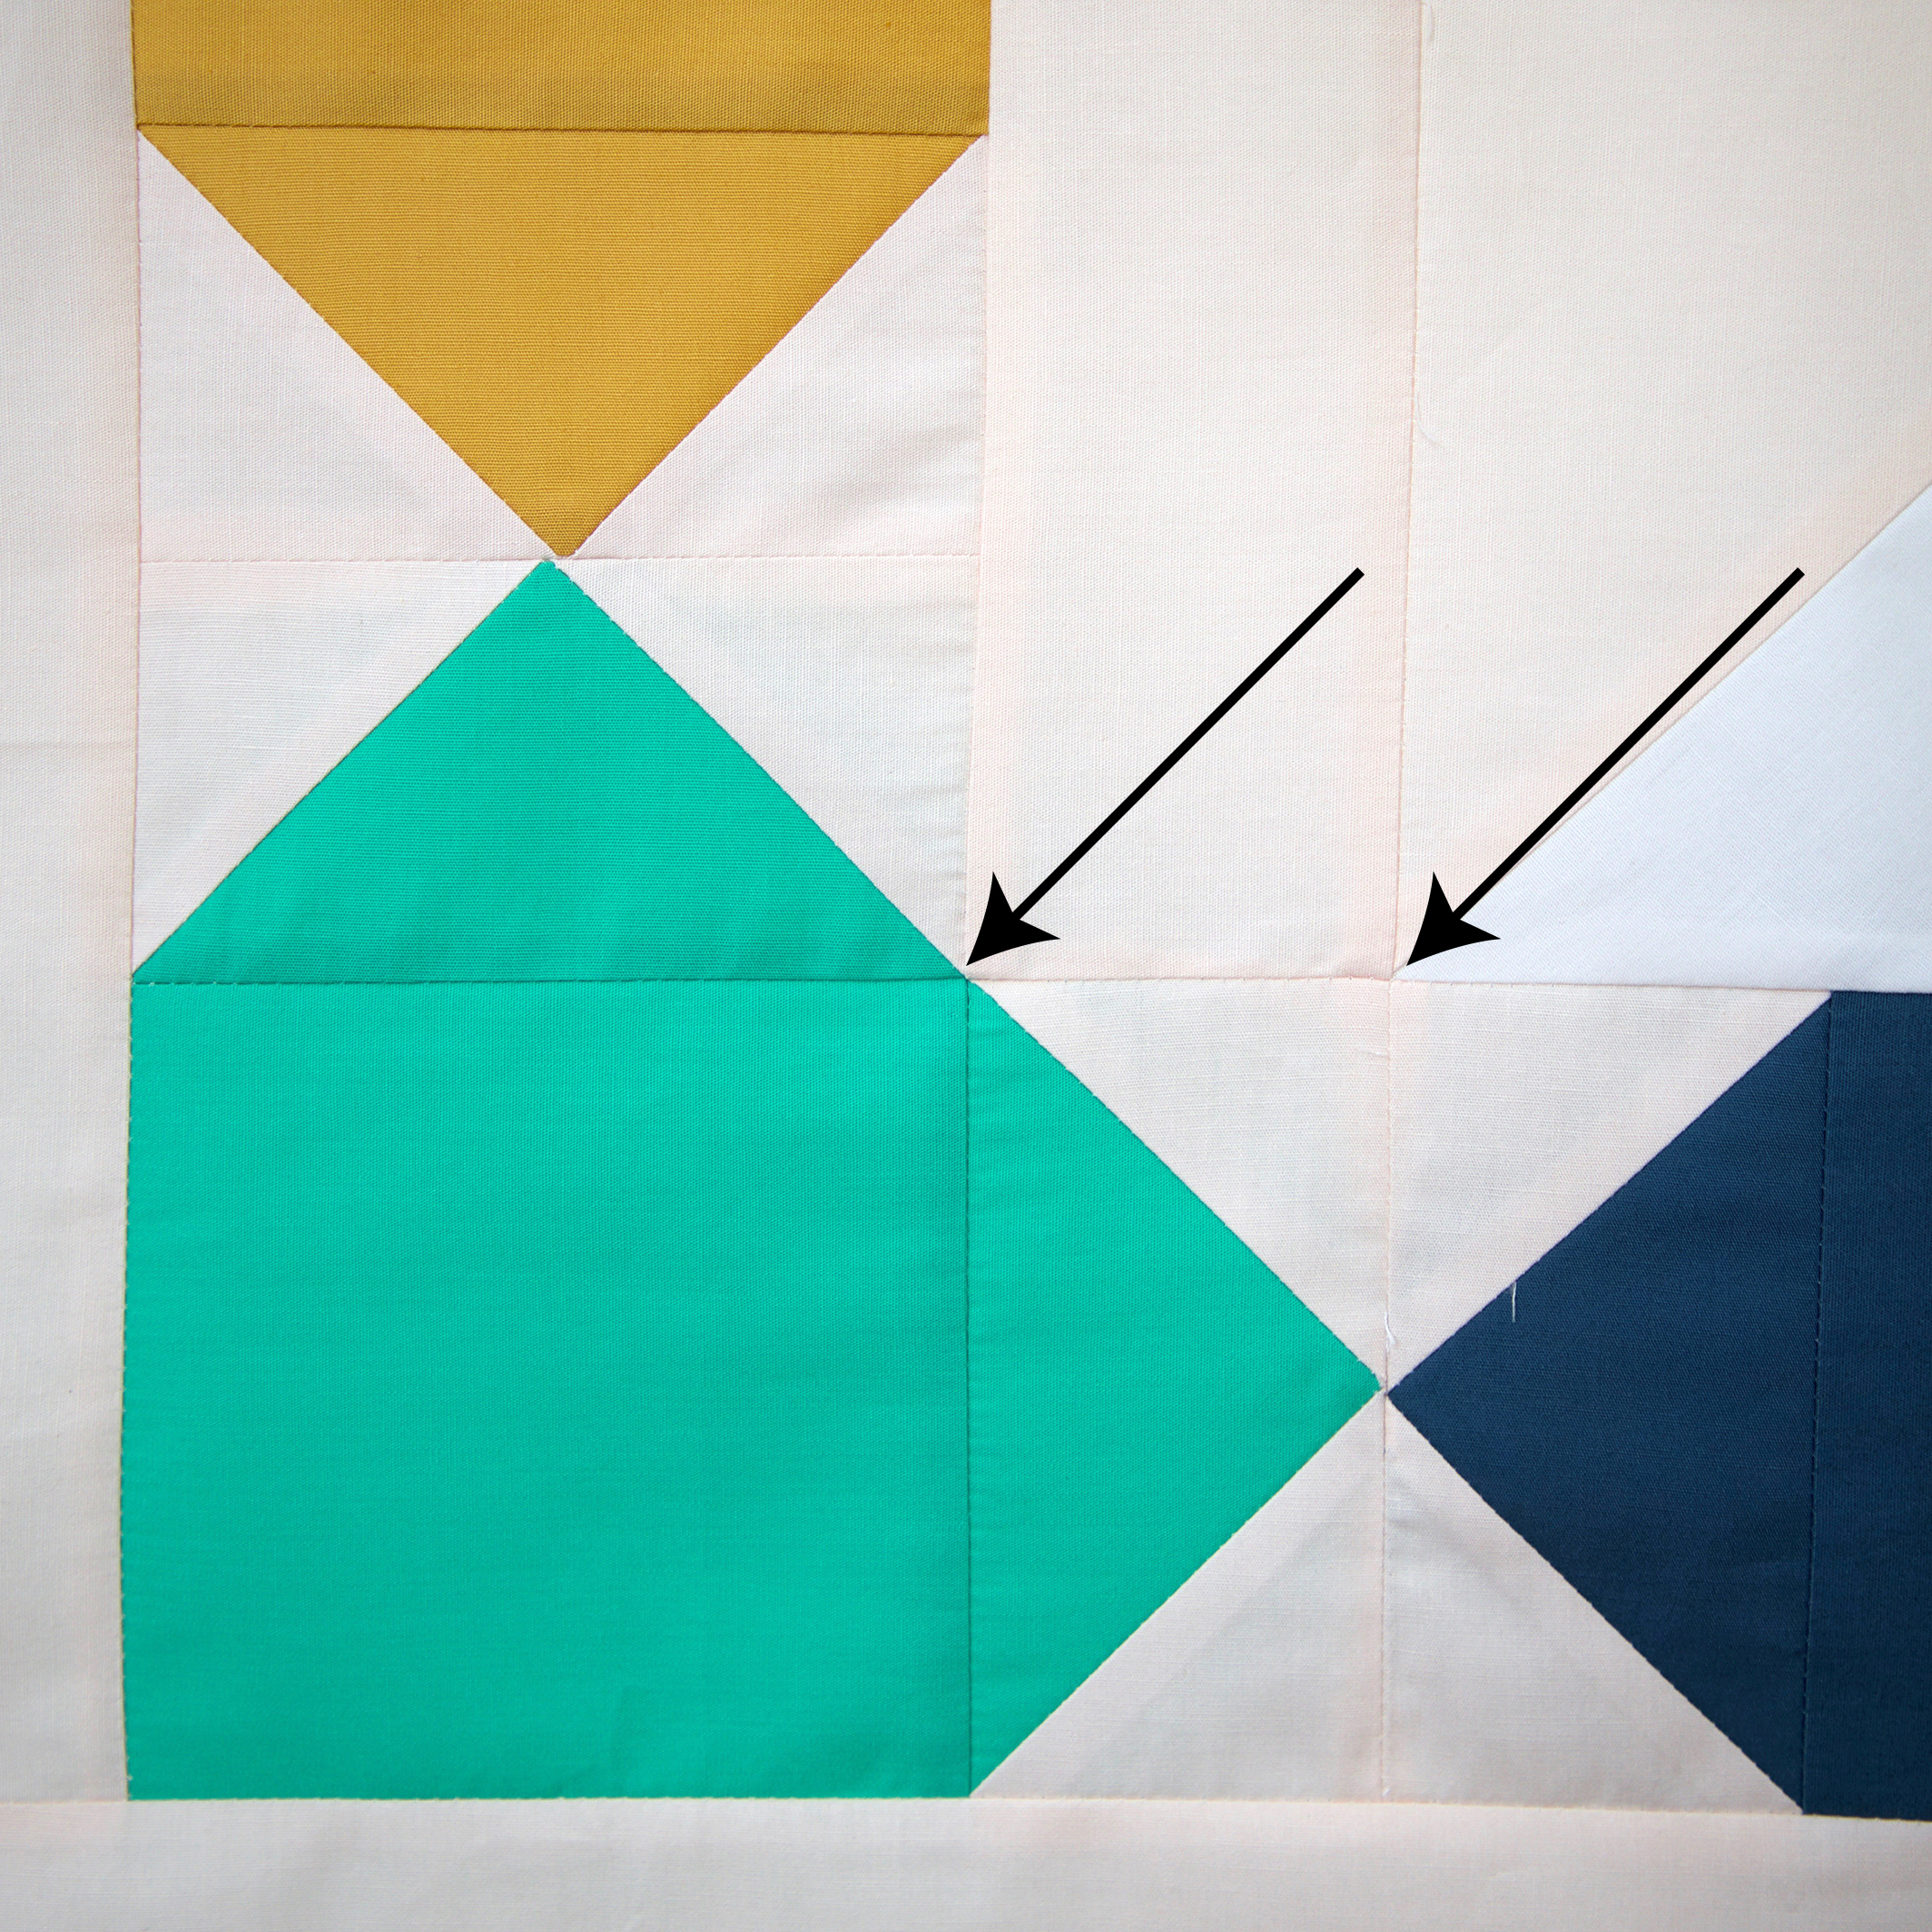
As you can see, the Flying Geese units will measure up nicely to the 4-1/2" square corner squares in the pieced border and the 2-1/2"-wide inner border (even though my points are less than perfect, you get the idea here :).

BG0A6626.jpg

You're quilt center (before adding any of the borders) should be measuring somewhere in the neighborhood of 51-1/1" x 60". If you're way off that mark or increased the size of your quilt by adding more blocks you'll need to make some adjustments... 

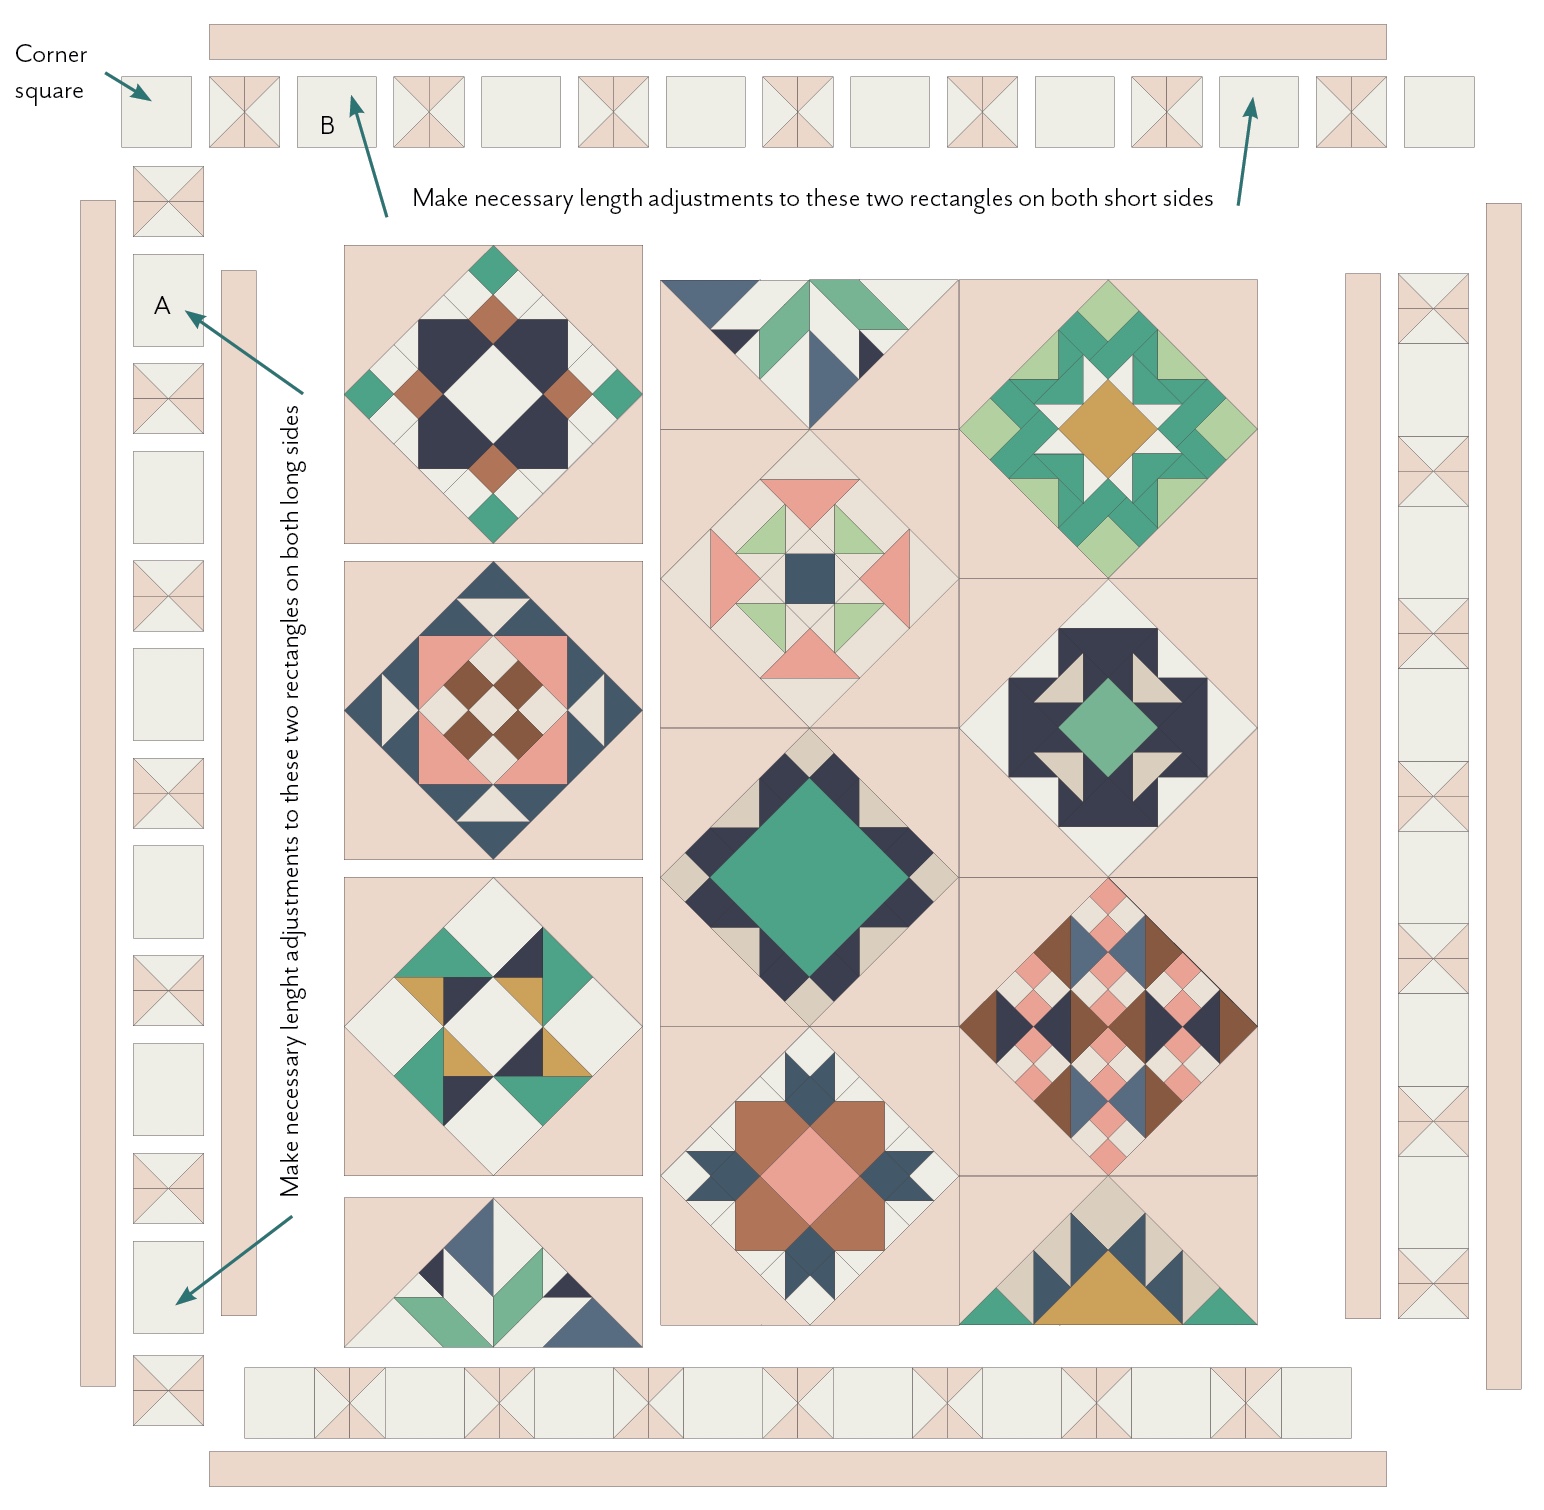
Obviously, if you've made a larger quilt than our sampler you will need to get out the calculator and cut more strips for those inner and outer boarders and make additional Pop Beads in the middle borders. Note that the rectangles in the Pop Beads are two different sizes and are labeled A and B on the PDF instructions. 

Community Sampler Quilt Top.jpg

Before you really get crazy and cut all the A and B rectangles, cut just a couple (and label) then sew some of the Flying Geese units to rectangles and check your sizing. 

BG0A6824.jpg

Since the B rectangle/Flying Geese units are stitched directly against the top and bottom of the quilt (no inner border between) that's a good place to start for checking sizes. If your seams match up on major points and seams of the quilt top center then you're in that perfect world senecio and are in good shape to proceed with piecing the borders as given in the instructions. 

If you're considerable off you have two options. 

One, do the math to figure what sort of adjustment is needed to the A and B rectangles to hit on those major seams in the quilt top center. Start by measuring the opposite sides of the top and average those number (subtract 1/2" for total seam allowances and work in finished sizes for now). Each FG pair will measure 4'' finished so add up the number of 4'' units needed. From the remaining amount, figure how many rectangles are needed. Divide that amount by the number of rectangles needed to get the total length per rectangle. Remember to add in the seam allowances after figuring the finished length needed for an A or B rectangles. Yeah, I know, no fun at all.

Okay, option two. Cut and piece as stated in the instructions (unless of course you need to cut more because you made a bigger quilt). After piecing each border section as directed, the adjustments will be made to the end rectangles only. You're border may not hit on the major seams and points of the quilt top but will be easier to figure up and still look balanced in the end.

Remember, don't change the 4-1/2" measurement on any of the rectangles as this side will match the length of the Flying Geese units and corner squares.  

border adjustment Community Sampler.jpeg

I truly hope these pieced borders don't cause heartache and frustration but I do want to cover any possible problems that could occur do to the variables of sewing. Do a few samples like stated above and test the waters before jumping in.

If you're not up to this challenge then maybe consider a simple 4" -wide finished solid middle border (4-1/2" x length needed cut size) and follow the same steps as for making the inner and outer border. 

Remember to use your sew along community on Instagram (#CommunitySampler) if you have questions or need some moral support!

COMMUNITY SAMPLER SPONSORS

My co-host Maureen Cracknell and I are continually amazed by the joy and excitement each of you bring to our virtual community. Thank you for making this sew along so special. Please visit Maureen's blog and see the progress she's making on her sampler quilt, using her beautiful AGF fabrics Love Story collection. Be sure to use the #CommunitySampler hashtag when posting your blocks to Instagram and tag both my @sharonhollanddesigns and @maureencracknell so we don't miss any of your beautiful work! But, please be patient with both Maureen and I over the next few weeks if we don't comment back. Both Maureen and I are preparing sewing samples for our new spring collections and there's just not enough hours in the day (or energy) to get it all done!

Don't forget that this Friday's a Giveaway Friday on the Community Sampler sew along. Maureen and I will take turns hosting a giveaway each week where one of our generous sponsors will be featured and offering amazing prizes both here on our blogs and also on Instagram. I'll be hosting the giveaway this Friday and you'll be instructed how to enter at that time.

Happy sewing!